Updated: 11/16/2021
Views: 1995
On November 18, 2021, your Kareo account will be upgraded to the latest version.
Billing
Automated Patient Billing
Kareo Patient Collect activated customers have the option to enable Kareo's Automated Patient Billing and take the guesswork out of patient statements. Our intelligent patient messaging optimizes both digital and mailed statements to save you time and get you paid faster. For more information or questions about Automated Patient Billing, review the FAQs.
|
Navigate Automated Settings
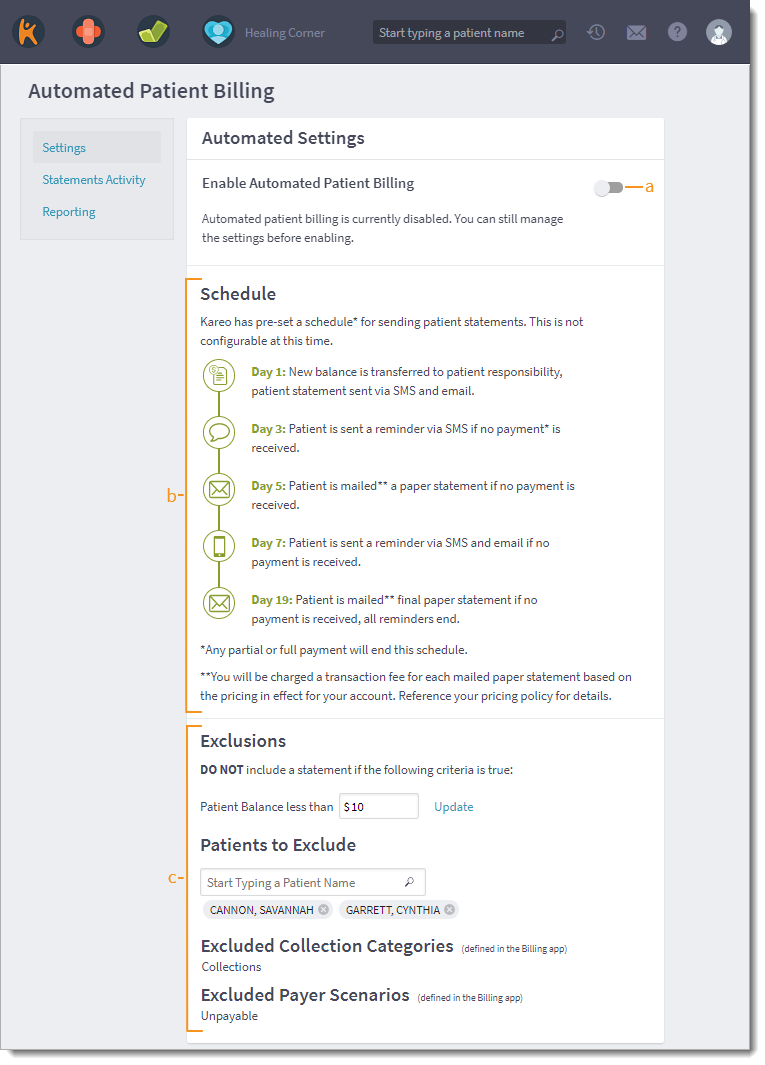
- Hover over the Billing icon and click on Automated Patient Billing. The Automated Patient Billing page opens with Automated Settings selected by default.
- Enable Automated Patient Billing: Click the toggle on to enable or off to disable automated patient billing.
- Schedule: The pre-set schedule for sending statements to eligible patients in the automated billing cycle.
- Exclusions: The following criteria can be modified prior to enabling automated patient billing.
- Patient Balance less than: To exclude patient balances that do not meet a specific amount, enter the minimum patient balance amount. Then, click Update to save.
- Patients to Exclude: To exclude a specific patient, enter the first few letters of the patient's name in the search box. Then, click to select the patient from the auto-populated results list.
- Excluded Collection Categories: Auto-populates based on the Collection Categories in the Desktop Application (PM). Patients associated with a Collection Category record that indicates "Send Statement?" is disabled are excluded from automated patient billing.
- Excluded Payer Scenarios: Auto-populates based on the Payer Scenarios in the Desktop Application (PM). Patients with charges associated with a Payer Scenario record that indicates "Send patient statements?" is disabled are excluded from automated patient billing.
|
 |
Enable Automated Patient Billing
- Hover over the Billing icon and click on Automated Patient Billing. The Automated Settings page opens.
- Review the information under the Schedule section.
- Review the information under the Exclusions section. If necessary, enter or modify the criteria.
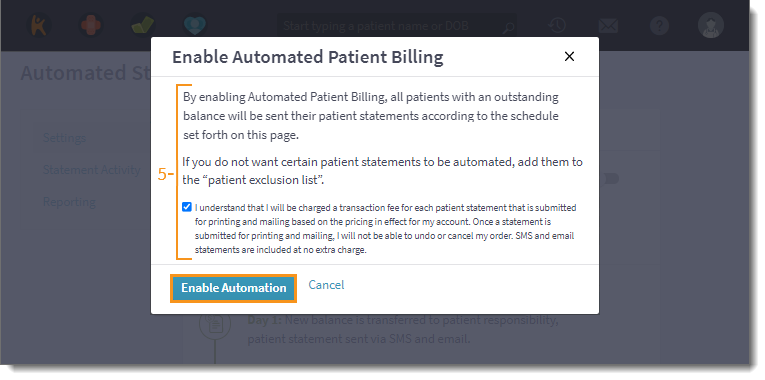
- Once finished, click the Enable Automated Patient Billing toggle on. The Enable Automated Statements pop-up window opens.
|
 |
- Review the information. Then, click to select the checkbox to indicate the additional charge(s) are understood.
- Click Enable Automation. Automated patient billing is enabled.
Once Automated Patient Billing is enabled:
- Kareo begins automatically sending statements to eligible patients the following business day at noon for each time zone (based on the service location's address).
Note: Patient statements are not sent on weekends and practice holidays.
- Review the Automated Statements Activity weekly and Automated Reporting as part of the monthly closing activities.
- Automated patient billing can be excluded when sending patient statements in the Desktop Application (PM).
|
|
| Navigate Automated Statements Activity
The Automated Statements Activity page allows you to review automated statement logs for specific patients, delivery methods, statuses and types.
- Hover over the Billing icon on the top menu and click on Automated Patient Billing. The Automated Patient Billing page opens then click Statements Activity. The Automated Statements Activity page opens.
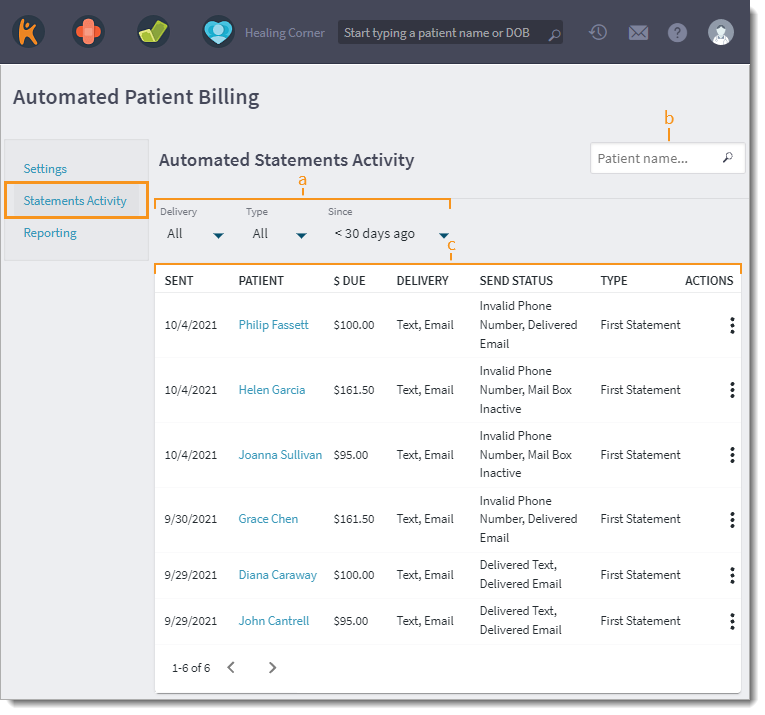
- Use the drop-down menu options to filter automated statement activity logs.
- Delivery: Defaults to All methods. Click to select Email, Text, or Mail.
- Type: Defaults to All. Click to select First Statement, Reminder 1, Reminder 2, Reminder 3, or Final Reminder.
Note: Each statement type relates to each day of the automated patient billing pre-set schedule.
- Since: Defaults to < 30 days ago. Click to select a different time period.
- Search: Quickly find a patient's automated statement activity by Patient name.
- Each listed automated statement log shows the date sent, patient name, dollar amount due, delivery method(s), status, type, and additional actions.
- To access the patient's chart, click the patient name.
- To access the patient's Demographics page or exclude the patient from automated patient billing moving forward, click the more options icon under the Actions column.
|
 |
| Navigate Automated Reporting
The Automated Reporting page allows you to review patient statements sent via all methods (e.g., text/SMS, email, mail), generated revenue, and patient payments made for a specified time frame.
Note: The Automated Reporting page only includes patient statement and payment data for automated patient billing.
- Hover over the Billing icon on the top menu and click on Automated Patient Billing. The Automated Patient Billing page opens then click Reporting. The Automated Reporting page opens.
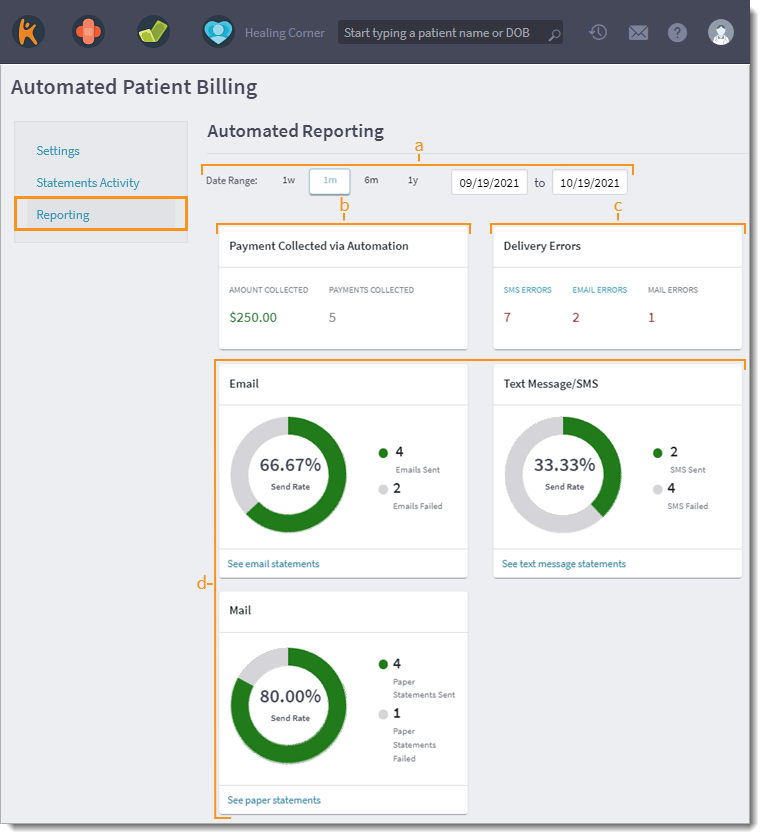
- Date Range: Click to select the date range to generate patient statements and patient payments activity during that time frame.
- 1w: Generates all activity within the previous 7 days and the current day.
- 1m: Selected by default. Generates all activity within the previous month to the current day.
- 6m: Generates all activity within the previous six months to the current day.
- 1y: Generates all activity within the previous year to the current day.
- If desired, enter a custom date range.
- Payment Collected via Automation:
- AMOUNT COLLECTED: Total patient payments dollar amount.
- PAYMENTS COLLECTED: Total number of in-office and online patient payments made.
- Delivery Errors:
- SMS ERRORS: Number of statements that were not delivered successfully via text (SMS) method. Click to view details such as the patient, date sent and error.
- EMAIL ERRORS: Number of statements that were not delivered successfully via email method. Click to view details such as the patient, date sent and error.
- MAIL ERRORS: Number of returned mailed paper statements and statements that received errors.
Note: For more details to address the mail errors, review the Patient Statements reports found under the Clearinghouse Reports in the Desktop Application (PM).
- Email, Text Message/SMS, Mail:
- Send Rate: The percent of statements delivered during the specified time frame.
- Sent: Number of statements delivered successfully via the indicated method.
- Failed: Number of statements that were not delivered successfully via the indicated method.
- See statements: Click to view the automated email, text, or paper statement activity.
|
 |
Billing General Improvements
- Electronic Remittance Advice (ERA) information can be copied and pasted into free-text fields within Kareo. Available November 29, 2021.
- Kareo was updated with the new Pfizer, Moderna, and Janssen CPT codes used to report COVID-19 vaccine and immunization administration that went into effect September and October 2021. Visit the AMA website for more information.
Back to top
Clinical
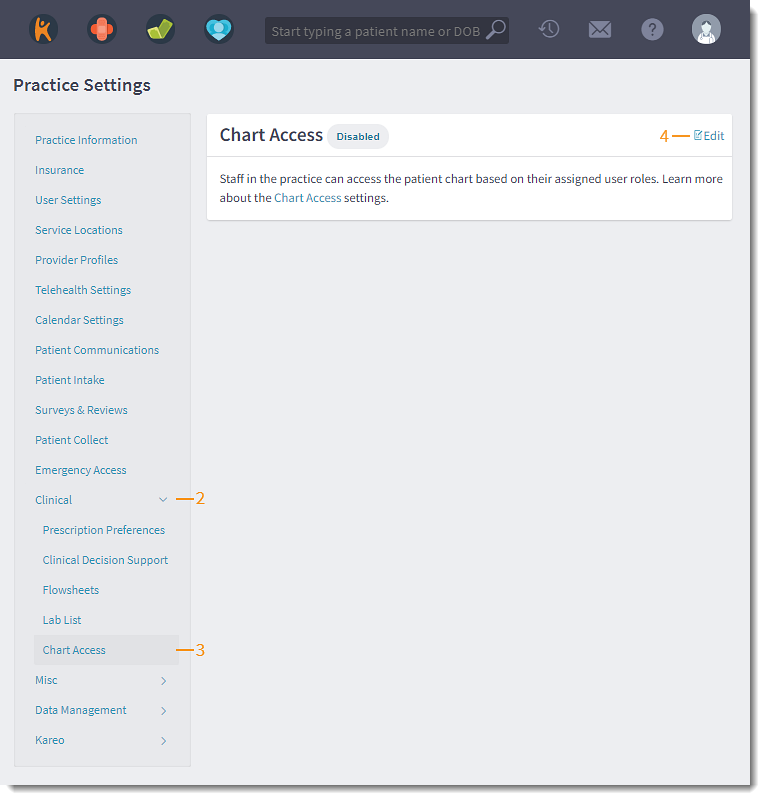
Restricted Chart
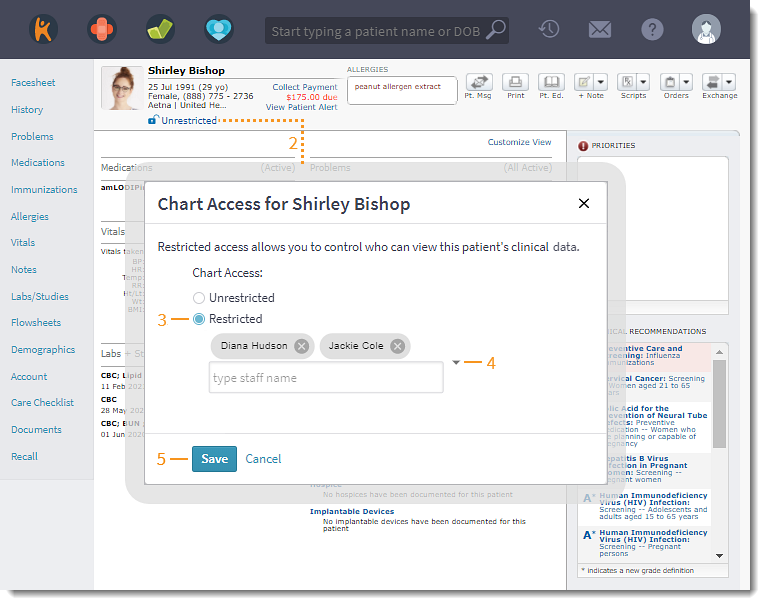
Restricted charts allows staff the option and control to restrict sensitive areas of a patient’s charts. With this feature enabled, the practice can protect the patient's privacy by allowing only the clinical staff member(s) involved in the patient's care to access sensitive areas of the patient's chart.
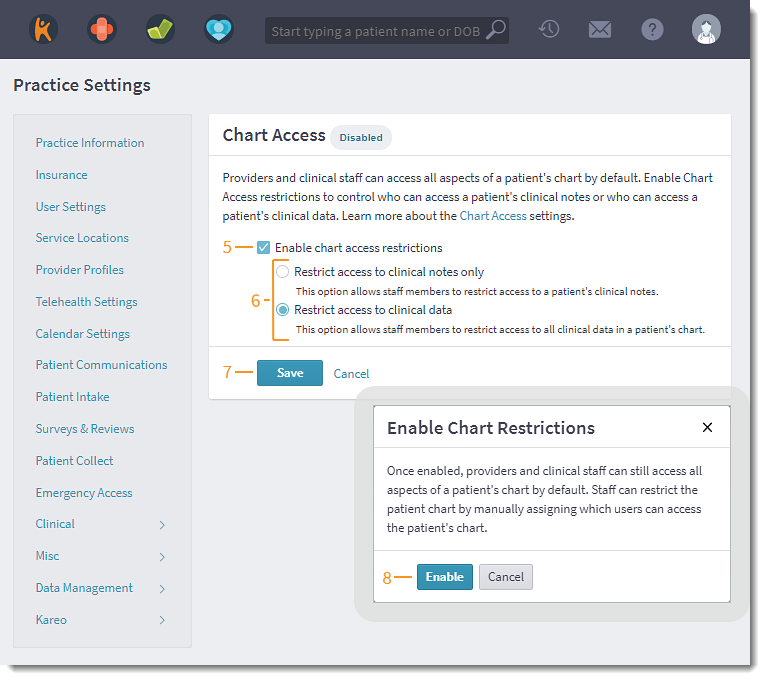
Based on the needs of the practice, the System Administrator can choose which level of privacy to enable:
- Clinical Notes: Allow staff to restrict access to the patient's clinical notes only. When access is restricted, the patient's clinical notes will only be accessible to assigned clinical staff members.
- All Clinical Data: Allow staff to restrict access to all of the patient's clinical data (e.g., vitals, notes, medication, etc). When access is restricted, the patient's clinical data will only be accessible to assigned clinical staff members.
Weight-for-length and Head Circumference Percentile
Vitals for patients 0-36 months in age now includes weight-for-length and head circumference percentiles. The percentiles are calculated based on:
- Weight-for-length percentile: The patient's recorded height and weight
- Head circumference percentile: The patient's recorded head circumference
Enter Vitals
- Access the patient's vitals page or clinical note.
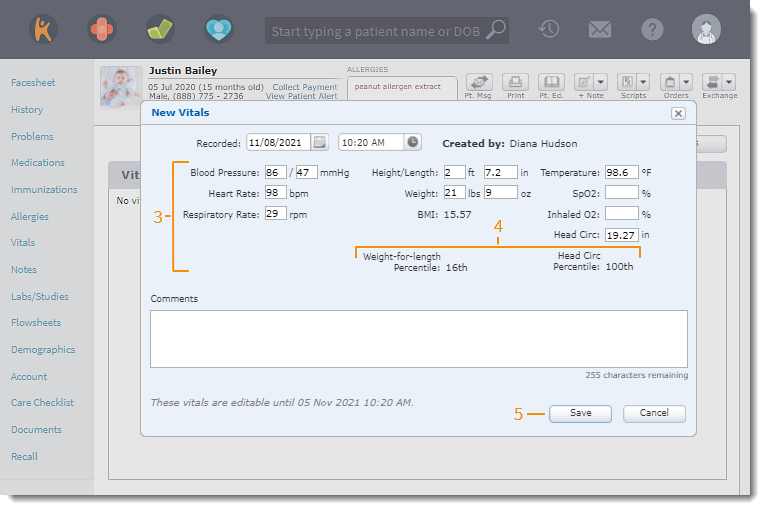
- Click + Vitals. The New Vitals pop-up window opens.
- Populate the patient's vitals in the corresponding fields, specifically the patient's height, weight, and head circumference.
- The Weight-for-length Percentile and Head Circumference Percentiles displays based on the patient's calculated recorded vitals.
- Click Save when done.
|
 |
Clinical General Improvements
- Clinical staff can now document an administered vaccine with the specific month, day, and year the vaccine expires. If the vaccine expiration date does not include a specific day, select the last day of the expiration month for documentation.
- MenQuadfi (PF) is now available for selection when administering the meningococcal vaccine.
- The Pfizer COVID-19 vaccines PFIZER COVID (5-11Y) VAC(EUA) and PFIZER COVID (12Y UP) VAC(EUA) are now accessible to order, administer as new, or add as historical.
- Kareo was updated with the new Pfizer, Moderna, and Janssen CPT codes used to report COVID-19 vaccine and immunization administration that went into effect September and October 2021. Visit the AMA website for more information.
Clinical Resolved Issues
- Fixed an issue where users were unable to submit a superbill to the Desktop Application (PM)
- Fixed an issue where providers were unable to select or search for a pharmacy when tabbing through the new prescription page
Back to top
Engage
Online Appointment Booking: Minimum Notice Time
Patients can easily schedule an appointment from the Provider Profile page that integrates directly with your calendar. The new minimum notice time option allows you to set the time interval between the current time and the earliest appointment time the patient can request. This gives the practice the ability to set the time they need to confirm the appointment request and get ready for the appointment.
Setup Minimum Notice Time
- Hover over the Platform icon and click on Provider Profiles. The Provider Profiles page opens.
- Click Manage on the right of the provider name. The Provider's Profile page opens.
- Scroll down to the Online Appointment Booking section of the Provider Profile.
- Hover over Online Booking Settings and click Edit. The editor opens.
- Enable online scheduling:
- If necessary, click to select "Enable online booking".
- Click the Set Appointment Increment drop-down arrow and select a time interval between appointments.
- Allow same day appointment request:
- Click to select "Allow same day appt requests".
- Click the Allow patients to schedule no earlier than drop-down arrow and select the amount of time. Available options: 0 minutes, 30 minutes, 1 hour, 2 hours, 3 hours, 4 hours, 5 hours, 6 hours, 7 hours, or 8 hours.
- To indicate the provider only accepts self-pay patients, click to select "Accept self-pay only (no insurance)". To accept insurance and self-pay patients, leave the checkbox clear.
- To set online scheduling times to match the office hours set in Calendar Settings, click to select "Same as Office Hours. To set custom appointment hours, leave the checkbox clear.
- Click Save Changes. The editor closes and the updated information displays.
|
 |
Online Telehealth Scheduling
Online scheduling is now streamlined to enable patients to request a Telehealth or an in-office appointment from the provider's profile or practice online scheduler. Online Telehealth scheduling allows the patient to indicate their preference for a telehealth appointment and for the practice to easily identify and confirm telehealth appointments.
Additional set up is not required for the practice. The option to request a telehealth appointment is automatically available for providers who are subscribed to Kareo Engage and Kareo Telehealth.
Patient Experience: Request Appointment
Patients can request a telehealth appointment from the provider's profile or practice online scheduler.
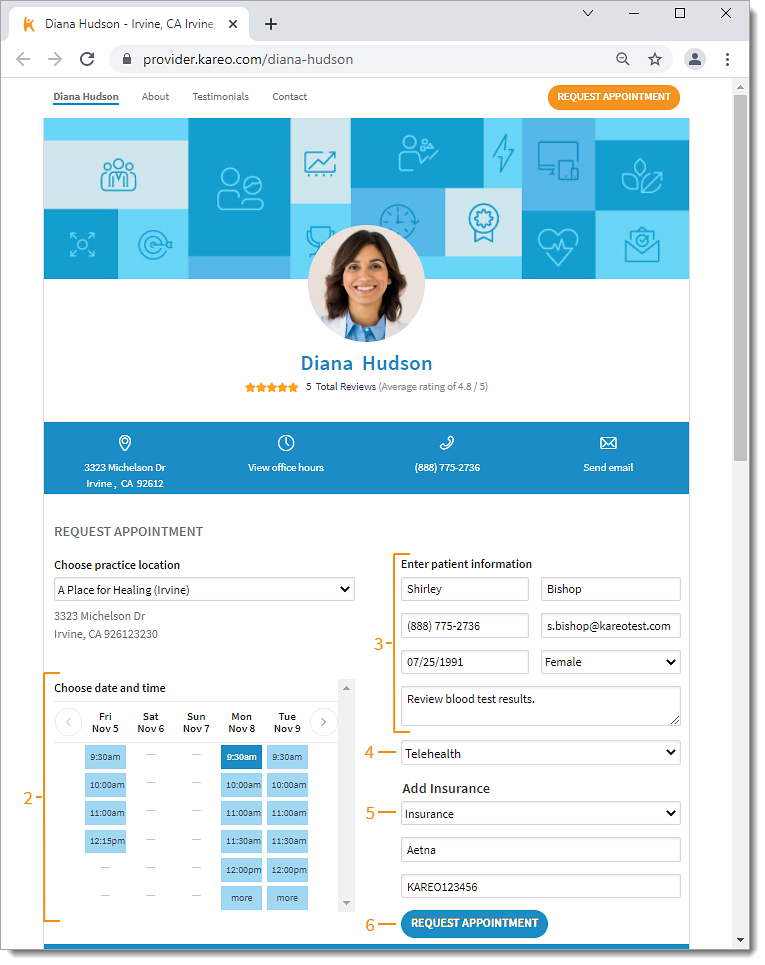
Provider Profile
- The patient accesses the provider's profile.
- Patient selects a date and time for the appointment.
- Patient populates their information: First and Last Name, Phone Number, Email address, Date of Birth, Gender, and Reason for visit.
- Patient clicks to select "I prefer telehealth appointments" to indicate their preference.
- Patient selects their Payment method: Insurance or Cash.
- If Insurance is selected, the patient selects their Insurance Company and enters the Member ID.
- Patient clicks Request Appointment. The appointment is now ready for the front office staff to review and confirm.
|
 |
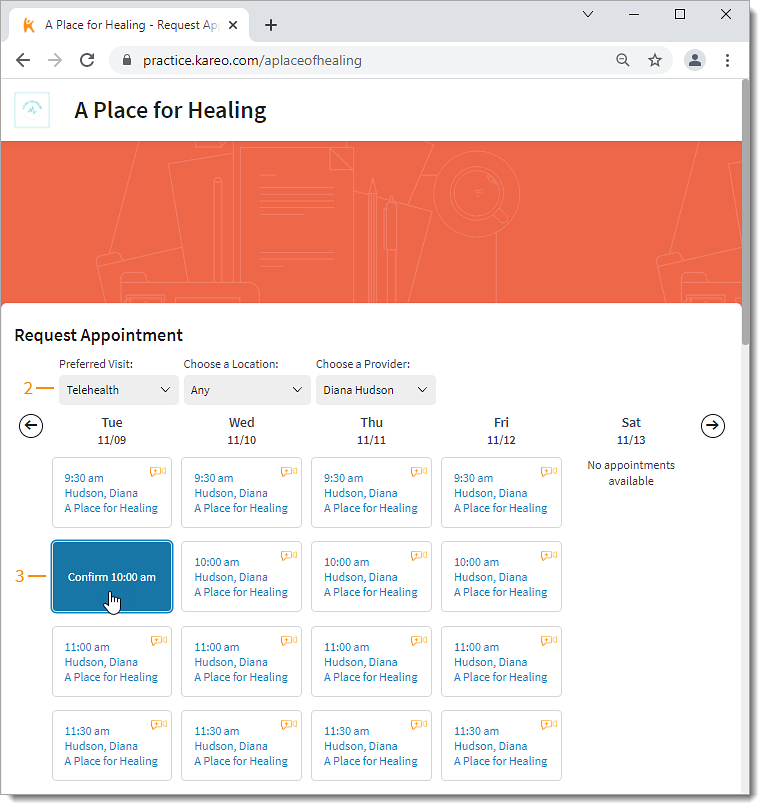
Practice Online Scheduler
- The patient accesses the practice's online appointment scheduler.
- Patient selects Telehealth from the Preferred Visit drop-down list.
- Patient clicks on an appointment time and clicks again to confirm the desired time slot. The Request Appointment page opens.
|
 |
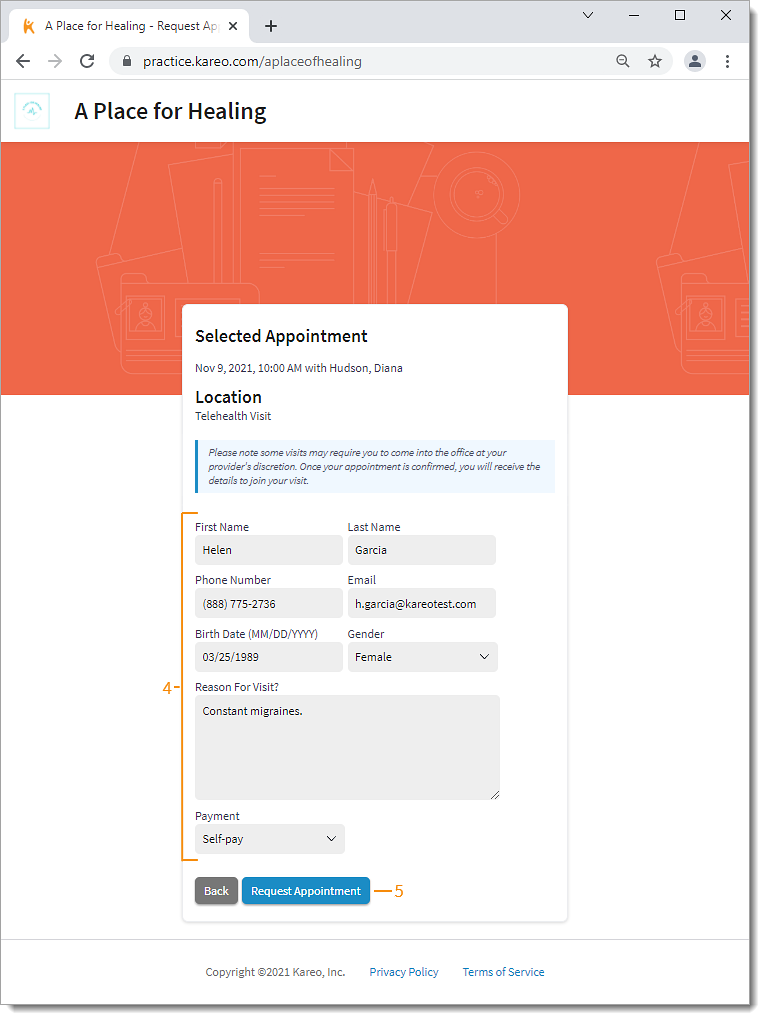
- Patient enters their First and Last Name, Phone Number, Email, Birth Date, Gender, Reason for Visit, and select a Payment type.
- Patient clicks Request Appointment when done. The appointment is now ready for the front office staff to review and confirm.
|
 |
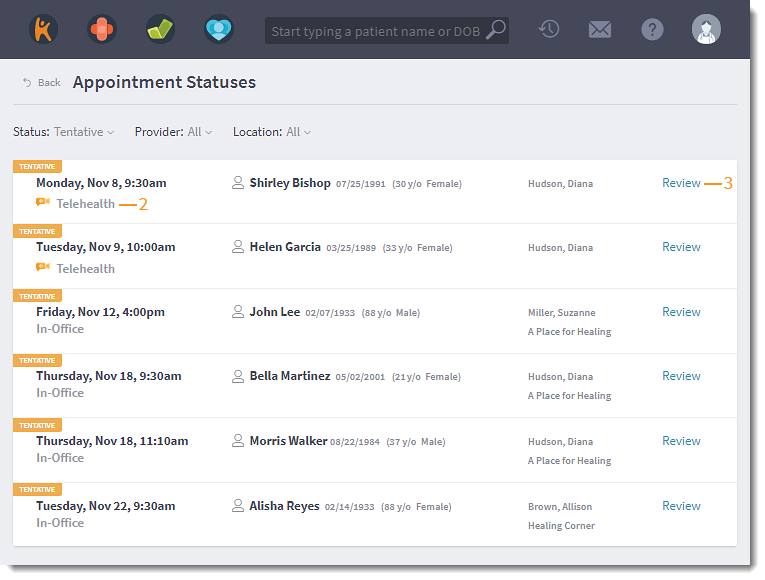
Review and Confirm Appointment
- On the Dashboard, click Tentative Appointments. The Appointment Statues page opens.
- The patient's appointment preference is displayed for the practice to quickly identify requested telehealth appointments.
- Click Review. The Confirm Appointment Request pop-up window opens.
|
 |
- Review the request. Then, select a Visit Reason based on the Note from Patient. The Duration updates to the duration set for the selected visit reason.
Note: The Appointment Type is defaulted to Telehealth based on the patient's preference when requesting the appointment.
- If applicable, select Patient Intake forms and the method of delivery for the patient to complete the intake forms electronically before the visit.
- Click Confirm Appointment when finished. The patient receives an appointment confirmation email with the telehealth room link to use for their appointment.
|
 |
Platform
Platform Resolved Issues
- Fixed an issue where users experienced latency when editing a patient's chart
- Fixed an issue where the patient's photo intermittently displays in the platform
- Fixed an issue where users were unable to access Payment Cards