Kareo + PatientPop Message Center
- Last updated
-
-
Save as PDF
Updated: 06/08/2023 | Views: 154
The seamless integration between Kareo and PatientPop enables your practice to acquire more patients by streamlining online patient communications within a unified, easy to use Message Center.
The Message Center allows users within a practice to communicate with each other and with patients. Create timely and targeted messages with custom email templates and patient groups, schedule batch email messages to be delivered on a future date, or communicate freely by sending personalized, on-demand messages. This interactive system lets patients reply directly to any communication they receive and delivers responses right to your inbox. Additionally, the practice can review new leads to acquire new patients.
Watch the Kareo + PatientPop Integrated Message Center video to learn how the unified Message Center to streamline online patient communications. Additionally, review PatientPop's Integrated Message Center - FAQs for more information.
Access Message Center
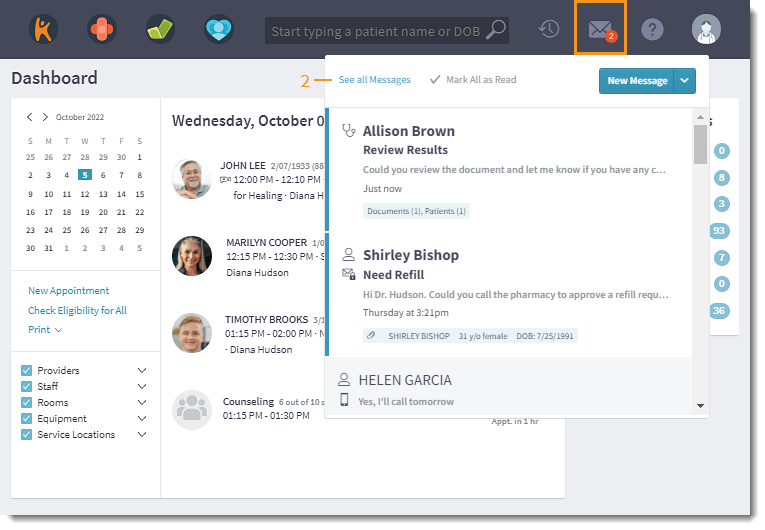
- Click the envelope icon. The messaging summary window opens.
Note: A red notification badge displays when new messages are received.
- Click See All Messages. The Message Center opens.
|
 |
Configure Message Settings
Every user can configure their own message settings to customize notifications. If applicable, users can also choose to view practice specific messages and new leads.
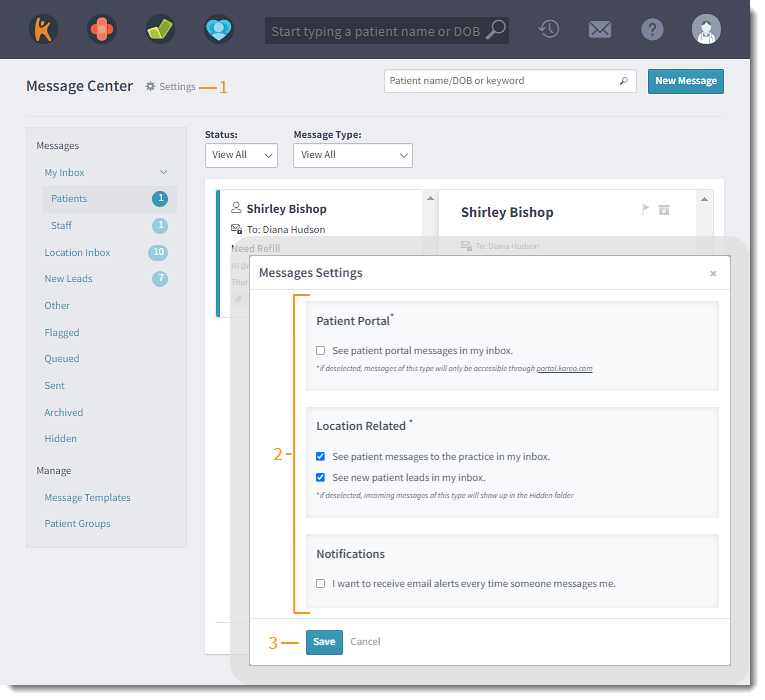
- Click Settings. The Messages Settings pop-up window opens.
- Select which notification(s) to configure:
- Patient Portal: By default, this option is selected and allows Patient Portal messages to appear in the user’s Inbox. To disable this option, click to clear the selection.
- Location Related: By default, these options are selected for providers, clinical assistants, and office staff.
- See patient messages to the practice in my inbox: When this option is selected, new messages sent from patients to the practice location number displays in the Location Inbox.
- To disable this option, click to clear the selection. Existing messages will stay in the Location Inbox until the patient sends a new message to the practice. Then, the entire conversation with the patient will be moved to the Hidden folder.
Note: When this option is disabled, users (providers, clinical assistants, and office staff) can review the new conversation and incoming messages to the practice location number in the Hidden folder.
- See new patient leads in my inbox: When this option is selected, new messages sent from Web-to-Text, Call-to-Text, or a direct text message from a potential patient to the practice location displays in New Leads.
- To disable this option, click to clear the selection. Existing leads will stay in the New Leads until the patient sends a new message to the practice. Then, the entire conversation with the patient will be moved to the Hidden folder.
Note: When this option is disabled, users (providers, clinical assistants, and office staff) can review the new conversation and incoming leads to the practice location in the Hidden folder.
- Notifications: By default, this option is deselected. To receive email alerts for every new message, click to select this option.
- Click Save when finished.
|
 |
Navigate Message Center
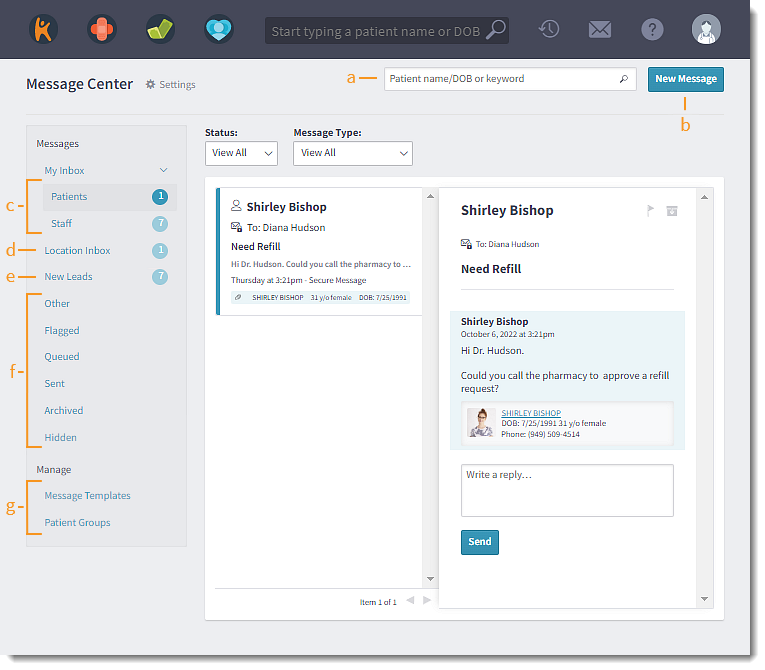
- Search messages by patient name or keyword.
- New Message: Click to send a new message to staff member(s), email a patient or patient group, or text patient(s).
- My Inbox: Click a folder to view messages in the Inbox and filter messages as necessary. Available filters varies based on the selected folder.
- Patients: Display messages sent from the patient responding directly to the user via emails, text, or Patient Portal
- Filter by Status: View All or Unread
- Staff: Display messages between the practice's staff members
- Filter by Status: View All or Unread
- Location Inbox: Display messages between a patient and a specific practice location. Review Location Inbox for additional information.
- New Leads: Displays messages sent from Web-to-Text, Call-to-Text, or a direct text message from a potential patient to the practice location. Review New Leads for additional information.
- Additional Folders: Click to view additional messages. Available filters varies based on the selected folder.
- Other: Displays New Appointment request, messages from Kareo Support, other reports, and announcements
- Filter by Status: View All or Unread
- Flagged: Display messages that were flagged
- Filter by Message Type: View All, Email, Text, or Patient Portal
- Queued: Display messages scheduled to be sent
- Filter by Message Type: View All, Email, Text, or Patient Portal
- Sent: Display messages that were sent by the user
- Filter by Message Type: View All, Email, Text, or Patient Portal
- Archived: Display messages that were archived
- Filter by Message Type: View All, Email, Text, or Patient Portal
- Hidden: Display incoming messages between a patient and a specific practice location or new leads when the Location Related option(s) is disabled in Settings
- Click to manage Message Templates or Patient Groups.
|
 |
Navigate Messages
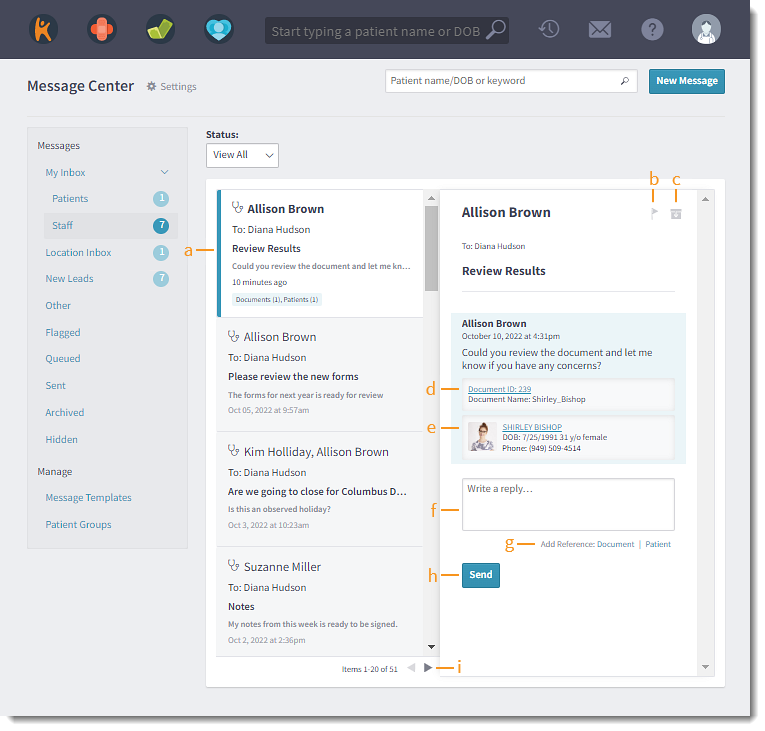
- Click a message to read more and reply.
- Message preview displays the newest message.
- Messages with multiple participants in the conversation are grouped into one thread with the newest message at the bottom of the message.
- Click the flag icon to indicate the message is important. Flagged messages display on the Dashboard under Outstanding Items and in the Flagged folder.
- Click the file box icon to remove the message from the inbox and move them to the Archived folder.
 Tip: It is recommended to archive messages to remove them from the inbox since messages cannot be deleted. Tip: It is recommended to archive messages to remove them from the inbox since messages cannot be deleted.
- If applicable, click the Document ID to open attached documents.
- If applicable, click the patient's name to open their record.
- If applicable, enter a reply to the message.
- Add Reference: If applicable, attach document(s) or patient(s) when replying to a staff message.
- Document: Click to attach previously uploaded documents or upload new documents. Each referenced document cannot exceed 10MB.
- Patient: Click to search for and reference one or more existing patients.
- Click Send to reply to the message.
- Click the left or right arrows to view the previous or next page.
|
 |
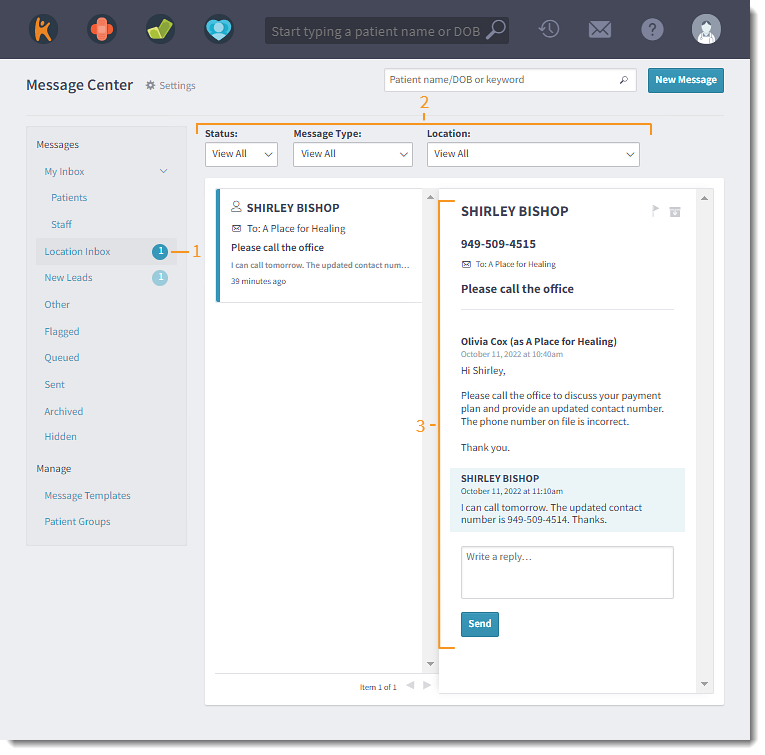
Location Inbox
By default, users with a provider, clinical assistant, or office staff role can access the Location Inbox to view patient messages sent to the practice location number via Call-to-Text or direct text message. Users can also review responses to appointment reminders, recall, general inquiries, or email/text messages sent to the practice location number.
Providers can view messages coming from their patients, even if those messages are sent to a practice location number with the Location Related option in Settings enabled. If the provider would like to view all messages for the practice, a System Administrator must grant the provider a "Office Staff" role in the provider's user account.
Tip: To find the practice location number, access the PatientPop Portal. Then, click Settings > Phone Numbers. The number for each practice location displays.
- Click Location Inbox. The inbox displays.
- Filters: Use filters to view specific types of messages or for a specific location
- Status: View All or Unread
- Message Type: View All, Email, or Text
- Location: View All or select a specific location
- Message: Click on a message to read more and reply.
|
 |
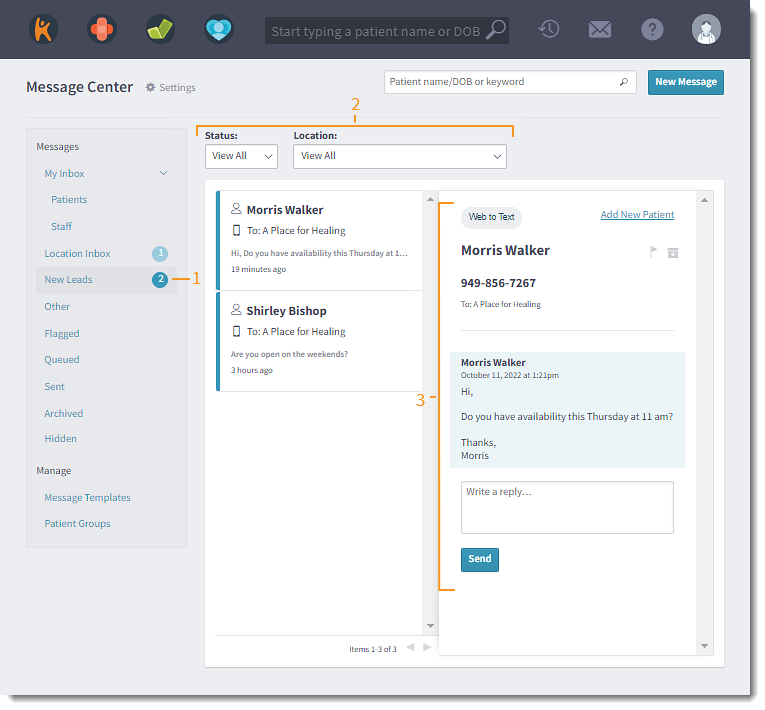
New Leads
By default, users with a provider, clinical assistant, or office staff role can access the New Leads folder to view and respond to all potential patients’ inquiries via text messages. These messages can be sent using Web-to-Text, Call-to-Text, or a direct text message from a potential patient to the practice location number.
Tip: Reporting for new leads is available in the PatientPop Portal under Insights.
- Click New Leads. The inbox displays.
Note: To access the New Leads folder as a provider or clinical assistant, enable the Location Related option in Settings.
- Filters: Use filters to view messages with a specific status or practice location
- Status: View All or Unread
- Location: View All or select a specific location
- Message: Click on a message to read more and reply.
- To create a new patient from the lead, click Add New Patient. The Create Patient page opens.
|
 |
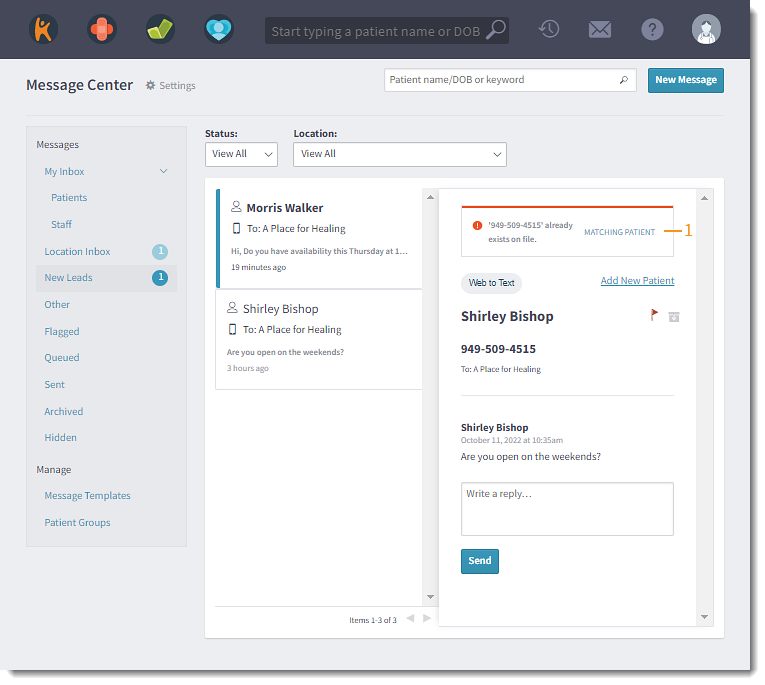
New Leads: Merge Patient
If the phone number attached to the lead matches an existing patient, the front office staff can merge the lead with the patient. After the merge is complete, the message moves from the New Leads folder to the Location Inbox folder.
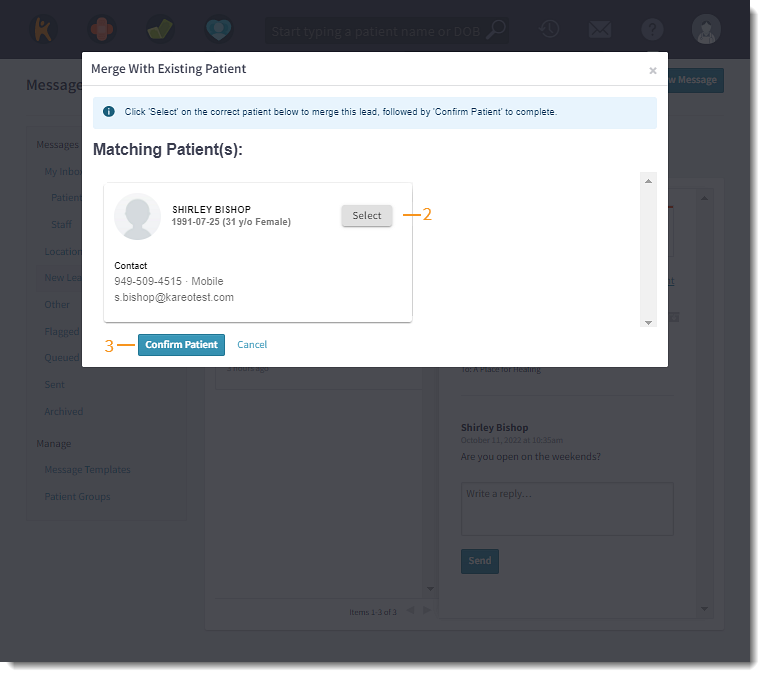
- Matching Patient: Click to merge the lead with an existing patient. The Merge with Existing Patient pop-up window opens.
|
 |
- Review the patient(s) and click Select next to the correct patient.
- If the lead does not match with an existing patient, click Cancel to close the window. Then, click Add New Patient to create a patient from the lead.
- Click Confirm Patient. The message now displays in the Location Inbox folder.
|
 |