Updated: 11/16/2023 | Views: 10106
View the patient's documents, referrals, and shared patient education. Documents can include files uploaded by the practice, submitted via Patient Intake, or received via fax. After a document is uploaded to the patient's documents tab, the practice can also share the uploaded documents with patients via the Patient Portal.
Note:
- If you are integrated with Billing, documents you upload through Clinical, Billing, or the mobile application are viewable in both systems. Uploaded documents are stored on the Documents page and in the patient's chart in Clinical and under Documents in Billing.
- Once a document is assigned to a patient, it cannot be changed to a different patient. If a document is assigned to a patient in error, delete the document and start again.
- The size of a file cannot exceed 10MB.
Access Patient Documents
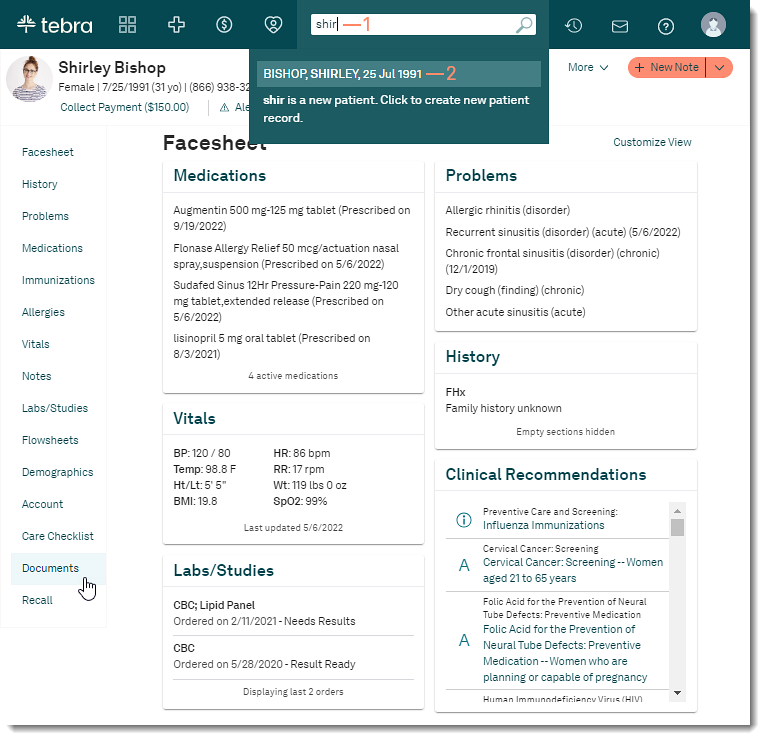
- Enter the first 2–3 letters of the patient's name or date of birth (mm/dd/yyyy) in the top navigation bar search box.
- Click to select the patient from the auto-populated results. The patient's Facesheet page opens.
- Click Documents. The Documents page opens to the Documents tab.
|
 |
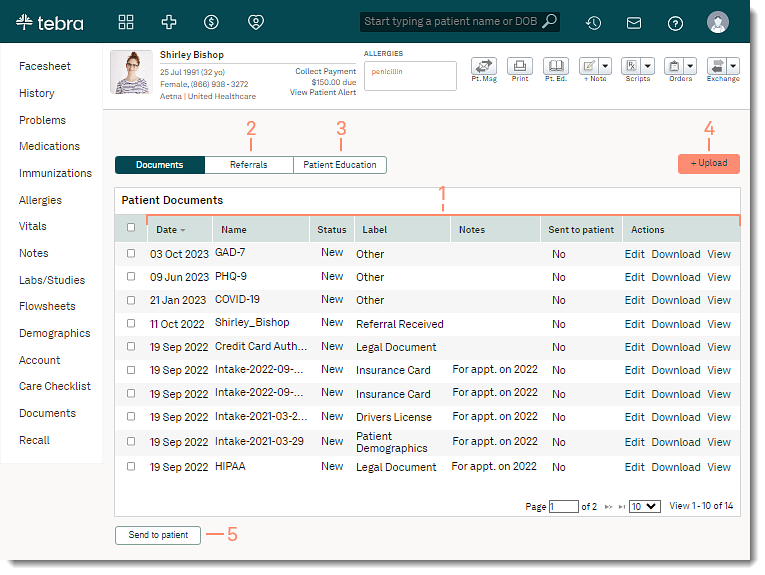
Navigate Documents Tab
Review the patient's documents uploaded by the practice, submitted via Patient Intake, or faxed.
- Navigate the Documents tab:
- Date: Displays the date the document was added. Click the Date column header to sort documents by date. Click again to reverse the order.
- Name: Displays file name as it was saved. Click the Name column header to sort by document name in alphabetical order. Click again to reverse the order.
- Status: Displays the status (New, In-Process, Processed, or Error) selected for a document.
- Label: Shows the document type selected when the file was uploaded. Click the Label column header to sort by alphabetical order. Click again to reverse the order.
- Notes: Displays any notes added to the Document entry.
- If the document was submitted through Patient Intake, the appointment date is populated
- Send to patient: Displays whether the practice has sent documents to the Patient Portal.
- Actions:
- Edit: Opens a window to edit the Document entry information.
- Download: Open and save the document.
- View: Opens an image.
- Merge: Click to merge Summary of Care information from another provider to the patient's record.
Note: This option is only available for documents labeled as Summary of Care Received.
- Click Referrals to view the patient's referral documents.
- Click Patient Education to view documents shared with the patient.
- Click +Upload to add a new document.
- Send to Patient: Review Send Patient Documents to learn how to send documents to the patient via the Patient Portal.
|
 |
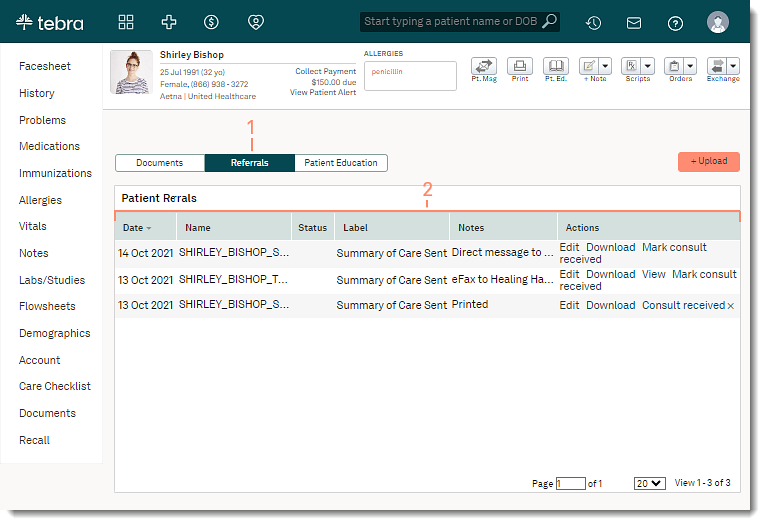
Navigate Referrals Tab
Review the patient's referrals sent, printed, or downloaded.
For CMS Incentive Programs: When a referral comes back, mark it as received as part of your Quality Measures.
- Click the Referrals tab. The patient's referrals displays.
- Navigate the Referrals tab:
- Date: The date the referral was generated. Click the Date column header to sort documents by date. Click again to reverse the order.
- Name: The file name of the referral document. If the file was eFaxed, the file saves as PDF. All other referrals are saved as a .xml file. Click the Name column header to sort by document name in alphabetical order. Click again to reverse the order.
- Status: This column is currently not in use.
- Label: All referrals sent, printed, or downloaded are labeled as Summary of Care Sent.
- Notes: Indicates if the referral was printed or downloaded in a clinical note, sent via Direct Messaging, or sent via eFax.
- Actions:
- Edit: Click to view document details or to delete the document.
- Download: Click to download referral file.
- View: Click to open the referral in the web browser.
Note: This option is not available for referrals sent via Direct Messaging or printed in-office.
- Mark consult received: Click when the other provider sends a referral back to close the loop. The option updates to Consult received.
- If the document was marked as received in error, click Consult received to update the option to Mark consult received.
|
 |
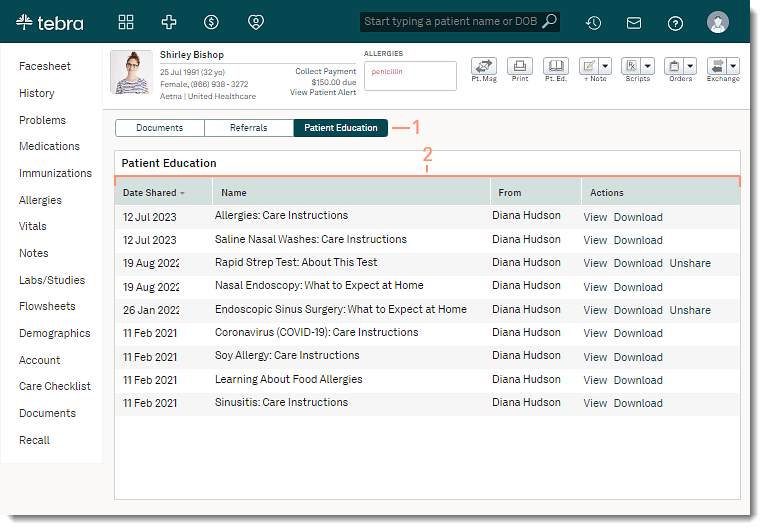
Navigate Patient Education Tab
Review patient education shared with the patient via Patient Portal or printed in-office.
- Click the Patient Education tab. The shared patient education displays.
- Navigate the Patient Education tab:
- Date Shared: The date the patient education was shared with the patient. Click the Date Shared column header to sort documents by date. Click again to reverse the order.
- Name: The name of the patient education document. Click the Name column header to sort by document name in alphabetical order. Click again to reverse the order.
- From: The provider that shared the patient education with the patient.
- Actions:
- View: Click to open the patient education in the web browser.
- Download: Click to download a PDF of the patient education.
- Unshare: Click to remove the patient's access to the document in the Patient Portal.
Note: This option is only available when the patient education was sent to the Patient Portal.
|
 |