Collect Patient Payment (Stripe)
- Last updated
-
-
Save as PDF
Updated: 09/29/2023 | Views: 25960
For Patient Collect (Stripe) activated practices, the Collect Payment feature provides an easy way to record or swipe a card to post patient payments for copays and outstanding account balances. To collect patient payments via a Stripe Terminal, review Stripe Terminal: Collect Patient Payment.
This feature is available for Billing subscribers.
Note: For Tebra Payments activated practices, review Collect Patient Payment (Tebra Payments).
Initiate Payment
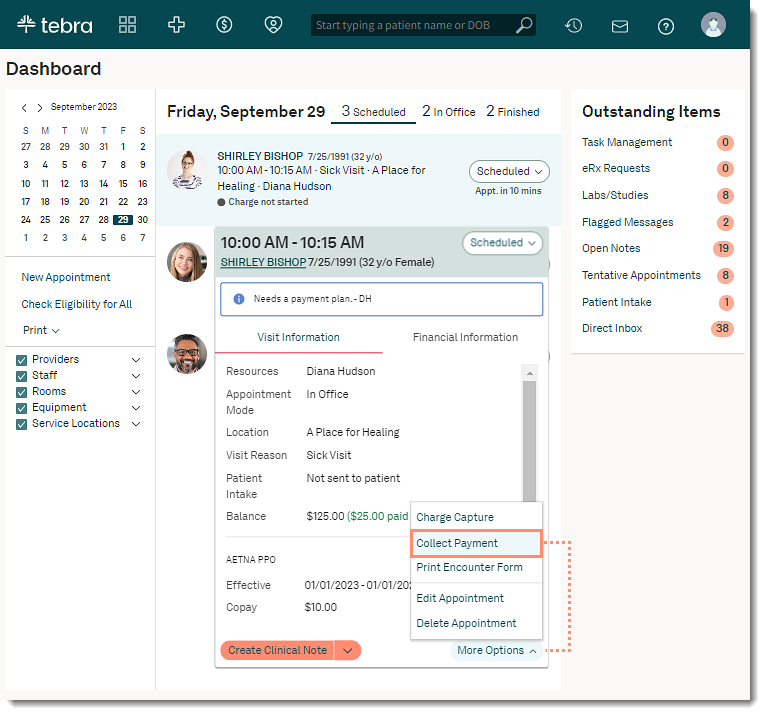
A patient payment can be collected from various locations: the patient's appointment on the Dashboard, the patient's Facesheet, the patient's Account tab, etc. It is recommended to collect the payment from the Dashboard to display the amount collected today on the patient's appointment card.
- Hover over the Platform icon and click on Dashboard. The Dashboard opens.
- Click on the appointment to view the appointment card.
- Click More Options and select Collect Payment. The Collect a Payment page opens.
|
 |
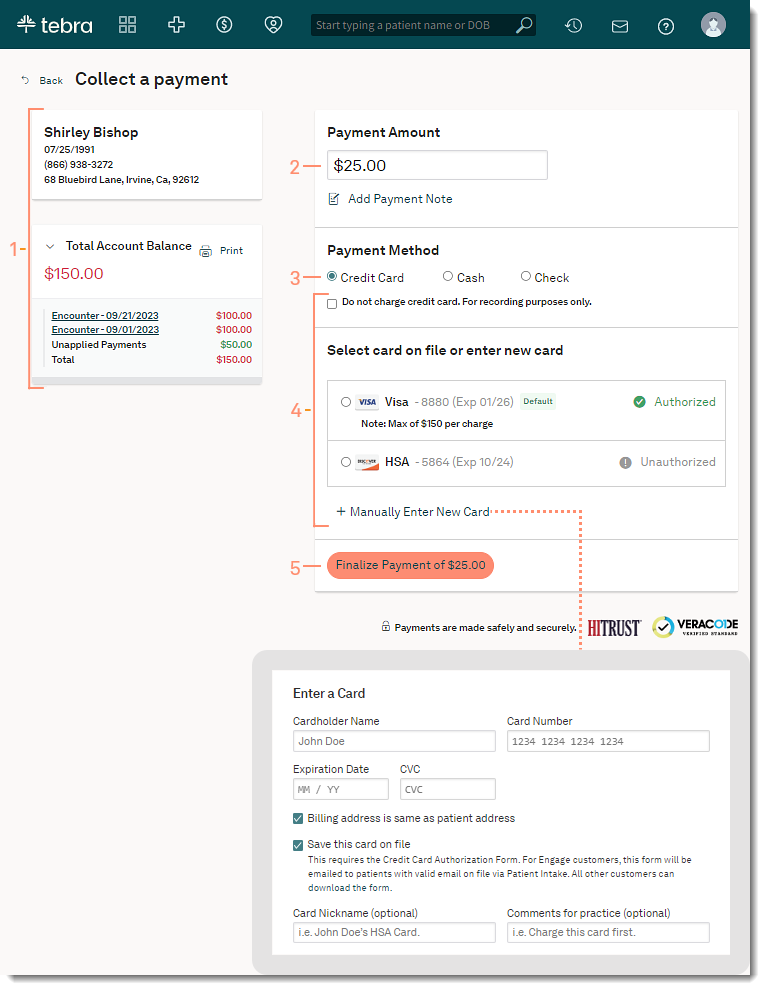
Collect Payment
- Verify patient details, review outstanding charges and unapplied payments.
- Click Total Account Balance to see an overview of charges and unapplied payments.
- To view or print the Balance Details, click Print.
- By default, the Payment Amount field is populated with the Total Account Balance. If necessary, enter a different payment amount.
- To enter additional details about the payment (e.g., date of service), click Add Payment Note. This note is only visible to the practice and does not print on the patient receipt.
- Select Payment Method of "Credit Card", "Cash", or "Check".
- If Credit Card is selected, select how to process the payment:
- To record a credit card payment that has already been processed, click to select "Do not charge credit card. For recording purposes only.".
Note: If this option is selected, the payment will not be processed through Stripe.
- To use a saved patient payment card, click to select the card.
- To manually enter, click + Manually Enter New Card. Then, populate the Cardholder Name, Card Number, Expiration Date, and three-digit CVC code.
- By default, "Billing address is same as patient address" is selected. If necessary, click to clear to enter a different billing address.
- To simultaneously save the new credit card on file and email the Credit Card Authorization form to the patient for authorization (Engage subscribers only), click to select "Save this card on file". Otherwise, the patient agreement needs to be completed via paper.
Note: For convenience and optional use, click Download the form for a template.
- Optionally, enter a Card Nickname or notes (up to 500 characters) into the Comments for Practice field.
- Click Finalize Payment. The Collect a Payment confirmation page opens.
|
 |
- Review the details in the confirmation window. If applicable, click Back to return to the previous window and make changes.
- To generate a detailed receipt (e.g., for FSA/HSA patients), click to select "Create itemized receipt". Otherwise, a non-itemized receipt displays once the payment is submitted.
- Click Submit Payment. The Receipt page opens.
|
 |
Payment Receipts
If "Create an itemized receipt" was selected when the payment was submitted, a detailed receipt displays. Otherwise, a non-itemized payment receipt displays.
Note: The payment processed through the Platform shows as an Unapplied Payment until it's applied to the patient's account in the Desktop Application.
- To print the receipt for the patient, click Print at the bottom of the window.
- To enter the patient's email address to receive a modified email receipt that only contains general information (e.g., payment confirmation number, date payment was processed, amount paid), click Email at the bottom of the window.
Note: The full details of itemized and non-itemized receipts can only be printed and will not be sent via email.
|
 |