Updated: 09/23/2023 | Views: 8652
Telehealth is the next generation HIPAA compliant video visit solution from Tebra. It provides an integrated experience with the web platform. Telehealth appointments can be conducted on a computer or mobile device with up to 200 participants. This allows providers the flexibility to host multiple patients or providers in one visit room.
Once an appointment is scheduled, the patient receives an appointment reminder with a link to join the telehealth visit room. In order for a patient to receive a reminder, verify the following:
- The provider's Patient Communication settings are activated
- The practice's Service Locations allow appointment reminders
- The patient's communication preferences are set on the Profile tab of the Demographics page
- Appointment reminders are sent to the email and mobile phone entered on the Profile tab of the patient's Demographics page
Note:
- Chrome is the preferred browser for optimal use for Telehealth.
- The appointment workflow is not supported through Tebra's mobile app. To schedule an appointment or join a video appointment on a mobile device, log into app.kareo.com through a mobile browser.
Available for Telehealth subscribers.
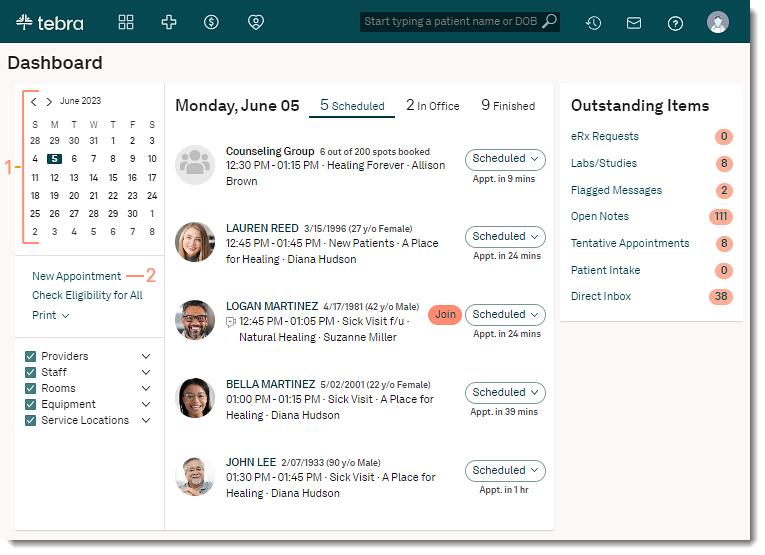
Access Calendar
- Select the desired date on the calendar.
- Click New Appointment. The Calendar page opens.
- Select a Provider from the drop-down.
- Double click the desired time slot. The New Appointment page opens.
|
 |
Schedule Telehealth Appointment
Follow the steps below to schedule a telehealth appointment with one patient. To schedule a telehealth appointment with more than one patients, review New Group Telehealth Appointment.
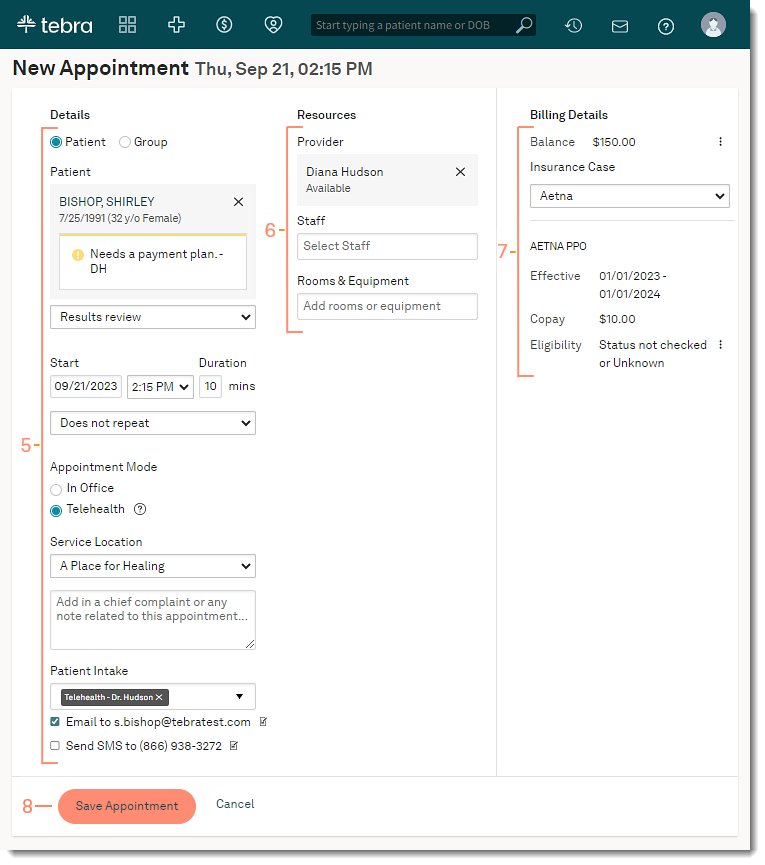
- Details:
- Begin entering the patient's name and click on the patient's name when it appears. If the patient record is not found, select Click to create new patient record to add a patient record.
- Select a Visit Reason from the drop-down menu.
- Adjust the appointment Duration, if necessary.
- Select a pre-set or custom recurring appointment option if necessary.
- Select "Telehealth" as the appointment mode.
- Select the Service Location from the drop-down menu.
- Add an optional note about the appointment. Appointment notes will populate the chief complaint of the patient’s clinical note (Clinical subscribers only).
- If applicable, click to select which patient intake forms to send (Engage subscribers only).
- Select the patient intake form method of delivery:
- By default, the option to email the patient intake form is selected. If necessary, click to clear.
- To send the patient intake form via text message, click to select "Send SMS". If necessary, enter the patient's mobile phone number.
- Resources:
- Provider: Search for and select a Telehealth subscribed provider (required).
- Staff and Room & Equipment: Search for and select a staff member, room, or equipment if necessary.
- Billing Details:
- Balance: Patient balance or credit displays (Billing subscribers only).
- Insurance Case: Select a case and review the insurance information with the patient.
- Policy: Policy information of the selected case.
- Effective: The policy start and end dates.
- Copay: The copay amount.
- Authorizations: If available, the number of visits remaining for the authorization.
- Eligibility: Eligibility status shows, if available (Billing subscribers only).
- Click the more options icon to select the option to View Report or Check Eligibility.
- Click Save Appointment when finished.
The provider joins the telehealth visit at the time of the scheduled appointment. Review Patient Experience: Telehealth Visit to learn more about the patient's view.
|
 |