Updated: 09/22/2021
Views: 695
On September 23, 2021, your Kareo account will be upgraded to the latest version.
Billing
Note: There are no software updates that require installation for the Desktop Application (PM) in September.
Billing General Improvements
- The ICD-10 codes have been updated with the new 2022 ICD-10 codes. Visit the CMS website for more information about the ICD-10 codes. Available October 1, 2021.
Billing Resolved Issues
- Fixed an issue where users were unable to access Kareo
- Fixed an issue where users received an error message when checking patient eligibility
- Fixed an issue where users experienced intermittent latency
- Fixed an issue where the Key Performance Indicators data was not updating
- Fixed an issue where EFT files incorrectly routed to unrelated Kareo accounts
- Fixed an issue where some ERA files did not route to Kareo accounts
Back to top
Clinical
Clinical General Improvements
- The ICD-10 codes have been updated with the new 2022 ICD-10 codes. Visit the CMS website for more information about the ICD-10 codes. Available October 1, 2021.
- The patient’s Smoking Status, Lab, Implantable device, Assessment & Plan, Goals of Treatment, and Health Concerns are now included in the CCDA Export.
- Updated Influenza Vaccines to include the 2021-2022 CDC Influenza Immunizations.
- The Immunization VIS dates for the following vaccines have been updated to reflect the CDC current guidelines:
- DTaP (Diphtheria, Tetanus, Pertussis)
- Hib (Haemophilus influenzae type b)
- Influenza – Inactivated
- Influenza – Live, Intranasal
- Measles/Mumps/Rubella & Varicella (MMRV)
- Measles/Mumps/Rubella (MMR)
- Meningococcal ACWY (MenaACWY and MPSv4)
- Meningococcal, Serogropu B (MenB)
- Pneumococcal Conjugate (PCV13)
- Polio (10/30/2019)
- Td (Tetanus-Diphtheria)
- Tdap (Tetanus, Diphtheria, Pertussis)
- Varicella (Chickenpox)
Back to top
Platform
Platform Resolved Issues
- Fixed an issue where users received an error message when attempting to save an appointment
- Fixed an issue where users experienced latency or an error message when logging into and navigating in Kareo
- Fixed an issue where users received an error message when attempting to access a facesheet
Back to top
Telehealth
Unique Provider URL
Kareo generates a unique URL for each Kareo Telehealth subscribed provider. All Telehealth appointments for the provider will now be accessible through the same Telehealth URL to simplify how the patient joins the room.
Providers can post their Telehealth URL on their website, email signature, or social media for patients to quickly access their appointment. Patients who have reoccurring appointments with the provider can bookmark the Telehealth URL and quickly join when their appointment starts.
Feature available by the end of September 2021.
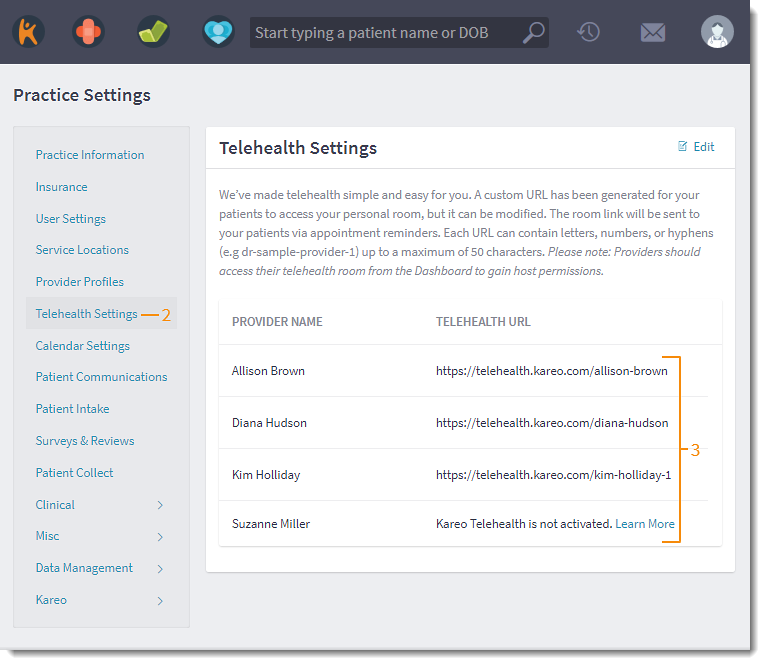
View Provider URL
Scheduled telehealth visits using the previous links are redirected to the provider's Telehealth URL. When applicable, patients will receive the new Telehealth URL in their appointment reminders to join the visit.
- Hover over the User icon and click on Practice Settings. The Practice Settings page opens.
- Click Telehealth Settings. The Telehealth Settings page opens.
- The Telehealth URL displays. To further customize the provider's link, edit the Telehealth URL.
- If the provider has not activated Kareo Telehealth, click Learn More for additional details.
|
 |
| Edit Provider URL
To further customize the provider's link, edit the Telehealth URL. Once saved, the previous Telehealth URL will redirect all appointments to the new Telehealth URL. When applicable, patients will receive the new Telehealth URL in their appointment reminders to join the visit.
The provider's previous Telehealth URL will be deactivated after 45 days and will be available for another provider to claim as their new Telehealth URL.
Note: Providers can manage their own Telehealth URL and System Administrators can manage the URL for all providers in the practice.
- Click Edit. The Telehealth URL editor opens.
- Enter the Telehealth URL without spaces to create a unique URL that does not exceed 50 characters.
 Tip: Use numbers or a hyphen (-) as separators. Tip: Use numbers or a hyphen (-) as separators.
- Click Save when finished. The new unique URL is now available for providers to use, distribute, and send to patients when applicable.
|
 |
Enhanced Group Telehealth Appointment
Kareo Telehealth now supports up to 100 participants in a session. Of the 100 participants, 12 can join as a video participants and the remaining 88 can only join as audio participants.
The first 12 participants to join the session will have the option to enable their camera and microphone. The remaining participants can only enable their microphone. If they attempt to enable their camera, they receive a message stating, "Sorry, you can't turn on your cam on at the moment".
Feature available by the end of September 2021.
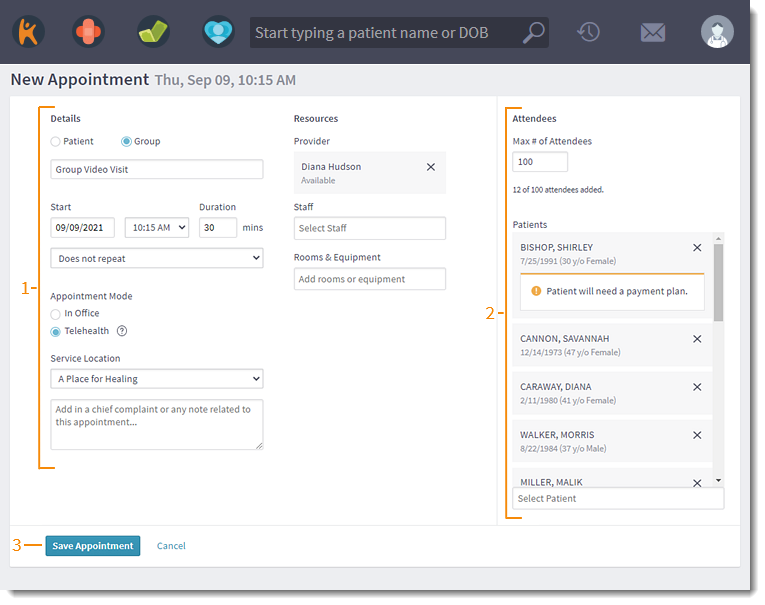
Schedule New Group Appointment
- Create a new group telehealth appointment.
- Add up to 100 attendees.
- Set the Max # of Attendees, if necessary.
- Search for patients:
- Existing Patient: Begin entering the patient's name and click on the patient's name when it appears. Repeat to add additional patients.
- New Patient: If the patient record is not found, select Click to create new patient record to add a patient record.
- Click Save Appointment when finished. The appointment is saved.
- Send the telehealth link to the patients.
|
 |
Virtual Waiting Room
Provider now have host permissions to control who can join the room and when. Participants are now required to knock to request access to the telehealth visit room and join a virtual waiting room to await the provider's response.
Features available by end of September 2021.
| Access Telehealth Visit
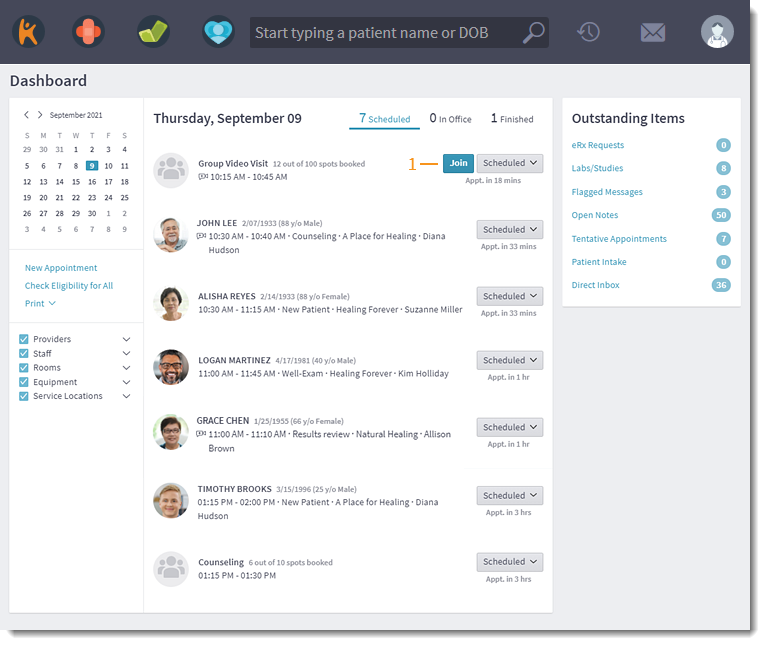
Providers should join the Telehealth visit from the Dashboard to be granted host permission. This will give the providers the ability to approve or deny participants access to the visit room.
Providers can also join the Telehealth visit by directly accessing their Telehealth URL. However, they must be logged into Kareo using the same web browser to be granted host permission.
- Click Join on the Scheduled telehealth group appointment. The video appointment opens in a new browser window.
- If necessary, activate the microphone and camera. Click Request permissions.
- Click Allow to use the microphone and camera. The telehealth visit room launches.
|
 |
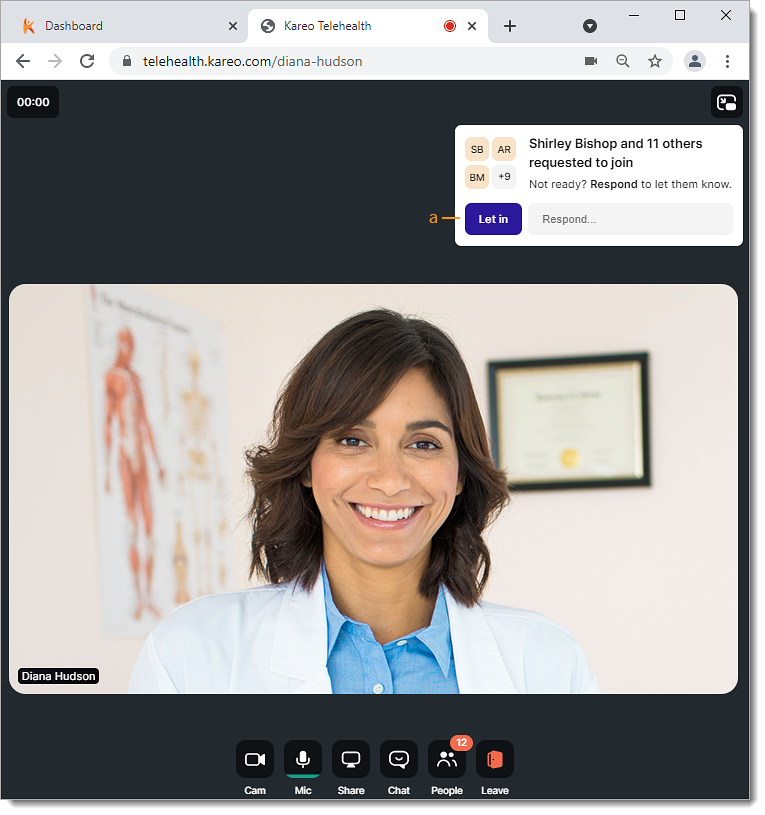
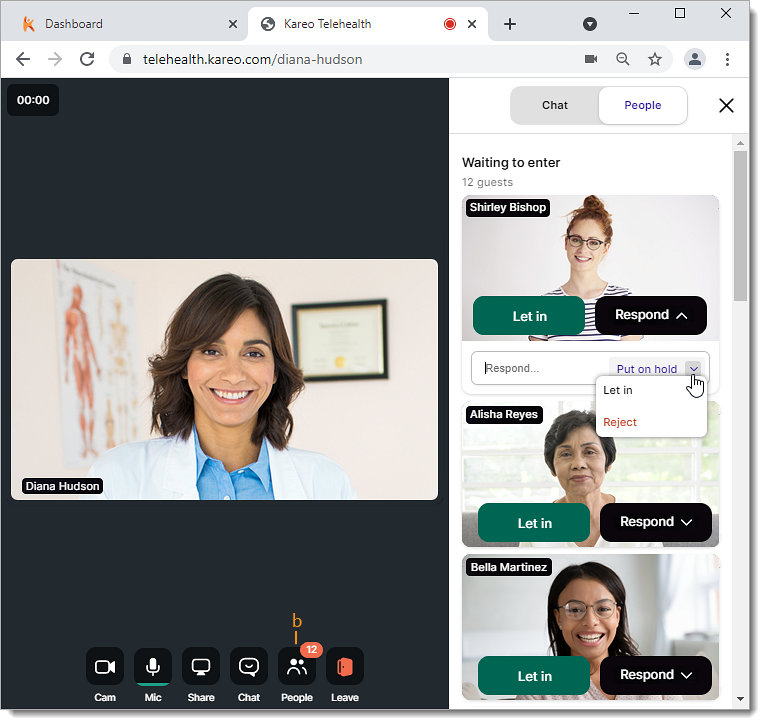
| Manage Participants
After participants knock to request access, they await the provider's response in a waiting room. The provider is notified when someone knocks and has the option to allow participants into the room in bulk or manage the participant's request individually.
- To allow all participants who knocked in, click Let in from the notification.
- If additional participants knock, click Let in to allow them access.
|
 |
- To manage individual participants, click the People icon. The People panel opens.
- To let a specific participant in, click Let in on their image. The participant joins the room.
- If necessary, repeat the step to let additional participants in.
- To send the participant a message, click Respond on their image. The message field opens with additional options.
- Enter the message and click Put on Hold. The participant receives the response and is notified that their request to join is on hold.
Note: Patients cannot reply to the provider's message.
- To deny the participant access, click Respond on their image. Additional opens displays.
- Click the Put on hold drop-down arrow and select Reject. The participant is removed from the waiting room and receives a message stating, "The host did not grant you access. If you were invited to this room, please contact the person who invited you."
Review the Patient Experience to learn more about the patient's waiting room view.
|
 |
Enhanced Telehealth Room
In addition to the new virtual waiting room and expanded participant count, providers now have host permissions for the room and the option to create a breakout session to split participants of the call into smaller groups. Mental health providers can use these breakout sessions for behavioral groups, support groups with different focus, skill development, and etc.
Features available by end of September 2021.
| Navigate Telehealth Room
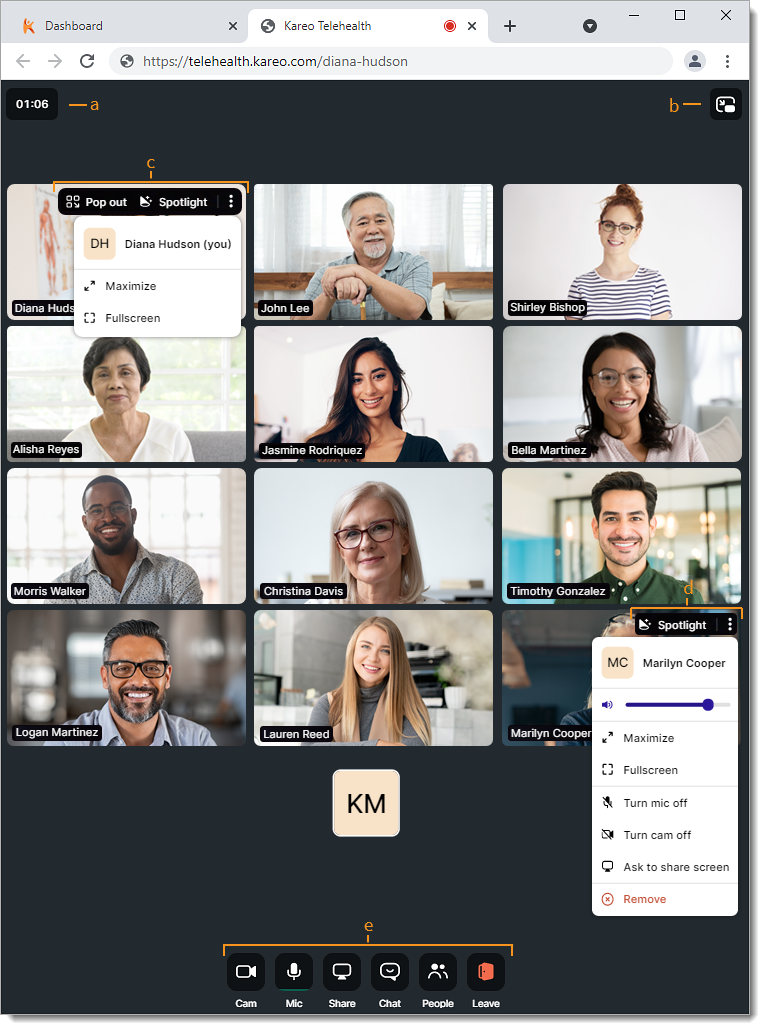
Once participants are in the telehealth visit room, providers can use the following features with host permissions:
- Timer: The timer starts when the first participant is let into the room to track the duration of the visit.
- Picture in Picture: Click the icon to pop the video out. This allows the provider to still see the participants and complete other tasks (e.g., start documenting the group note, open a file to share, etc.).
- Provider Controls: The provider hovers over their window to see the controls:
- Pop out: Click to pop the provider window out of the grid layout and onto the bottom right corner of the room.
- Spotlight: Click to make the provider window the largest for everyone.
- More options: Click the icon to display additional options:
- Maximize/Minimize: Click to make the window the largest for the provider or make the window smaller again.
- Fullscreen: Click to make the provider window fill the entire screen.
- Participant Controls: Hover over the participant to see the controls:
- Spotlight: Click to make the participant window the largest for everyone.
- More options: Click the icon to display additional options:
- Volume Slider: Adjust the participant's volume for the provider only.
- Maximize: Click to make the participant's window the largest for the provider only.
- Fullscreen: Click to make the participant's window fill the entire screen for the provider only.
- Turn mic off/on: Click to mute or unmute the participant for everyone.
- Turn cam off/on: Click to disable or enable the participant's camera.
- Ask to share screen: Click to prompt the participant to share their screen.
- Remove: Click to remove this participant from the room.
- Room Controls:
- Cam: Click to turn the camera on or off. Hover over icon to select a different camera.
- Mic: Click to turn the microphone on or off. Hover over icon to select a different microphone.
- Share/Stop: Only available for laptop and desktop devices. Click to initiate a screen share and choose to share the contents of the entire screen, application window, or browser tab. Then, click to stop screen sharing when finished.
Note: The participant's video continues streaming while they share their screen and multiple participants can share their screen at the same time.
- Chat: Hover over the icon to enter and send a chat message to participants.
Note: For HIPAA compliance, the chat feature is only intended for communication during the visit and will not be saved later.
- To view and continue the chat conversation, click to expand the Chat panel.
- People: Click to expand the panel to view the list of participants in the room, turn off all mics, turn off all cams, remove all participants, or to create breakout groups. Hover over the icon to directly create a breakout group.
Note: The Cam and Mic icons next to the participant's display name indicates whether they have their camera and microphone on or off.
- Leave: Hover over the icon to select End meeting for all or Leave room. Select Leave room to allow the visit to continue without the host provider.
|
 |
| Breakout Groups
Create a breakout sessions to split participants of the call into smaller groups.
- Hover over the People icon and click on Breakout Groups. The Breakout Groups panel opens.
- By default, 2 groups are created. If necessary, click the drop-down menu to select up to 20 groups.
- To auto assign the participants evenly into groups, click Assign all.
- To randomize the assigned participants, click Shuffle.
- To individually assign a participant, drag and drop the participant into a group.
- To customize the group name, click the group name and edit the name.
Note: The group name displays in the patient's notification.
- Once the groups are ready, click Start breakout session. The participants receive a notification to join their assigned group. Review the Patient Experience to learn more about the participant's view.
|
 |
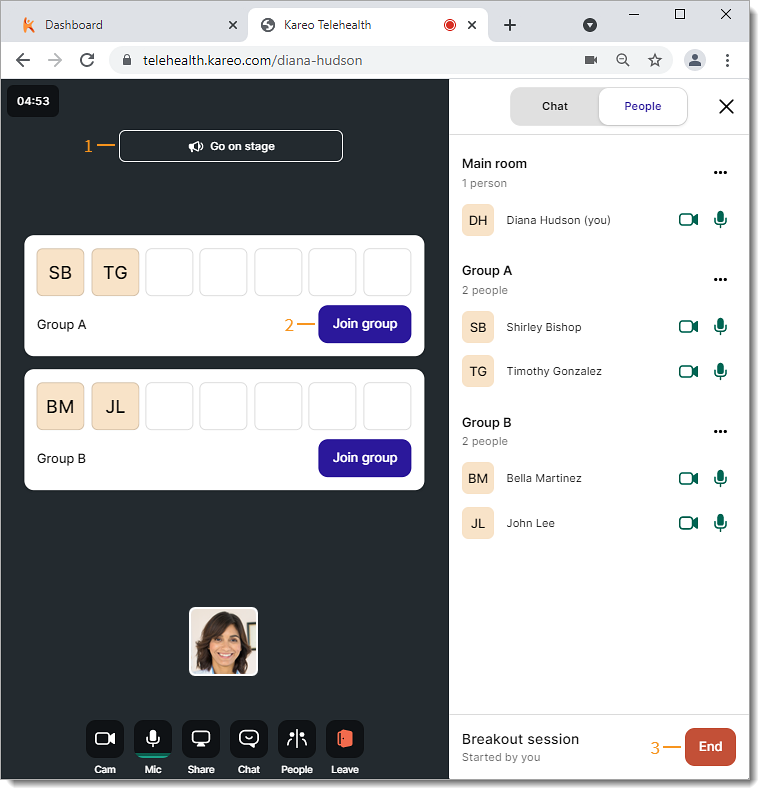
| Navigate Breakout Session
Once the breakout session starts, the provider can drop into any of the groups or broadcast a message to all groups at the same time.
- To send an audio broadcast to all groups, click Go on stage. The audio window opens to send the message.
- To end the message, click Get off stage.
- To drop into a group, click Join Group. The group session opens.
- To exit the group, click the back icon.
- To end the breakout session for all participants, click End from the People panel or hover over the People icon and click End breakout session. All participants are removed from the groups to rejoin the provider's room.
|
 |
Patient Experience
After a telehealth appointment is scheduled, the patient receives the telehealth URL from the practice. They can join the appointment with any mobile, laptop, or desktop device with an internet connected browser, camera, and microphone access.
| Telehealth Visit
Review the patient's experience accessing, knocking, and joining the provider's room for their telehealth visit.
To help the patient visually confirm that they are joining the correct room, the practice's uploaded logo displays at the top left of the screen.
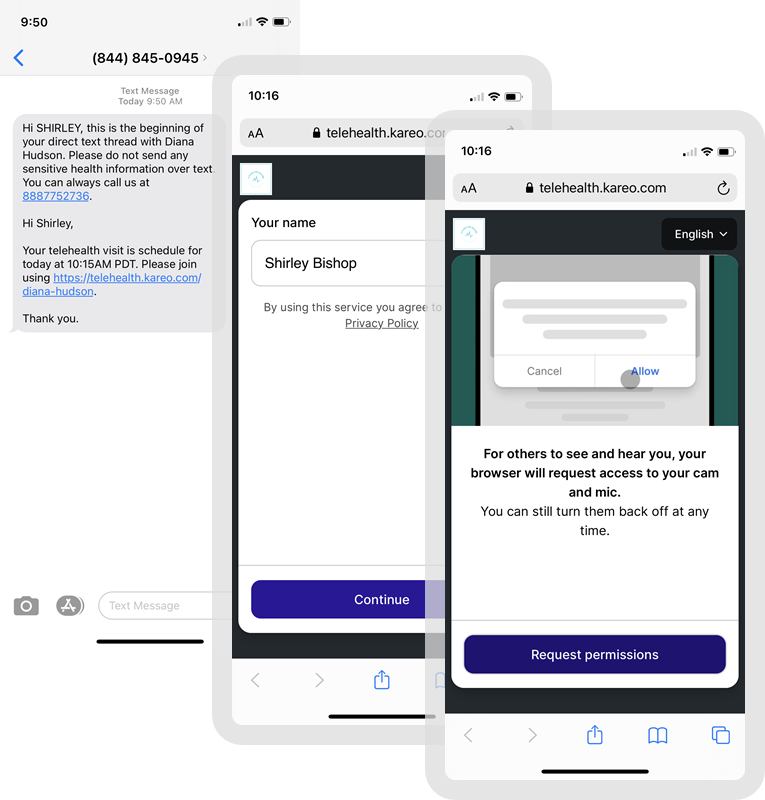
- At the time of the appointment, the patient taps on the telehealth URL in their email or text. The Telehealth page opens in a new browser window.
- The patient enters their name and taps Continue. The Request Permissions page opens.
- Patient taps Request Permissions to activate their camera and microphone.
- Patient taps Allow to use the microphone and camera for the appointment. The provider's room opens.
|
 |
- Patient taps Knock to let the provider know they have arrived for the appointment. An image of the patient is sent to the provider. The Waiting Room opens.
- The patients waits for a reply from the provider or to be let into the visit room in the waiting room.
- The patient is let into the room once the provider is ready to begin the video visit.
|
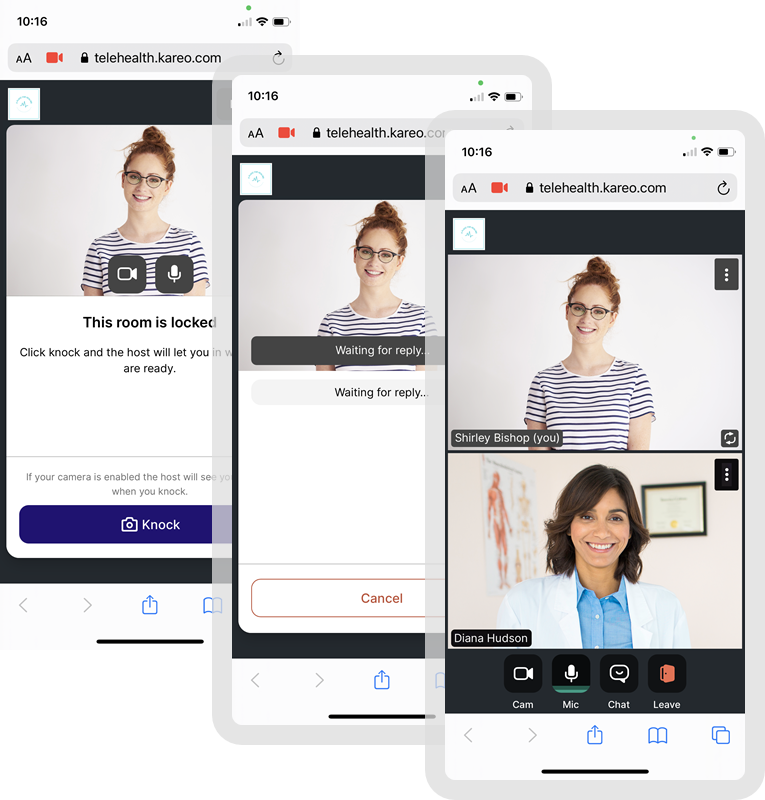 |
| Waiting Room
Review examples of the patient's experience in the waiting room after knocking.
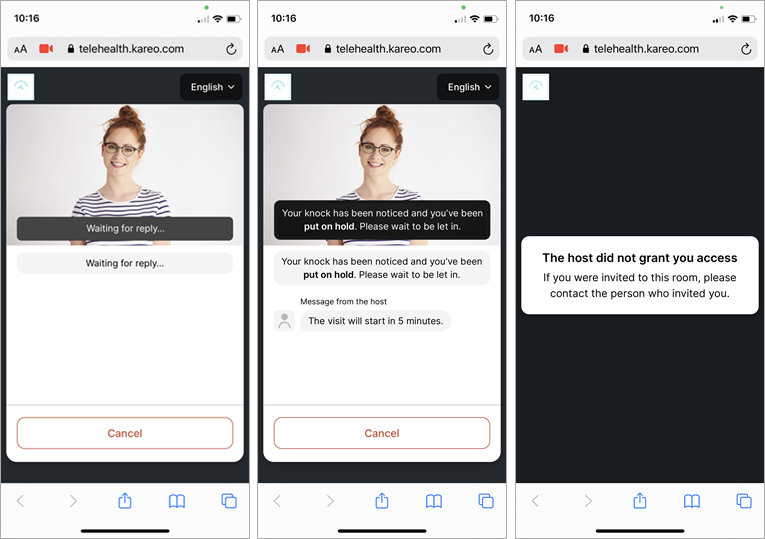
- The patient is waiting for a reply from the provider or to be let into the room.
- The provider sent a response and put the patient on hold. The patient can review the message from the provider and continues to wait to be let into the room.
Note: The patient cannot reply to the provider's response.
- The provider denied the patient access to the room. The participant is removed from the waiting room and receives a message stating, "The host did not grant you access. If you were invited to this room, please contact the person who invited you."
|
 |
| Breakout Session
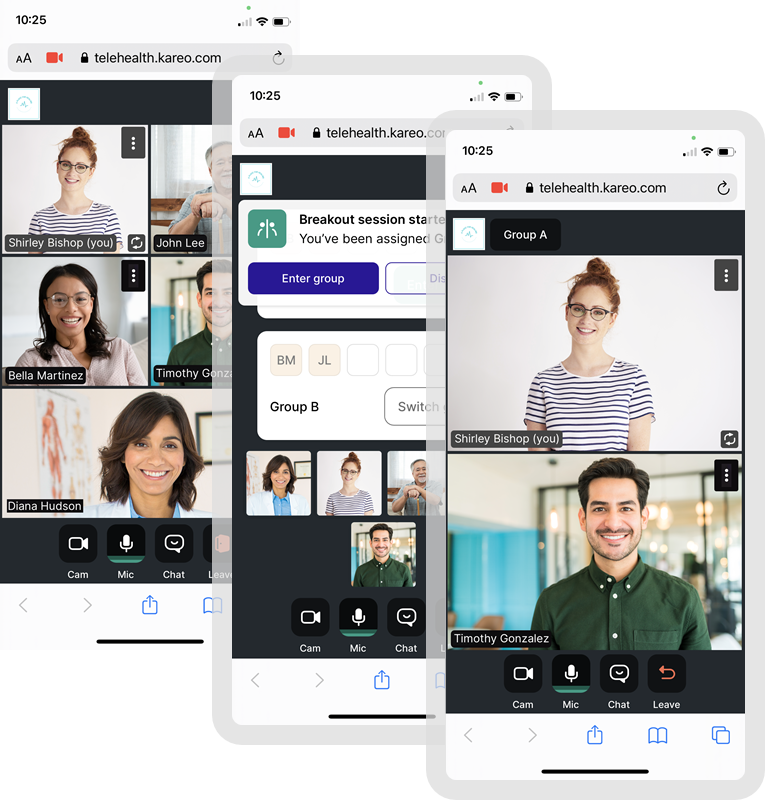
Review the patient's experience when the provider initates a breakout session.
- During the telehealth visit, the provider creates a breakout session. A notification appears to join the group.
- The patient taps Enter group. The session opens.
- The group is active until the provider ends the breakout session.
- The provider can drop into the session as necessary or broadcast a message for all groups (e.g., the sessions will in five minutes).
|
 |
Telehealth Resolved Issues
- Fixed an issue where providers and participants were unable to access a Kareo Telehealth room