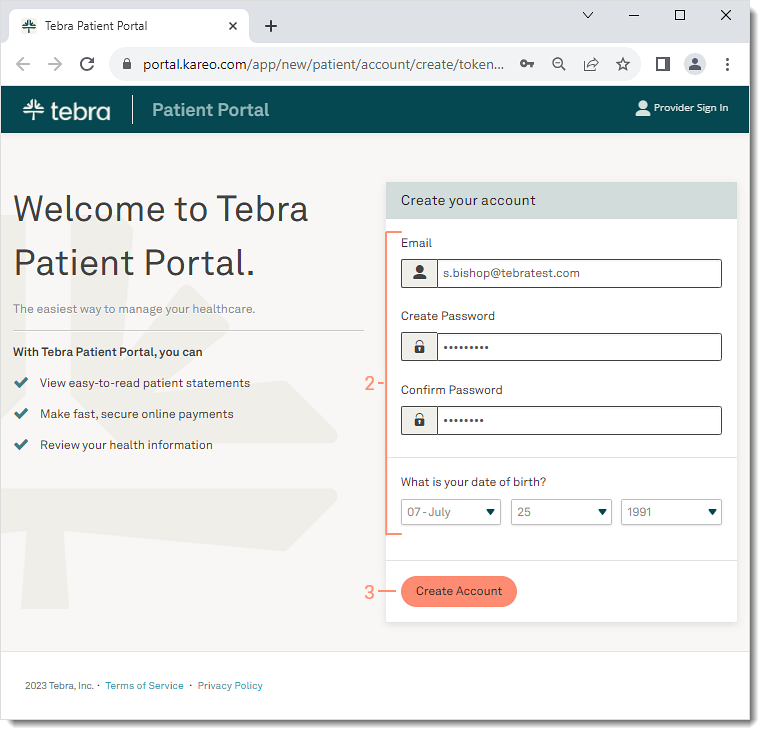
Activate Patient Portal
After the practice invites the patient to the Patient Portal, the patient receives an email invitation to activate their account.
- In the email invitation, the patient clicks Get Started. The Patient Portal create account page opens.
- The patient creates a Password and enters their Date of Birth.
Note: The Email auto-populates from the email invitation.
- Patient clicks Create Account. The account is created and the Patient Portal dashboard opens.
|
 |
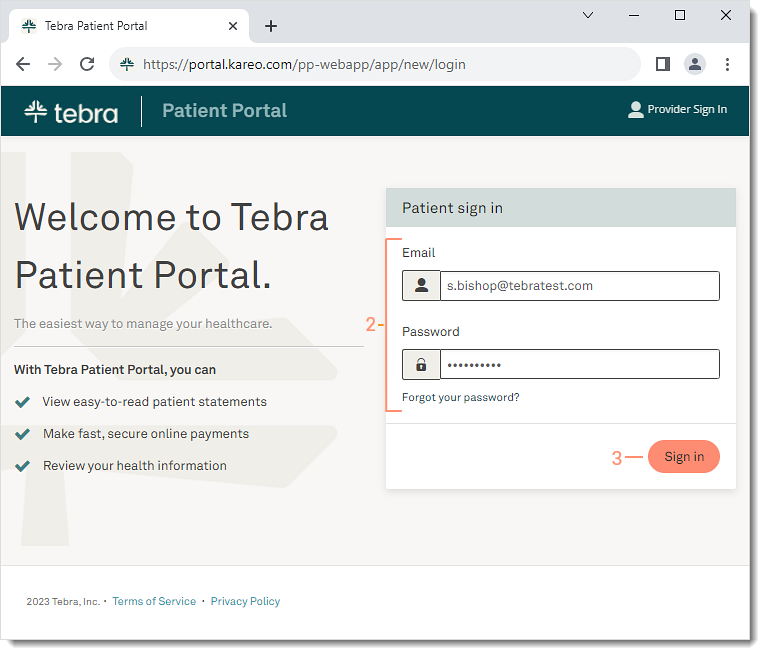
Access Patient Portal
After the account is activated, patients can log into the Patient Portal anytime through their mobile device or computer.
- The patient opens portal.kareo.com in a web browser. The Patient Portal page opens.
- Patient enters their Email and Password.
- Patient clicks Sign in. The Dashboard opens.
|
 |
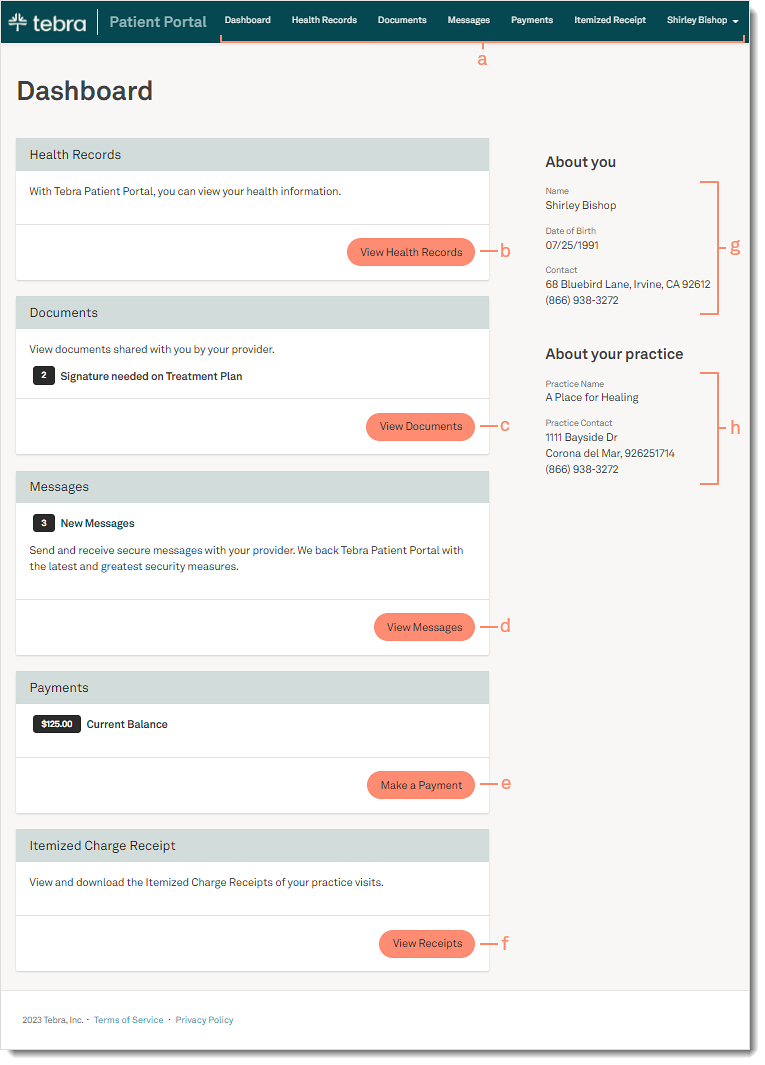
Navigate Dashboard
After the patient logs in, they can access their health information, documents, and more from the Dashboard.
- Top Menu: Click to access the Dashboard, Health Records, Documents, Messages, Payments, or Itemized Receipt. Click on the Patient Name to access My Account or to log out.
- Health Records: Click View Health Records to review health information such as: eLab results, vitals, medications, problems, and allergies.
- Documents: Click View Documents to review shared documents such as treatment plans, patient education, or uploaded documents. A notification displays when a treatment plan signature is requested by the provider.
- Messages: Click View Messages to send and receive messages secure with the provider. A notification displays when a new message is received.
- Payments: If applicable, click to make an online payment, view the bill, or view previous portal payments.
Note: Practice must be Stripe activated for patients to access this section.
- Itemized Charge Receipt: If applicable, click to view and download itemized receipts for their visits.
Note: Practice must enable the Receipt on Patient Portal setting, for patients to access this section.
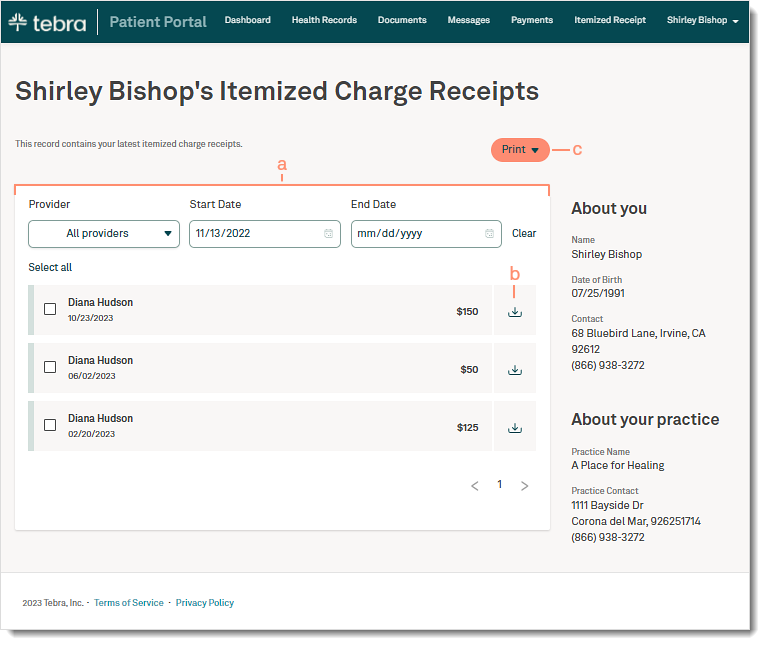
- About you: Patient details on file with the practice.
- About your practice: The practice address and contact information.
|
 |
|
|
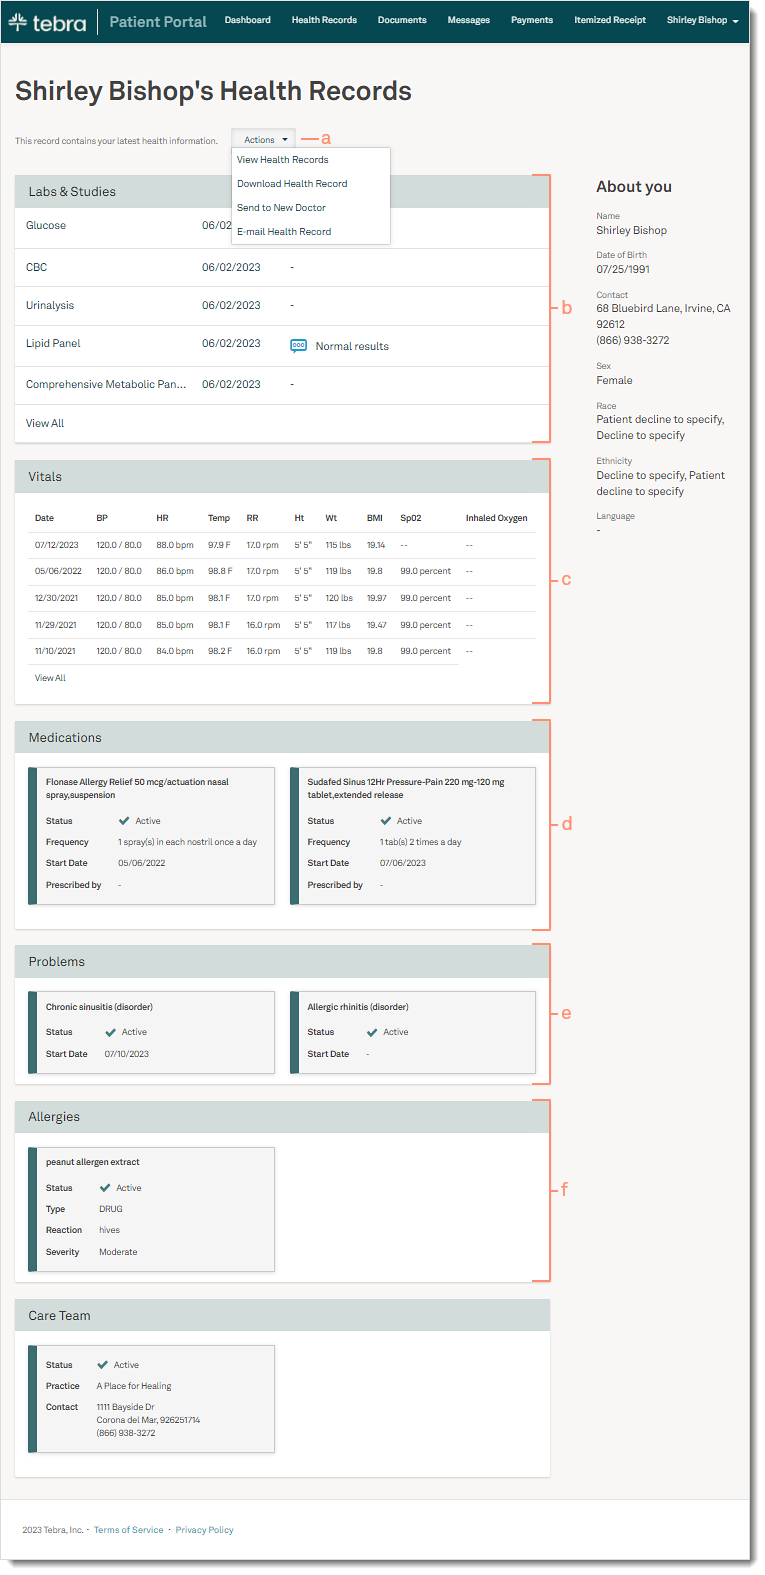 |
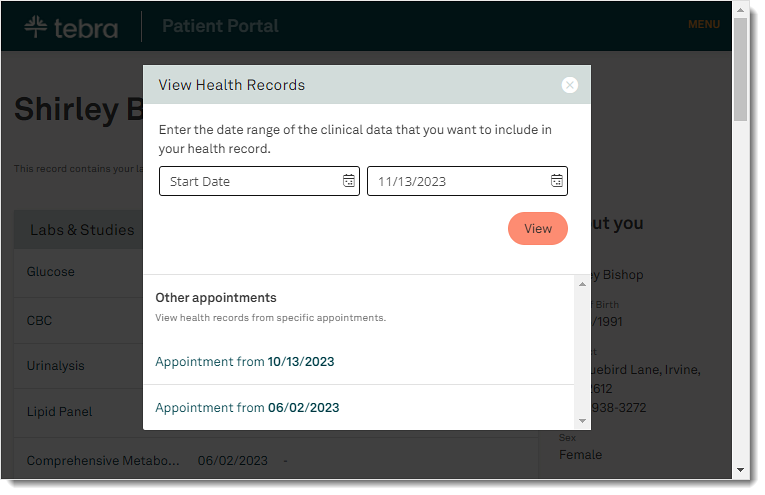
View Health Record
From the Health Records page, the patient can view their health records for a specific time frame.
- Click Action and select View Health Record. The View Health Records pop-up window opens.
- View all health records or by specific appointments:
- To view all health records, select the date range. Then, click View. The summary of care opens in a new browser.
- To view health records from specific appointments, click the Appointment Date. The summary of care opens in a new browser.
|
 |
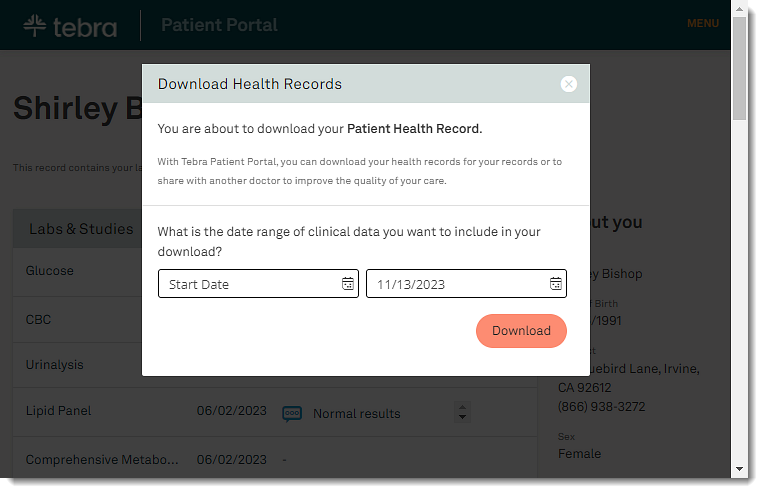
Download Health Record
From the Health Records page, the patient can download their health records.
- Click Action and select Download Health Record. The Download Health Records pop-up window opens.
- Select the date range.
- Click Download. A zip file is saved containing the XML files.
|
 |
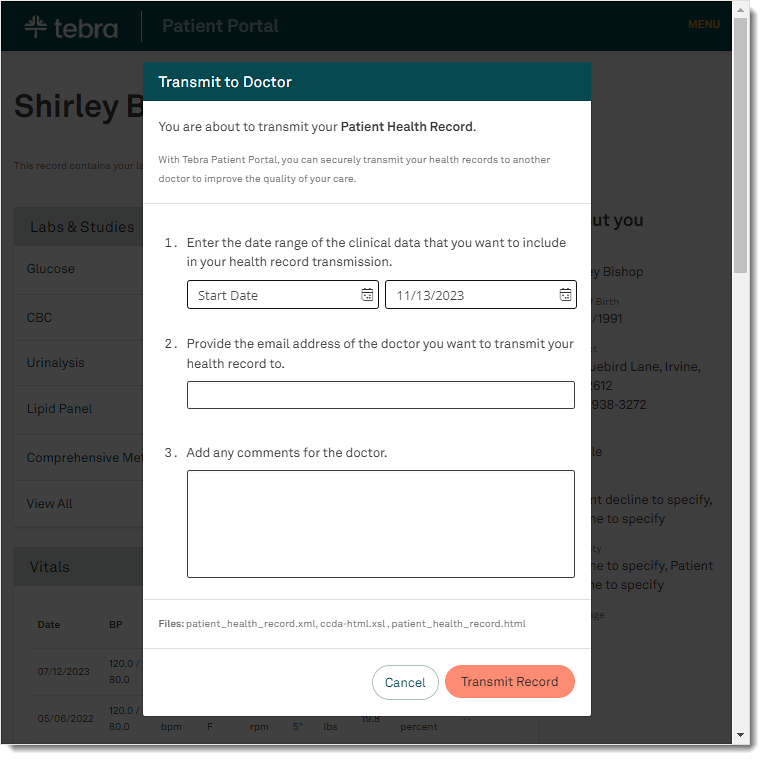
Send to New Doctor
From the Health Records page, the patient can send their health record to another provider. Patient must have the provider's direct message address to use this feature.
- Click Action and select Send to New Doctor. The Transmit to Doctor pop-up window opens.
- Select the date range.
- Enter the provider's email address and optionally add comments.
- Click Transmit Record when finished.
|
 |
E-mail Health Record
From the Health Records page, the patient can send their health record to another provider.
- Click Action and select E-Mail Health Record. The Transmit to Doctor pop-up window opens.
- Select the date range.
- Enter the provider's email address and optionally add comments.
- Click Transmit Record when finished.
|
 |
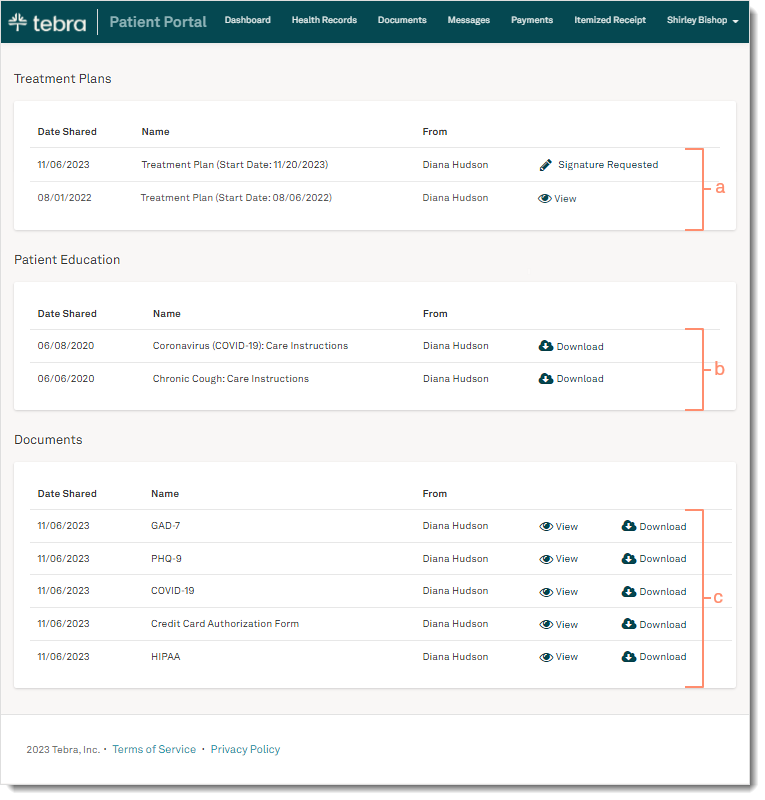
Navigate Documents
After clicking View Documents from the Dashboard, the patient can review documents shared by the practice.
- Treatment Plans: Displays treatment plans that requires a signature by the patient and shared treatment plans. Click to view details and optionally download.
- Patient Education: Displays sent patient educations. Click Download to save the file.
- Documents: Displays sent patient documents.
- To see the document, click View.
- To save the document, click Download.
|
 |
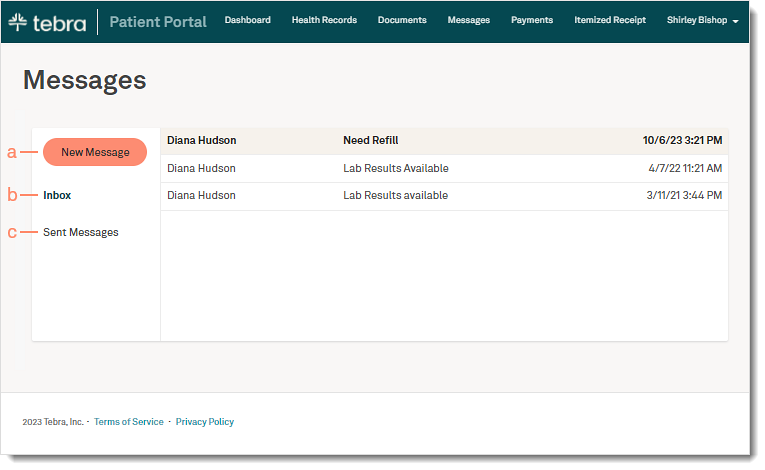
Navigate Messages
After clicking View Messages from the Dashboard, the patient can review messages sent by the practice or send a message to the provider.
- New Message: Send new secure message to the provider.
- Inbox: Displays messages sent by the provider.
- Sent Messages: Displays message sent to the provider.
|
 |
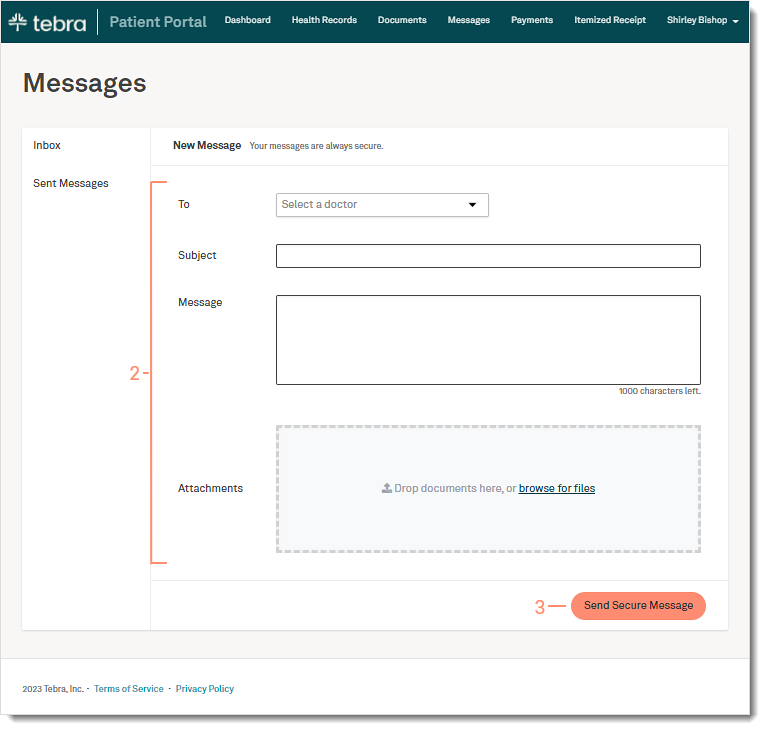
Send New Message
From the Messages page, patients can send a message to the provider.
- Click New Message. The New Message page opens.
- Compose message:
- Select a provider from the To drop-down.
- Enter the Subject and Message to the provider.
- Optionally, attach an image or document (not to exceed 10MB).
- Click Send Secure Message when finished. The message display in the provider's Message Center.
|
 |
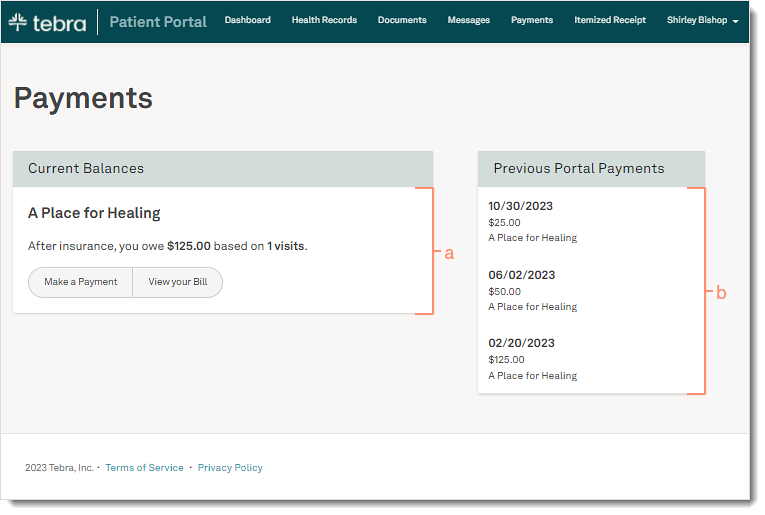
Navigate Payments
After clicking Make a Payment from the Dashboard, the patient can review their outstanding balance and detailed bills. Practices must be Tebra Payments or Patient Collect (Stripe) activated for patients to access the payments section.
- Current Balance: Displays the current patient balance. Click Make a Payment to pay the balance online or click View your Bill to see the breakdown of the bill or the print the statement.
- Previous Portal Payments: Displays previous payments made through the Patient Portal. Click View previous payments to see additional payments.
|
 |
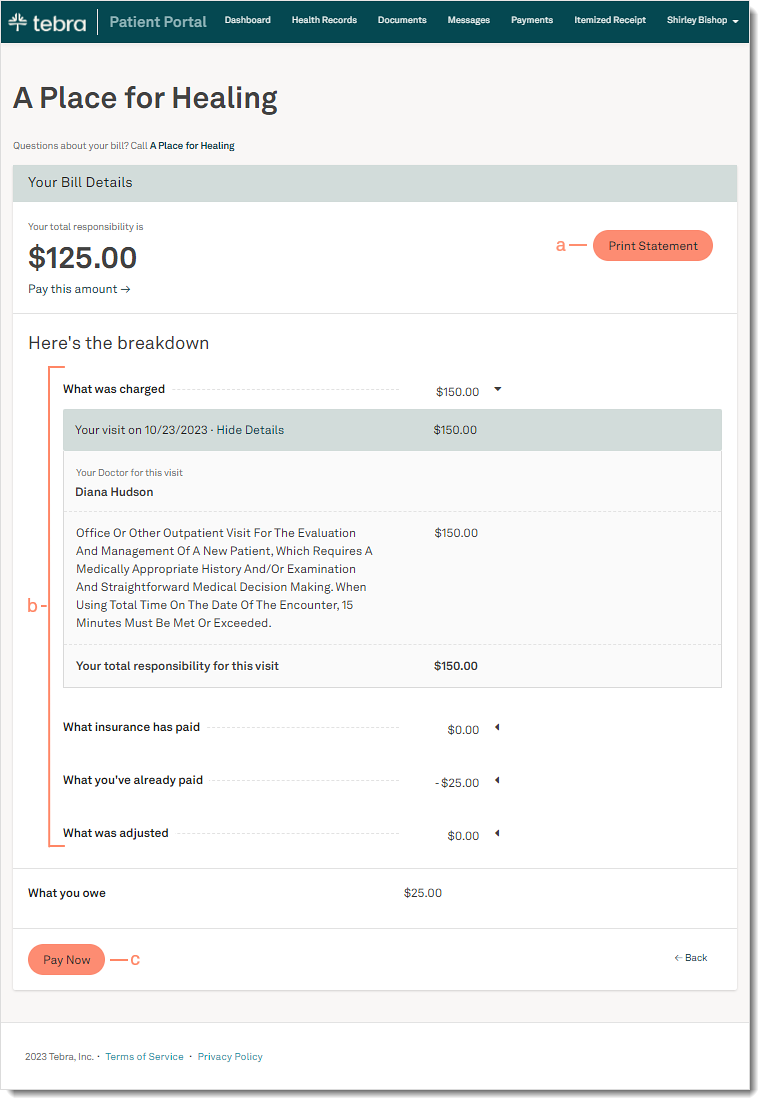
View Bill
After clicking View Your Bill from the Payments page, the patient can review their bill details.
- Print Statement: Click to print the details of the page.
- Review the breakdown:
- Click View Details to display which code(s) was billed for the specific visit and the breakdown of applicable insurance payments and adjustments.
- Review total insurance payment, patient payment, and adjustments.
- Payment: Review the patient balance. Click Pay this amount at the top of the page or Pay Now at the bottom of the page to make a payment.
|
 |
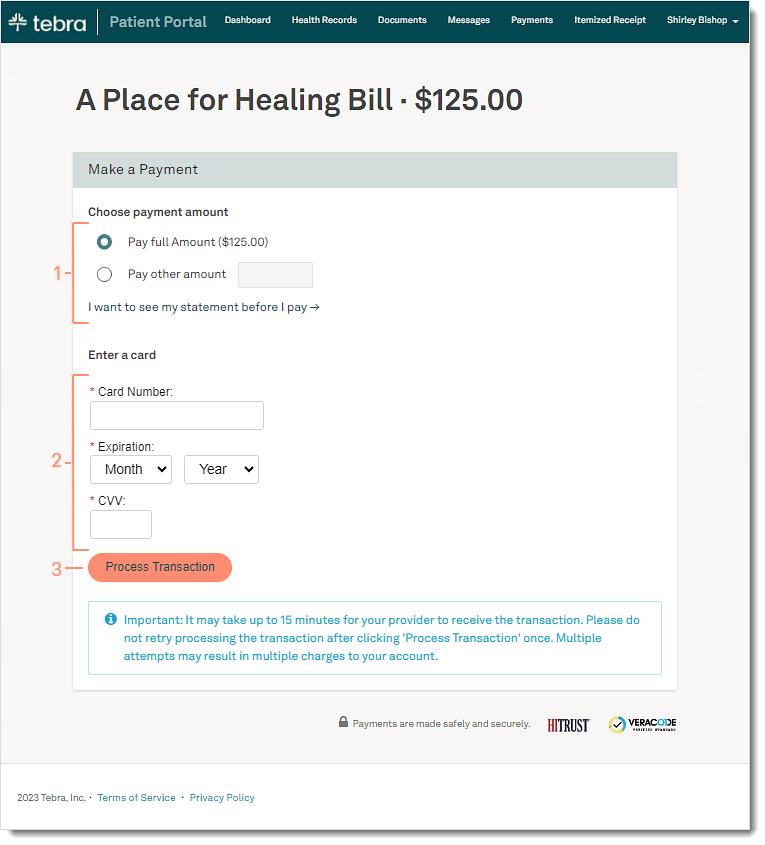
Make Payment
After clicking Make a Payment from the Payments page, the patient can make a payment online to pay their balance. This feature is available for patients when the practice has Tebra Payments or Patient Collect (Stripe) activated.
- For Patient Collect (Stripe) activated practices, review Patient Experience: Patient Portal Payment (Stripe) for more details.
- For Tebra Payments activated practices, review the following steps.
- The patient clicks to select the payment amount to pay.
Note: The patient can click I want to see my statement before I pay to view their statement first.
- The patient selects "Pay full Amount" to pay the total amount owed.
- The patient selects "Pay other amount" to enter a different payment amount.
- The patient enters the Card Number, Expiration Date, and CVV code.
Note: If any of the card information needs to be corrected after it was entered, all card information fields will automatically clear for security purposes.
- The patient clicks Process Transaction to charge the card. The Payment Successful page opens with a receipt and the option to print.
|
 |
Navigate Itemized Charge Receipt
After clicking View Receipts from the Dashboard, the patient can review their itemized receipts. The practice must enable the Receipt on Patient Portal setting, for patients to access this section.
- Filter: By default, all receipts from the last year to current date displays. To change the filters, click the Provider, Start Date, or End Date drop-down.
- To reset the filters, click Clear filters.
- Download: Click the download icon on a visit to save a PDF of the itemized receipt.
- Print: Generate a PDF for multiple visits or all visits. Click to select specific visits and click Select all. Then, click to expand the Print options and select Separate receipts to generate a PDF for each visit or select Combine all visits in a single receipt to generate a PDF of all visits on one receipt, when applicable.
Note: Only visits for the same practice and service location can be combined in a single receipt.
|
 |
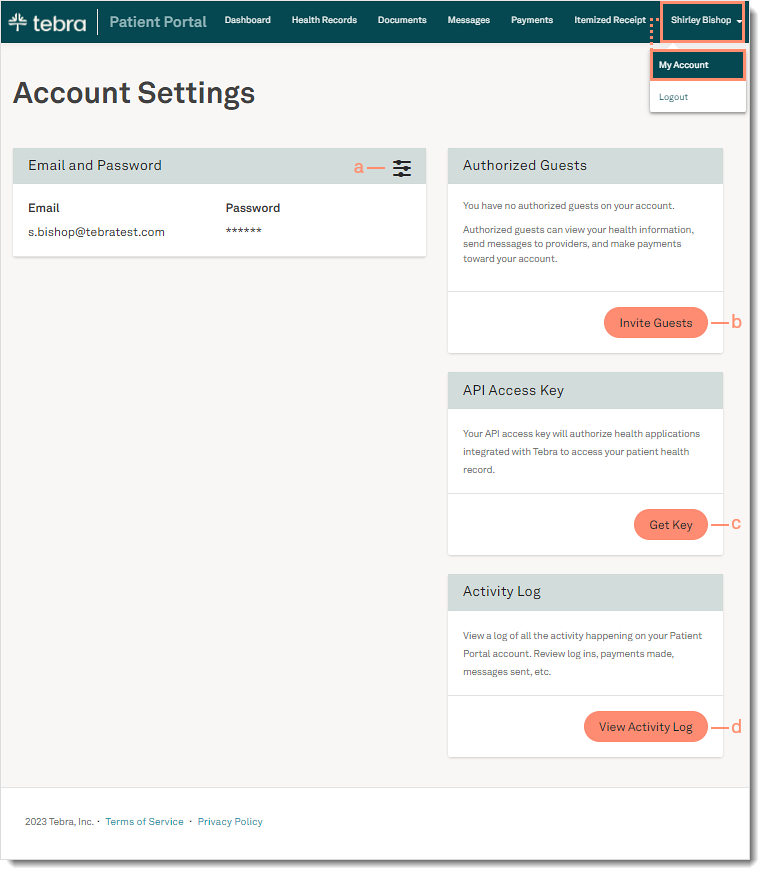
Navigate My Account
- Account Settings: Displays the email address associated to the account. Click the settings icon to reset the password.
- Authorized Guests: Click Invite Guests to allow authorized users to view the patient's health information, send messages, and make payments. To deny access to an authorized guest, click Revoke next to the guest's name.
Note: Authorized users do not have access to the Account Settings or Authorized Guests sections.
- API Access Key: Click Get Key to generate the API access key that authorizes health applications to integrate with Tebra to access the patient's health record. To deny the generated API key, click Revoke. Then, click Revoke Access on the confirmation pop-up window.
- Activity Log: Click View Activity Log to review log ins, payments made, messages sent, and more.
|
 |
Invite Guests
From the My Account page, patients can invite other users (e.g., family members) to view their health information, send messages, and make online payments.
- Click Invite Guests. The Invite Guest pop-up window opens.
- Enter the Guest First and Last Name.
- Select how the guest authenticates.
- Enter the Guest Phone Number or Date of Birth and Email Address.
- Click Send Invitation. The confirmation pop-up window opens and an email invitation is sent to the invited guest.
- Continue to add additional guests or click I'm done to close the pop-window.
|
 |
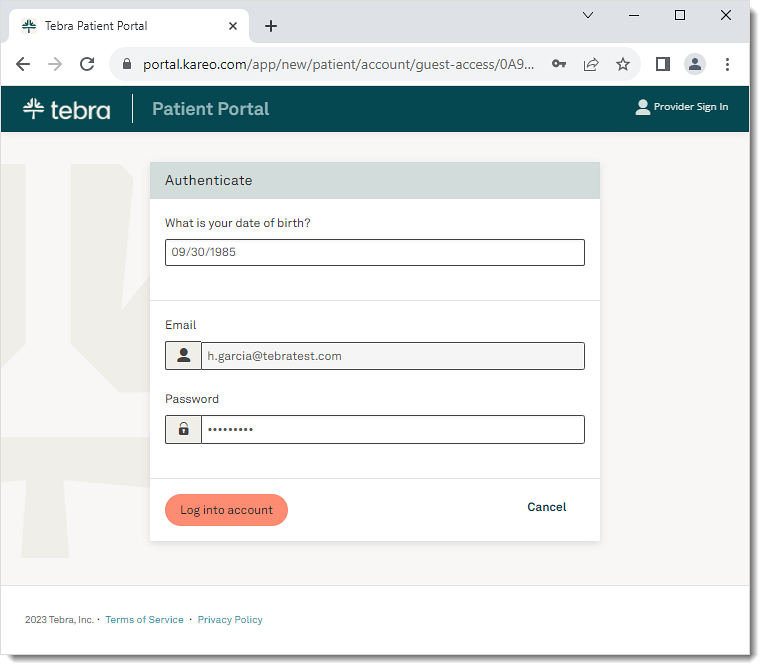
Invited Guest: Authenticate and Access Account
After the guest is invited to the Patient Portal, they will need authenticate their information to access the patient's account.
- The guest receives an email invitation and click Get Started. The Authenticate page opens in a new browser.
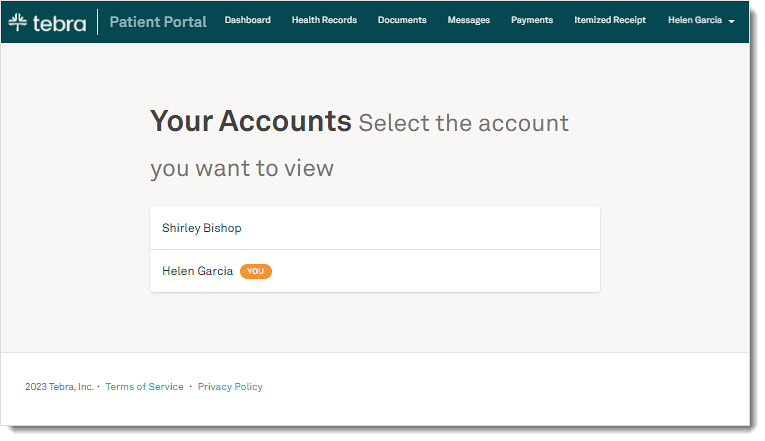
- The guest enters their phone number or date of birth for authentication and clicks Log into account. The Your Accounts page opens.
- If the guest does not have a Patient Portal account, create a password. Then, click Create Account. The Your Accounts page opens.
|
 |
- Select an account to view.
|
 |
Invited Guest: Switch Users
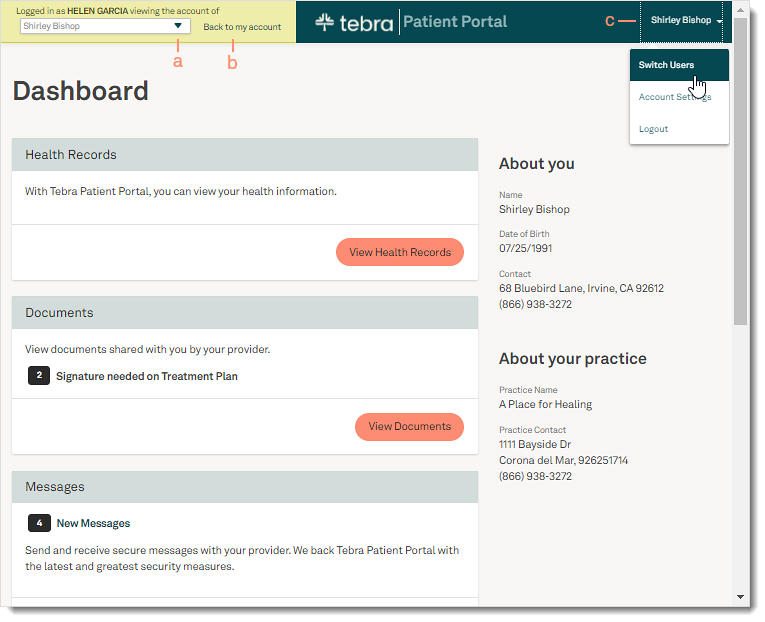
After an invited guest logs in, they can view their own health information and switch to another patient's account, when applicable.
Note: If the guest has not been invited to the Patient Portal by a provider or practice, they will not have access to the options below.
- Click the drop-down to select a user.
- Click Back to my account to view their health information.
- Click Patient Name and select Switch Users. The Your Accounts page opens to select a different account.
|
 |