Updated: 12/22/2023 | Views: 8834
A note is the clinical documentation for a specific patient visit and can include problems, medications, allergies, immunizations, history, assessment, and treatment plan. With Clinical, you can create various notes to document all aspects of a patient's visit.
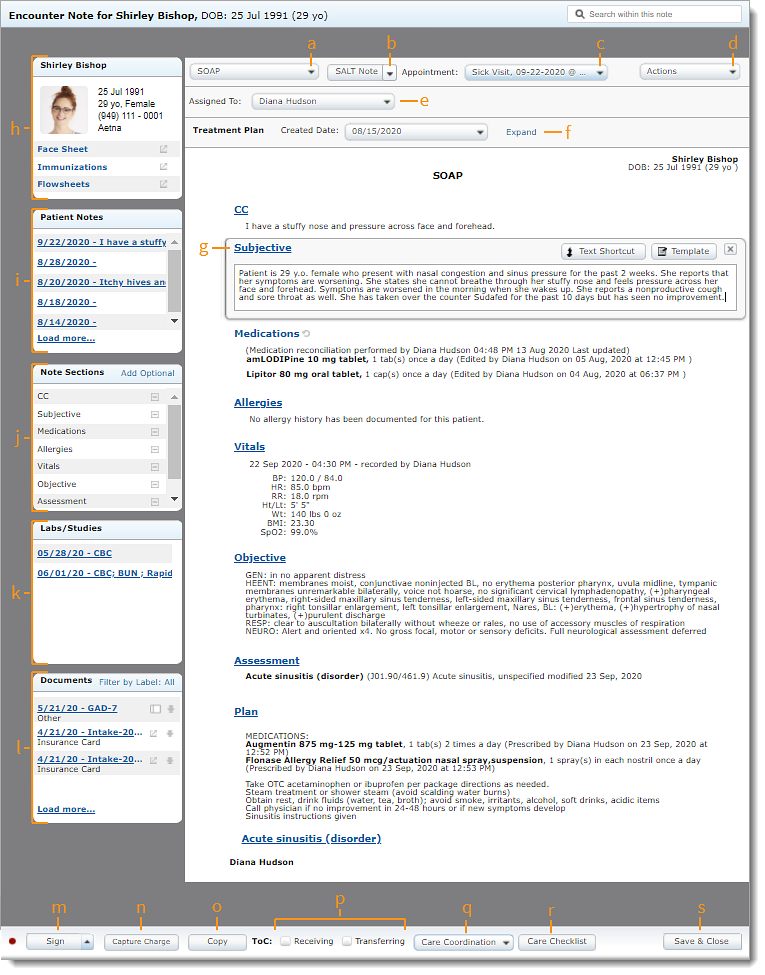
Access Notes
- Enter the first 2–3 letters of the patient's name or date of birth (mm/dd/yyyy) in the top navigation bar search box.
- Click to select the patient from the auto-populated results. The patient's Facesheet page opens.
- Click Notes. The Notes page opens.
- Click + Create Note. The Encounter Note page opens.
|
 |
Navigate Clinical Note
- Note Type: Click to select the type of note (e.g., SOAP, H&P, Office Memo, etc.).
- SALT Note (Optional): Click to select a previous note to use the SALT (Same As Last Time) feature. Sections from the previous note is copied into the new note, regardless of the note type.
- If the new note type is different, only common sections in both notes will be copied.
- Appointment: Select the date and time of the visit. Select No Appointment if the note is not related to a scheduled visit.
- If a note is created from an appointment, the date defaults to the appointment date.
- Actions: Click to Print the note or print Patient Education topics. Also provide the Clinical Summary by printing, downloading, or sending a copy to the Patient Portal.
- Assigned To: Click to select a provider or clinical assistant to assign the note to.
Note: Once a note is signed, another user cannot be selected.
- Treatment Plan: Click Expand to view details about the active treatment plan within the note.
- If necessary, select a different Created Date to view details for the corresponding treatment plan.
- Note: Click on the section headers to add or modify information using free-form text, Text Shortcut, Template, or other section specific type of entry options.
- Patient Information: Click Face Sheet or Flowsheet to view summary data within the note. Click Immunizations to view or add immunizations.
- Patient Notes: Displays the last five notes. Hover over the date of visit to view the assessment and plan. Click on the date of the visit to view or copy the note.
- Note Sections: Click on the section name to view or add information for the corresponding section. Click on the minus icon to remove the section from the note. Hover over Add Optional and click the plus icon to add additional sections.
- Lab/Studies: Displays the past five lab orders. Click on the lab date to view the lab within the note.
- Documents: Displays the last four documents attached to the patient's chart. When available, click the panel icon to view screening tool or medical intake documents (Engage subscribers only).
- Sign: Click to finalize the note. Signed notes cannot be edited. If necessary, add an addendum to the note.
- To finalized and request a supervising provider signature, click the up arrow and select Sign & Request Co-Sign. Then, select the name of the provider and click Sign & Notify.
- Capture charge: Click to create a charge to capture a comprehensive list of charges for the visit.
- Copy: Click to duplicate the note.
- Transition of Care (ToC): Click to select "Receiving" if the patient has been referred and the progress needs to be shared with the referring provider, or select "Transferring" if the patient is being referred to another provider.
- Care Coordination: Click to Send Referral or Send Continuity of Care.
- Care Checklist: Click to document important information required for regulatory requirements.
- Save & Close: Click to close and save the note.
|
 |