ePrescribe Controlled Substance (EPCS)
- Last updated
-
-
Save as PDF
Updated: 07/07/2023 | Views: 24616
Clinical offers medical professionals the ability to write prescriptions for controlled substances that can be printed for a patient or sent to a pharmacy electronically. With each new medication, Clinical automatically checks for and alert the prescriber of any drug-drug interactions and allergic reactions.
EPCS enrollment is required for providers to send controlled substances electronically.
Access Patient Medications
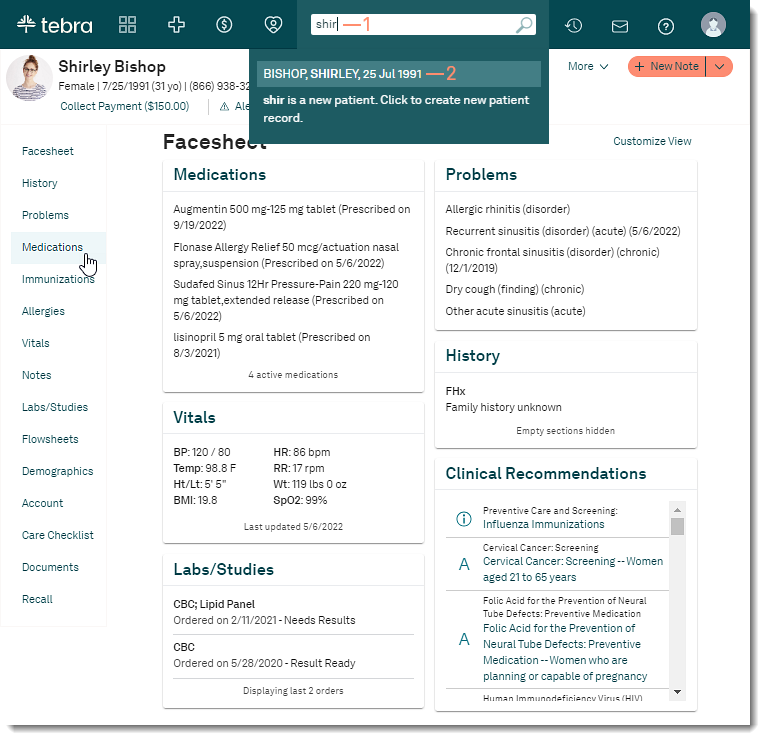
- Enter the first 2–3 letters of the patient's name or date of birth (mm/dd/yyyy) in the top navigation bar search box.
- Click to select the patient from the auto-populated results. The patient's Facesheet page opens.
- Click Medications. The Active Medications page opens.
|
 |
Prescribe Medication
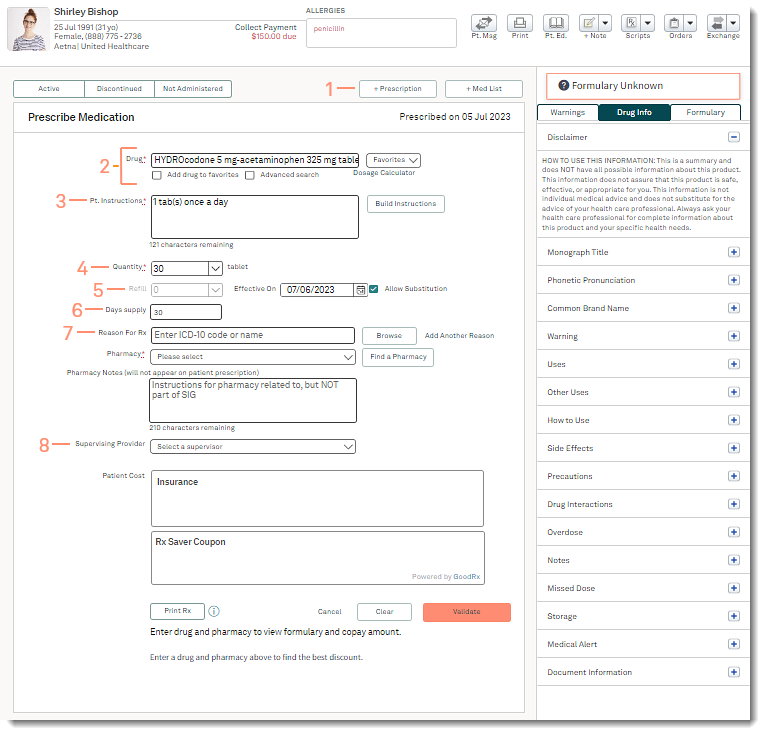
- Click + Prescription. The Prescribe Medication page opens.
- Drug: Enter the name of the drug, DME, or supplies to return a list of matching results with the applicable dosage and dispense forms. Select the desired result from the list.
 Tip: When the desired drug is not listed, enter additional drug information (e.g., generic drug name, entire drug name, "ER" for extended release drugs, dosage, or dispense form) to narrow the search. Tip: When the desired drug is not listed, enter additional drug information (e.g., generic drug name, entire drug name, "ER" for extended release drugs, dosage, or dispense form) to narrow the search.
- If the desired drug is not listed, click to select "Advanced Search". Enter the name of the drug, DME, or supply to return a list of matching results with the the available dispensable drugs and the brand name or generic form of the drug. Select the desired result from the list.
- If a drug is not on the list, the Create custom drug link displays, click to add as a custom drug. Custom drugs are not available for ePrescribing.
Note: Custom drugs are not available for ePrescribing and can only be printed.
- To prescribe a drug favorite, click Favorites and select the drug and dispense form.
- To create a new drug favorite, click to select "Add drug to favorites".
- To calculator the patient's dosage, click Dosage Calculator. When available, the patient's weight is pre-populated based on the last vitals taken. If a liquid drug is selected, the liquid formulation is also pre-populated.
- When applicable, the Medical Need or Narcotic Addiction DEA Number (NADEAN) field displays.
- Medical Need: Per DEA regulations, enter the medical condition associated to the prescribed drug.
- NADEAN: If the prescribed drug is for "Detoxification Treatment" or "Maintenance Treatment", enter the NADEAN in the following format: XA11111111.
- Pt. Instructions: Enter prescription instructions for the patient or click Build Instructions to create prescription instructions for the patient by selecting from pre-set options for Dose, Unit, Route, Frequency, Directions, and Duration.
- Quantity: Click the drop-down and select from available quantity options for the drug or enter a custom quantity. The unit description of the selected drug displays to the right of the Quantity amount.
- To indicate a partial dispensing, enter a decimal value leading with a zero (e.g., "0.5") as the Quantity.
- When applicable, the Total quantity displays based on the calculation of the drug's pre-determined manufactured unit size multiplied by the quantity amount entered.
- Refill: Refills are only available to be entered for new prescriptions for controlled substances on Schedule III-IV drugs.
- To prescribe a controlled substance for a future date, select an Effective On date.
Tip: Create new prescriptions with future effective dates to provide patients with an ongoing supply of the controlled substance.
- To allow the use of a generic version of the drug, click to select "Allow Substitution".
- Days supply: Enter the prescription days supply.
Note: For CQM reporting purposes only. The days supply does not populate on a printed prescription.
- Reason For Rx: If applicable, enter an ICD-10 code or click Browse for more options.
- To enter a second diagnosis, click Add Another Reason.
- Supervising Provider: If applicable, select a supervising provider from the drop-down to send electronically.
Note: Only active providers who are eRx enrolled will populate in the drop-down list. Supervising provider does not populate on printed prescriptions.
|
 |
Select Pharmacy
Select a pharmacy to view formulary, copay amount, and find coupons.
- Pharmacy: By default, the patient's preferred pharmacy is populated. If the patient has multiple preferred pharmacies, click the drop-down to select different pharmacy from the list.
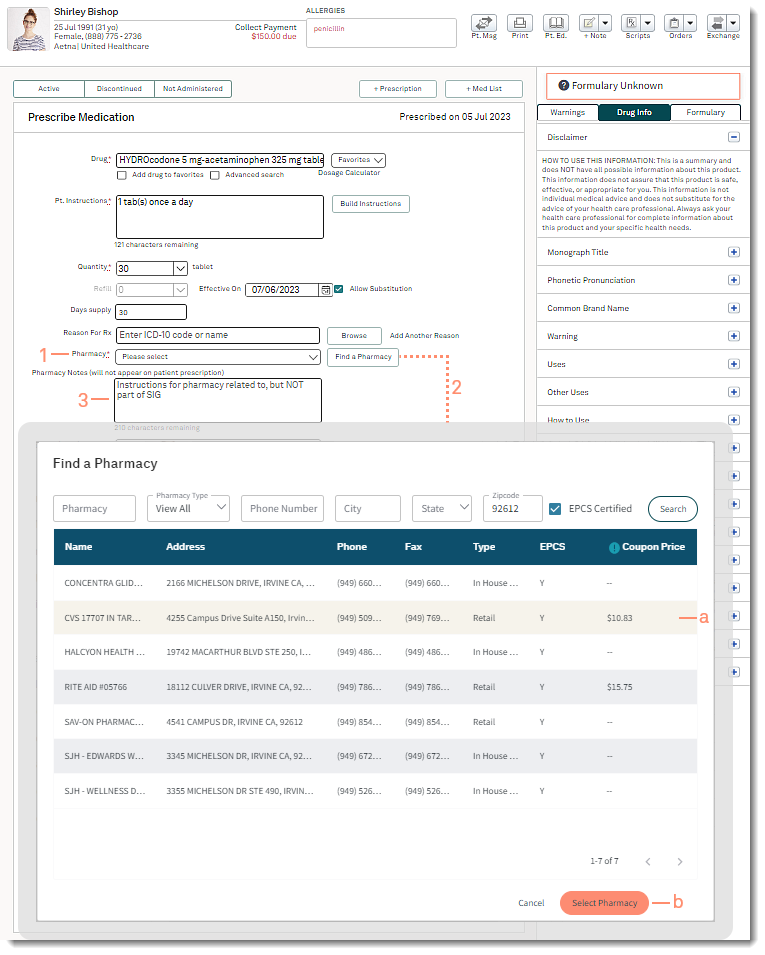
- If necessary, click Find a Pharmacy to search for a pharmacy. The Find a Pharmacy pop-up window opens.
- Click to select a pharmacy from the auto generated results based on the patient's zip code or search for a pharmacy.
- To search for a pharmacy, remove the zip code and enter any of the following search criteria. Then, click Search and click to select the pharmacy from the results.
Tip: Search by a city name or zip code only for broader results.
- Pharmacy: Enter the first 2–3 letters of the pharmacy's name, the whole pharmacy's name, or store number (e.g., CVS, 4825).
- Pharmacy Type: By default, View All is selected. To filter by a pharmacy type, click the drop-down to select Retail, Mail Order, or In House Dispensing.
- Phone Number: Enter the pharmacy's phone number.
- City: Enter the pharmacy's city.
- State: Select the pharmacy's state.
- Zip: Enter the pharmacy's zip code.
- EPCS Certified: By default, pharmacies that are certified for electronic prescriptions for controlled substances (EPCS) displays in the search results.
- Click Select Pharmacy to add to the prescription.
- Pharmacy Notes: Enter any instructions for the pharmacy; these notes will not appear on the prescription label.
|
 |
Patient Cost
View the drug's formulary status, coverage factor, and alternative medications based on the patient's formulary plan.
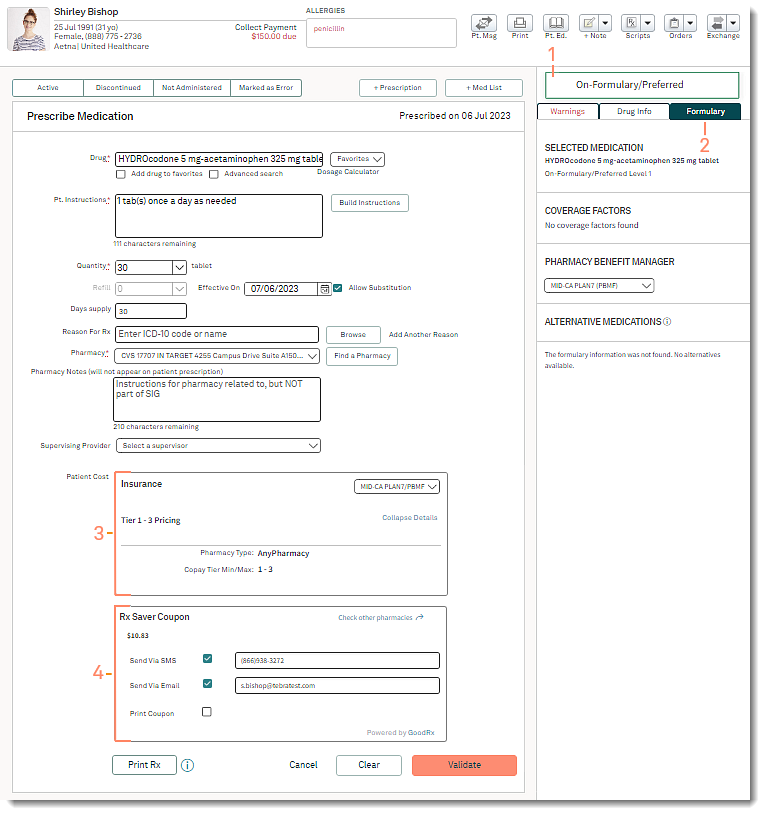
- Formulary Status: Displays the drug's formulary status with the plan. Available statuses:
- Non-Formulary: Displays when the drug is not included in the plan.
- On-Formulary/Non-Preferred: Displays when the drug is on formulary and is not a preferred drug.
- On-Formulary/Preferred: Displays when the drug is on formulary and is a preferred drug.
- Formulary Unknown: Displays when coverage information cannot be found or the drug could not be found in the formulary database.
- Non-reimbursable: Displays when there is no coverage and the patient is responsible for payment.
- Formulary: Click on the Formulary tab to view additional details.
- Coverage Factors: When available, the Quantity Limits, Age Limits, Gender Limits, General Information, Prior Authorization, or Step Therapy details display.
- Pharmacy Benefit Manager: If multiple plans are available, click the drop-down to select a different plan to view the drug coverage and formulary status.
- Alternative Medication: When available, a list of alternative drugs within the same therapeutic treatment family displays. The list is sorted by the highest coverage to the least. To prescribe an alternative drug, click on the drug name to replace the current drug name with the alternative drug name.
- Insurance: Displays the available copay amount based on the selected plan.
- When available, click View Details for additional coverage details.
- If the copay amount is not available, advise the patient to check their plan for more information.
- Rx Saver Coupon: Displays the selected pharmacy's discounted rate for the drug. To provide the Rx Savings Coupon to the patient, click to select "Send Via SMS", "Send Via Email", or "Print Coupon". If necessary, enter the applicable mobile phone number or email address.
- To view another pharmacies discounted rate, click Check other pharmacies to search for a new pharmacy. If a new pharmacy is selected, the prescription updates with the selected pharmacy name.
|
 |
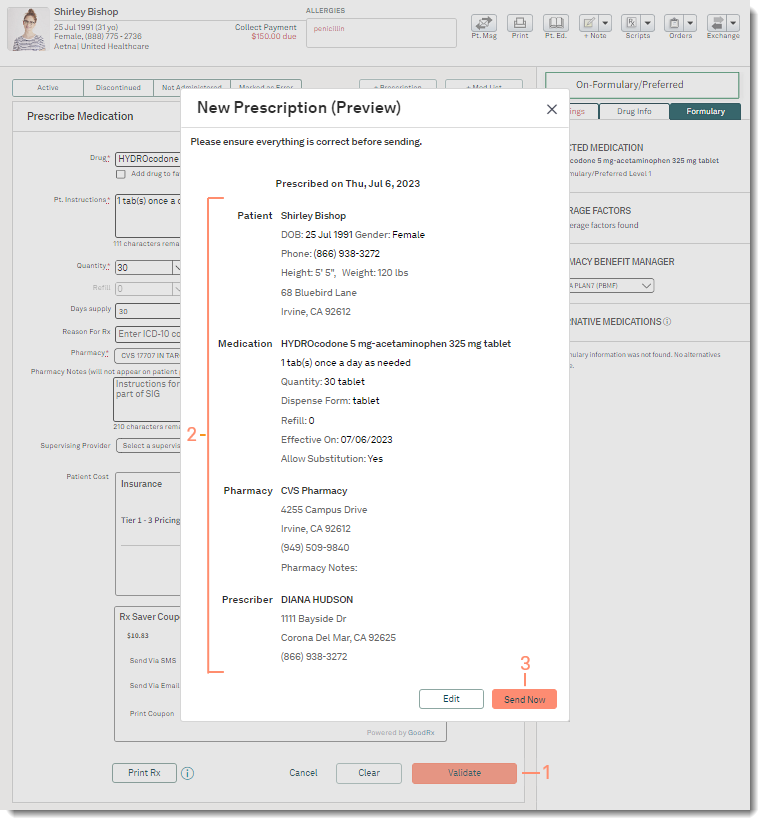
Validate Prescription
- Click Validate to electronically send the controlled substance. The New Prescription (Preview) pop-up window opens.
- To generate a paper prescription, click Print Rx.
- Review the Patient, Medication, Pharmacy, and Prescriber details for accuracy.
- To make changes, click Edit to return to the prescription.
- Click Send Now to proceed. The EPCSGold page opens in a new browser.
|
 |
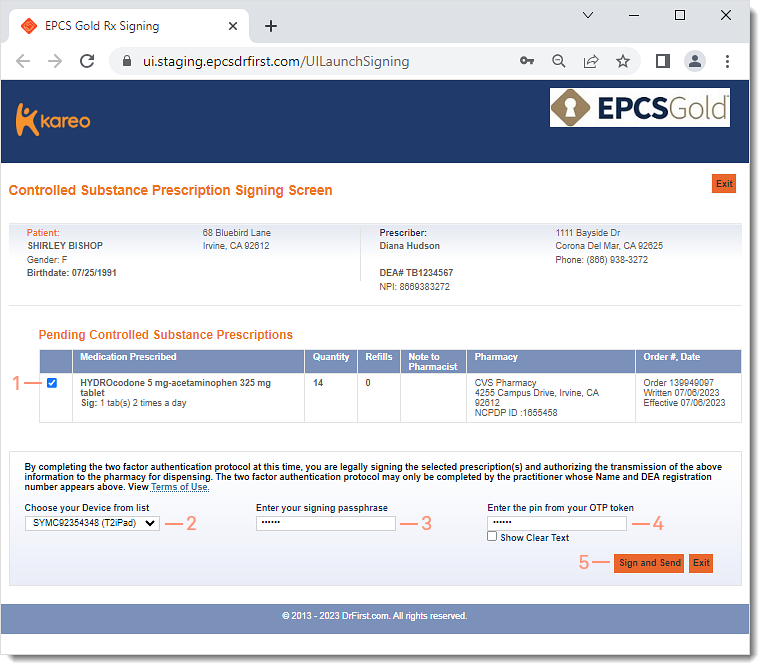
Authenticate Prescription
- Click to select the prescription.
- Select the token Device from the drop down.
- Enter the passphrase created during EPCS user registration.
- Enter the PIN from the token.
Tip: If the PIN is about to expire, wait for the next PIN to generate to avoid repeating this step.
- Click Sign and Send when finished.
|
 |