Updated: 03/26/2024 | Views: 2325
Document the patient's administered vaccines in the office, a previous administered vaccine, or document the reason why a vaccine was not administered. If necessary, order a vaccine to administer at a later date.
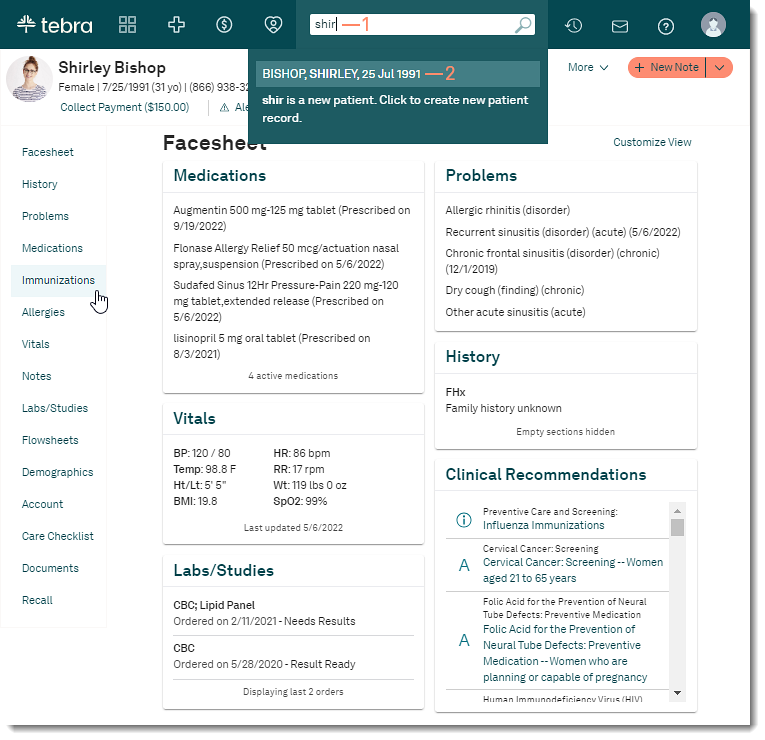
Access Immunizations
- Enter the first 2–3 letters of the patient's name in the top search box.
- Click to select the patient from the auto-populated results. The patient's chart opens.
- Click Immunizations in the left menu. The Immunizations page opens.
- Click + Vaccine to order, administer, add historical, or document not administered vaccines. The Vaccine page opens.
|
 |
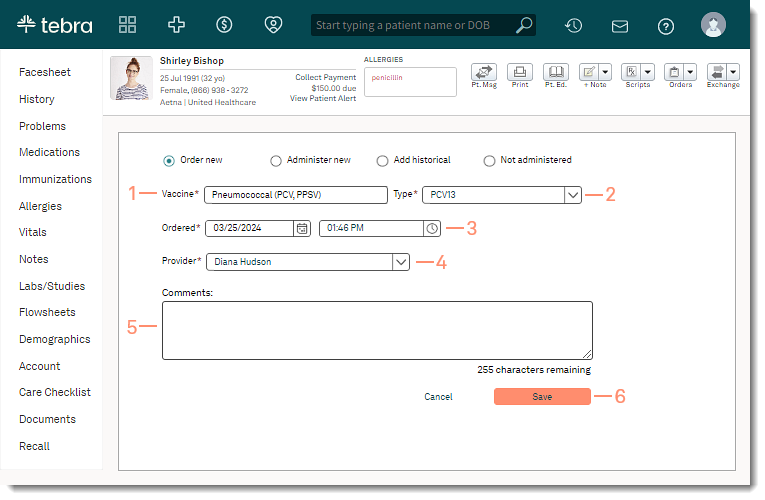
Order New Vaccine
If the vaccine is not available in the office, order the vaccine and document the order in the patient's chart. When the vaccine is available, administer the vaccine.
- Vaccine: Enter the vaccine and select from the auto-populated results.
- Type: Select from the populated drop-down list based on the vaccine selected.
- Ordered: By default, the current date and time populates. If necessary, select a different date or time.
- Provider: Select the who ordered the vaccine be administered from the drop-down list.
- Comments: Optionally, enter applicable notes for the vaccine.
- Click Save when finished.
|
 |
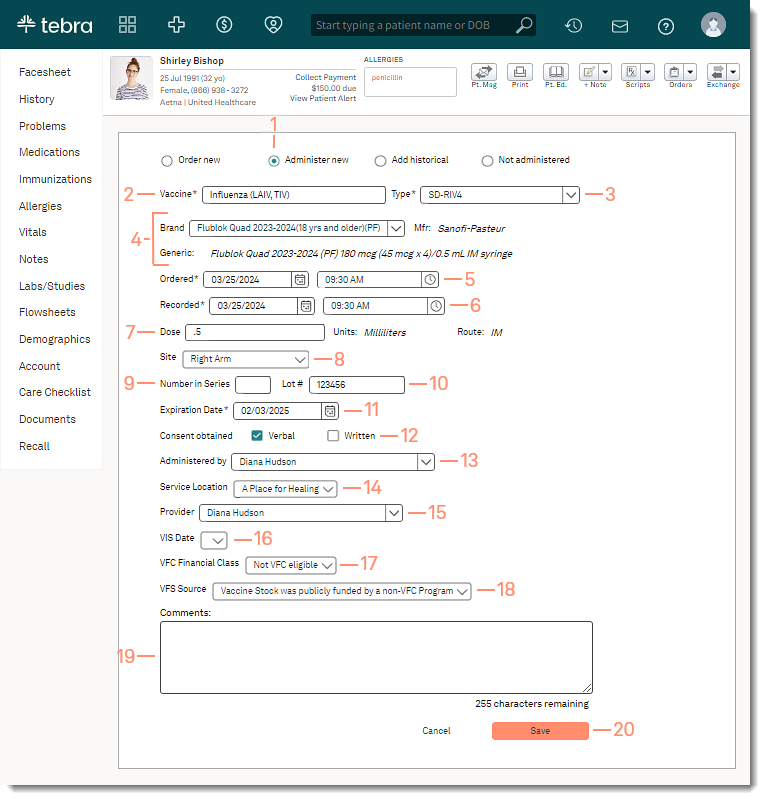
Administer New Vaccine
Document a vaccine that was administered.
- Click to select "Administer New".
- Vaccine: Enter the vaccine and select from the auto-populated results.
- Type: Select from the populated drop-down list based on the vaccine selected.
- Brand: The brand is auto-populated based on the Type selected. If there are more than one brand available, select from the drop-down list.
- Mfr (manufacturer): Auto-populated based upon the Brand selected.
- Generic: Auto-populated based on the Vaccine, Type, and Brand selected.
- Ordered: By default, the current date and time populates. If necessary, select a different date or time.
- Recorded: By default, the current date and time populates. If necessary, select a different date or time.
- Dose: Enter the dose administered.
- The Units and Route fields are auto-populated based on the vaccine selected.
- Site: If applicable, select the location of the injection from the drop-down.
- Number in Series: If the vaccine is a multi-part series, enter the number in the series.
- Lot Number: Enter the vaccine lot number as stamped on the label.
- Expiration Date: Select the vaccine expiration date.
Note: If the vaccine expiration date does not include a specific day, select the last day of the expiration month for documentation.
- Consent obtained: Click to select "Verbal" or "Written" to indicate how consent for the administration was obtained.
- Administered By: Select who administered the vaccine from the drop-down list.
- Service Location: If applicable, select which practice location the vaccine was administered from the drop-down list.
- Provider: Select the who ordered the vaccine be administered from the drop-down list.
- VIS Date: If applicable, select the date of the Vaccine Information Statement from the drop-down list.
- VFC Financial Class: If applicable, select the Vaccine For Children Financial Class from the drop-down list.
- VFS Source: If applicable, select the Vaccine Funding Source from the drop-down list.
- Comments: Optionally, enter applicable notes for the vaccine.
- Click Save when finished.
|
 |
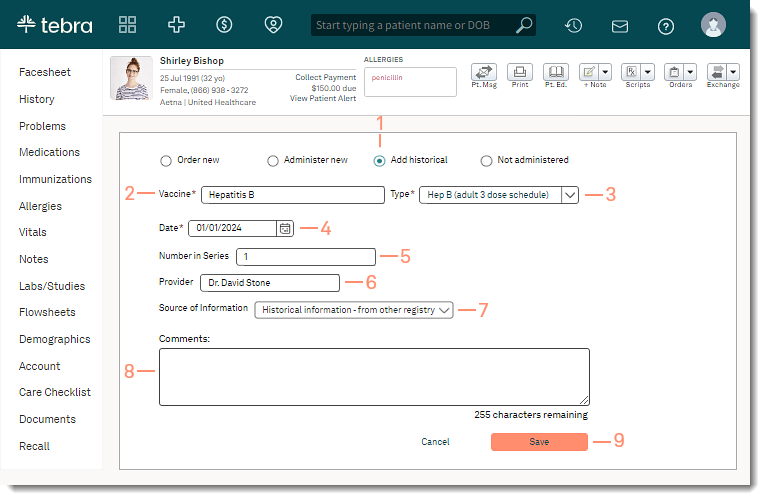
Add Historical Vaccine
Document a vaccine that was previously administered.
- Click to select "Add historical".
- Vaccine: Enter the vaccine and select from the auto-populated results.
- Type: Select from the populated drop-down list based on the vaccine selected.
- Date: Select the date the vaccine was administered.
- Number in Series: If the vaccine is a multi-part series, enter the number in the series.
- Provider: If available, enter the name of the provider who ordered the vaccine.
- Source of Information: Select the how the practice obtained the historical information from the drop-down list.
- Comments: Optionally, enter applicable notes for the vaccine.
- Click Save when finished.
|
 |
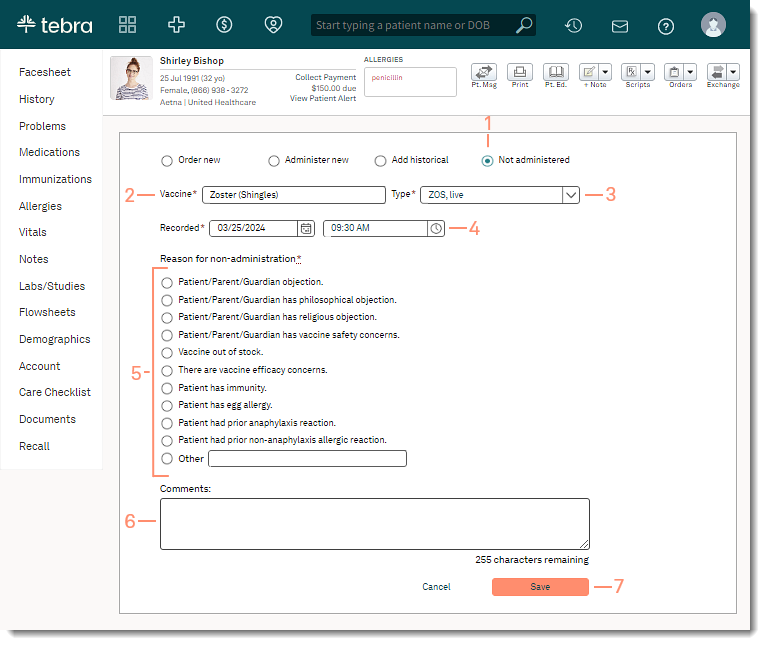
Add Not Administered Vaccine
Document the reason why the vaccine cannot be administered.
- Click to select "Not Administered".
- Vaccine: Enter the vaccine and select from the auto-populated results.
- Type: Select from the populated drop-down list based on the vaccine selected.
- Recorded: By default, the current date and time populates. If necessary, select a different date or time.
- Reason for non-administration: Click to select the why the vaccine was not administered.
- If "Other" is selected, enter the specific reason the patient declined the vaccine.
- Comments: Optionally, enter applicable notes for the vaccine.
- Click Save when finished.
|
 |