Updated: 06/09/2023 | Views: 1265
Patient Education is an integrated function that provides easy access and search capability to patient instructions related to each clinical encounter. Patient Education searches for accurate and up-to-date information based on the patient's gender, age, problems, diagnoses, medications, and labs. You can access Patient Education from the top of a patient's facesheet or from the Plan section of a clinical note.
Review documents sent to the patient's Patient Portal or printed in-office under the Patient Education tab in Documents.
Access Patient Education
- Enter the first 2–3 letters of the patient's name in the top navigation search box.
- Click to select the patient from the auto-populated results. The patient's Facesheet page opens.
- Click the More drop-down arrow and select Send Patient Education. The Patient Education pop-up window opens.
|
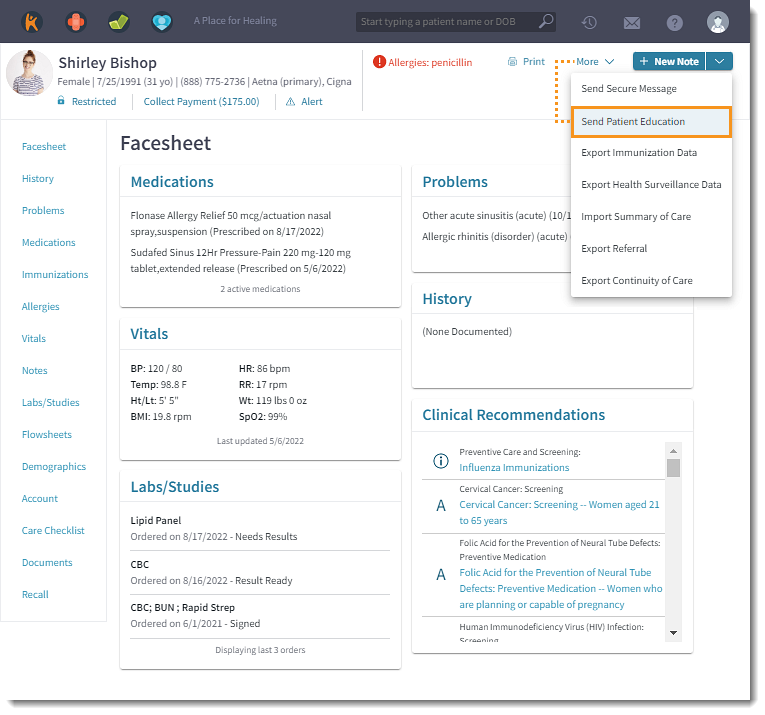 |
Select Patient Education
- Patient Education: Suggested documents related to the patient's problems, diagnoses, medications, and labs auto-populates.
- To find different documents, use Search, A-Z, Categories, Age Range, or Sex.
- Search Term: Populate a term and hit Enter on the keyboard to search.
- A-Z: Click to select an alphabet letter or number to view all documents starting with the specific letter/number.
- Categories: Click the Select Categories drop-down menu to view documents related to the category (e.g., Cardiovascular, Genetics, OB/Gyn, etc.)
- Age Range: By default, the selected age range is based on the patient's date of birth. Click the drop-down menu to select a different age range (e.g., All Ages, Senior (65 and up), etc.).
Note: Click on the Search bar to enable the option to select by age range.
- Gender: By default, the selected gender is based on the patient's sex. Click the drop-menu to select Both Gender, Male, or Female.
Note: Click on the Search bar to enable the option to select a different gender.
- Select Document: Hover over the document name and click the basket icon. The patient education is added to the cart. Repeat to add additional documents.
- To preview the content, click on the document name. The preview opens in the right panel.
- Additional options:
- Print Size: By default, M (medium) font size is select. To print with a bigger font size, click the Print Size drop-down menu to select L (large) or XL (extra large).
- Note: Click the note icon to include additional comments from the patient.
|
 |
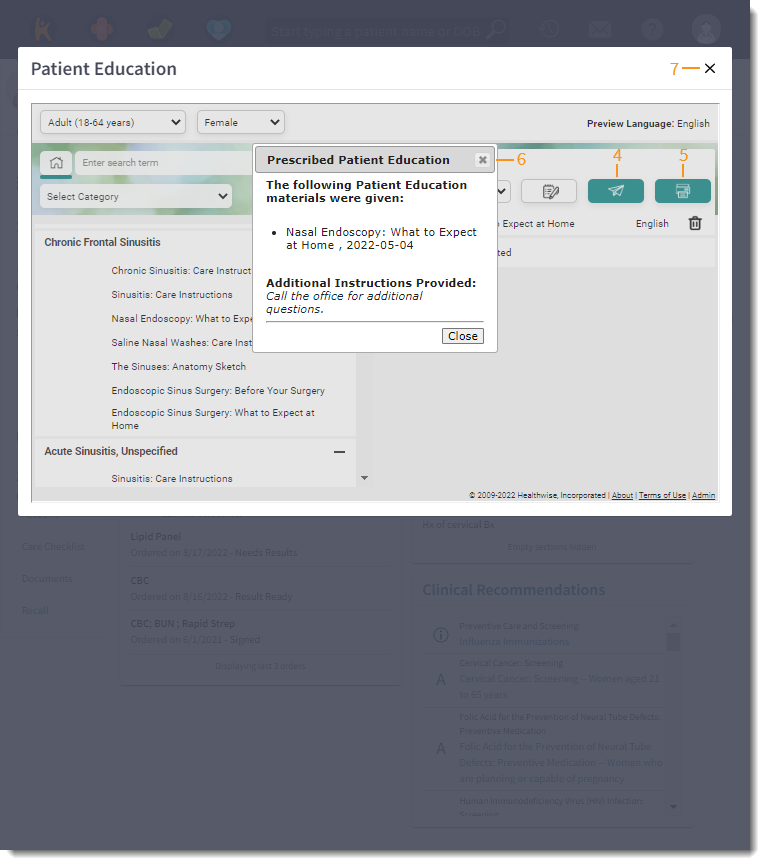
Provide Patient Education
Provide documents by sending and/or printing the patient education.
- To send the patient education to the Patient Portal, click the send icon. The Prescribed Patient Education confirmation window opens. The documents is now available in the patient's portal.
- To print the patient education, click the print icon. The Prescribed Patient Education confirmation window opens and a PDF of the patient education opens in a new browser tab. Use the browser printer function to print the document.
- Click Close on the Prescribed Patient Education confirmation window.
- Click X to close the Patient Education pop-up window.
|
 |