Navigate eLab Create Order Window
- Last updated
-
-
Save as PDF
Updated: 03/14/2024 | Views: 2240
After an eLab order is created, the order will be processed through the Create Order window.
This eLab order window is only available for existing providers who were already enrolled with eLabs prior to March 15, 2024. For new practices enrolled with eLabs after March 15, 2024, review Process eLab Order to learn more.
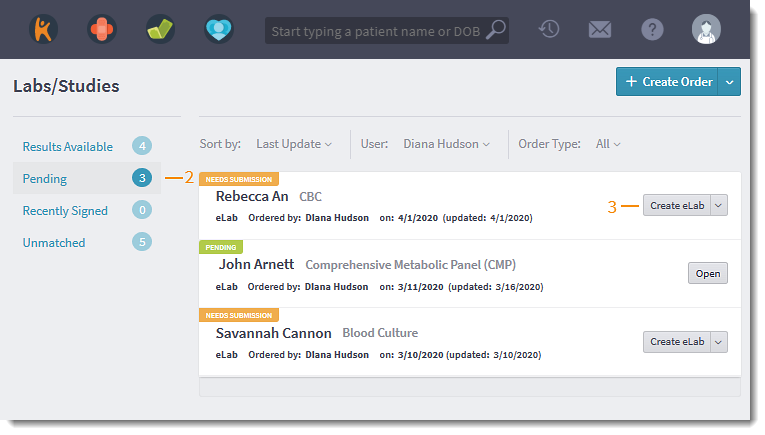
Access eLab Order
- Hover over the Clinical icon and click on Labs/Studies. The Labs/Studies page opens.
- Click Pending. Pending lab orders displays.
- Click Create eLab. The Create Order pop-up window opens.
|
 |
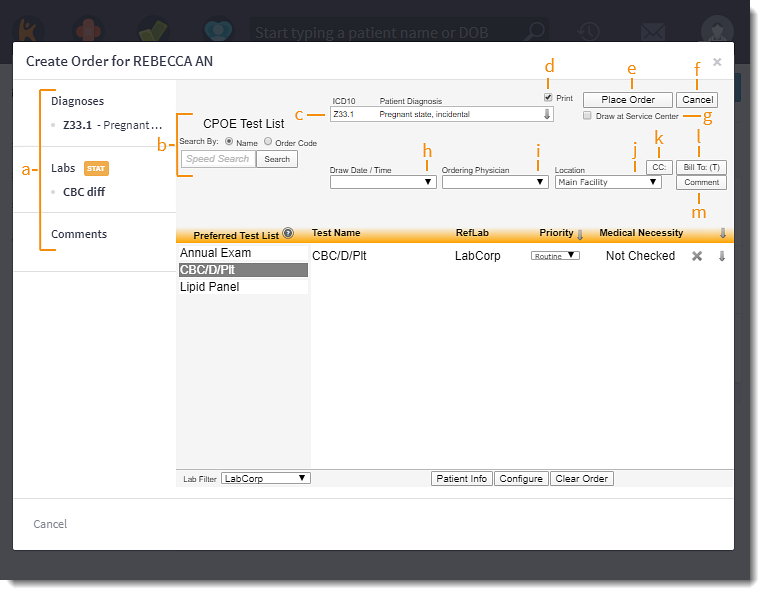
Navigate Create Order
- Order Details: Patient diagnoses, lab(s) request, priority level, and comments entered by the provider in the order.
- Search: If necessary, search for and select the test by Name or Order Code.
- ICD10: The patient diagnosis auto-populates from the lab order.
- Print: Print a PDF of the lab order for the patient or to send a hard copy with a sample to the lab. For Medical patients, the PDF will include an ABN. If a hard copy or ABN is not required, click to clear the selection.
- Place Order: Click when all necessary fields are entered to place the eLab order.
- Cancel: Click to close the window and to cancel the eLab order. The order will be removed from the Pending tab of Lab/Studies.
- Draw at Service Center: Click to select if blood will be drawn at an offsite lab facility.
- Draw Date/Time: If necessary, enter the draw date and time.
- Ordering Physician: Click to select a physician.
- Location: The Main Facility refers to the practice location.
- CC: Click to search for and select another provider to receive results for this lab.
- Bill To: The lab order is billed to the responsible party listed on the patient’s chart (e.g., insurance). Click to change the responsible party, if desired.
- Comment: Click to add an optional comment or instruction for the lab.
|
 |
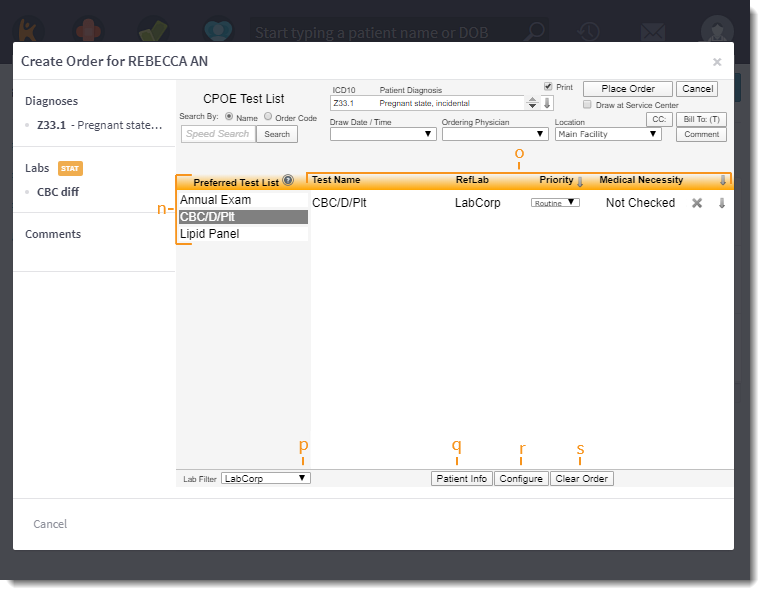
- Preferred Test List: A custom test list created by the practice for lab tests commonly ordered with the selected lab facility. Click on the test name(s) to add to the order.
- Selected Test: The selected lab test(s) to order for the patient.
- Test Name: The name of the test.
- RefLab: The name of the lab the order will be sent to.
- Priority: By default, the priority is set to Routine. Click to select a different priority: Stat, ASAP, or Pre-Op. If there are multiple test in the order, click the down arrow to set the priority for all test.
- Medical Necessity: For Medical patients, medical necessity is automatically when the order is placed. Select "Print" to generate an ABN.
- Remove: Click X to remove the test from the order.
- Test Details: Click the down arrow to view additional details.
- Lab Filter: Click to select the lab the order will be sent to.
Note: If the lab does not appear in the list, it is not set up as an eLab partner with the practice.
- Patient Info: Click to view the patient's demographics and insurance information.
- Configure: Click to create custom preferences for eLab ordering processing.
- Clear Order: Click to reset to the order window to default.
|
 |