Capture Charge from Clinical Note
- Last updated
-
-
Save as PDF
Updated: 03/27/2024 | Views: 5389
The Clinical Charge Capture enables you to capture a comprehensive list of charges for the exam, procedures, supplies, and other goods and services provided during the patient's visit.
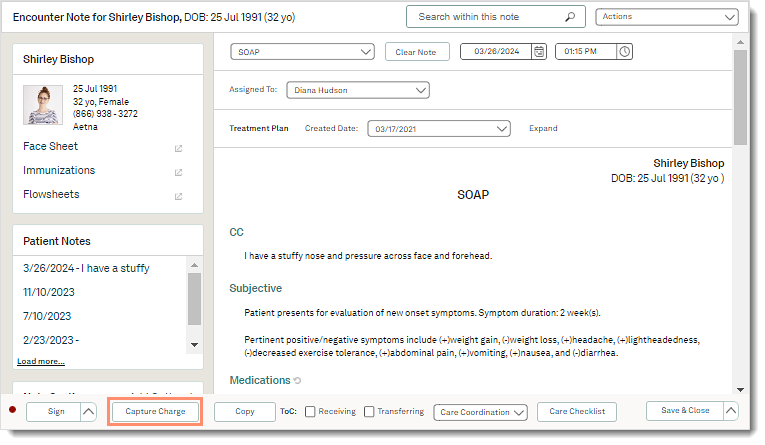
Creating a charge can be done in stages and by more than one person. It starts with clicking the Capture Charge button at the bottom of the note and ends with submitting the bill. Access the charge as often as needed to make changes until the charges are finalized and submitted for billing. The progress of the charge captures can be view on the Charges dashboard.
If the patient is a self pay patient, review Self-Pay Charge Capture from Clinical Note to learn how users with the appropriate permissions can apply patient payments and approve the charge.
Access Capture Charge
- Enter the first 2–3 letters of the patient's name or date of birth (mm/dd/yyyy) in the top navigation bar search box.
- Click to select the patient from the auto-populated results. The patient's Facesheet page opens.
- Click Notes. The Notes page opens.
- Click Open next to an existing note or create a new note.
 Tip: It is recommended to create the note from the patient appointment to auto-populate appointment details. Tip: It is recommended to create the note from the patient appointment to auto-populate appointment details.
- Click Capture Charge. The Charge Capture page opens.
|
 |
Create Charge Capture
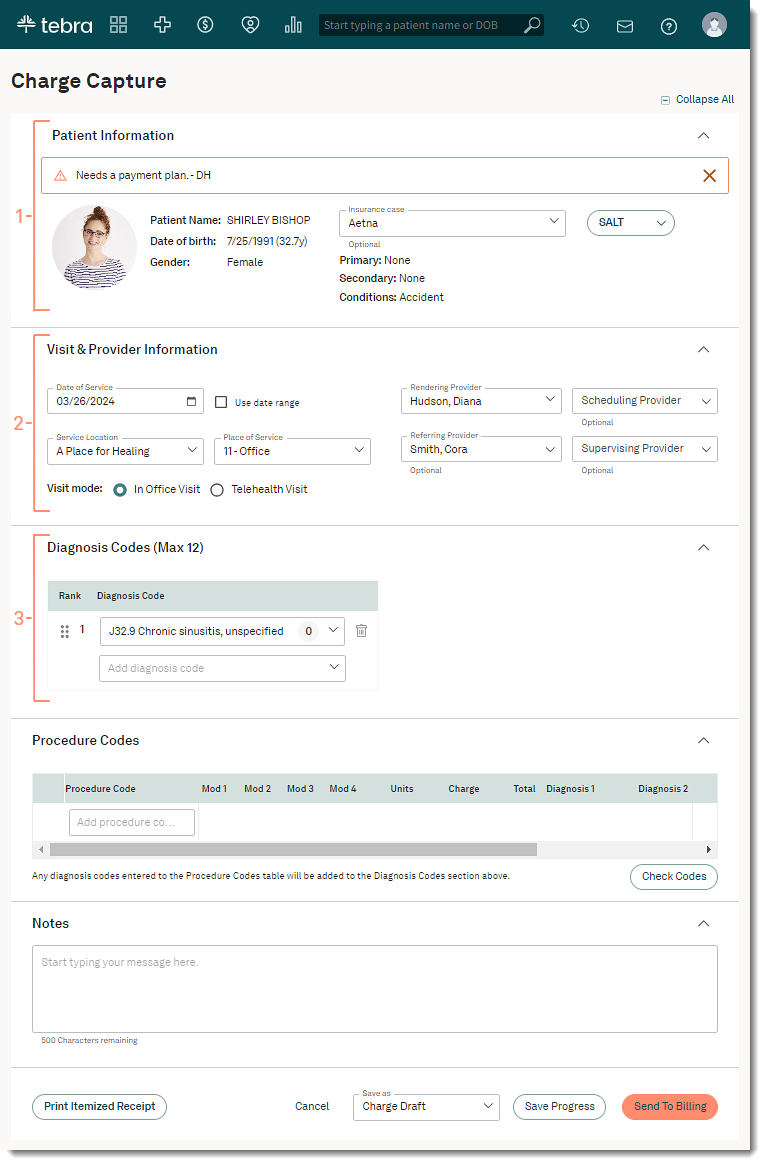
The charge capture is auto-populated with details pulled from the clinical note and/or associated appointment.
Note: The sections of the Charge Capture are collapsible. Click Collapse All to hide all sections or click the up arrow in the section header to collapse that specific section.
- Patient Information: Review and verify the patient demographics.
- Patient Alert: The patient alert displays, when documented.
- Patient Demographics: The patient's name, date of birth, and gender displays.
- Insurance Case: The patient's Primary, Secondary, and Conditions information displays based on the selected insurance case from the associated appointment.
- If an appointment is not associated to the note, the patient's primary insurance case is selected.
- If applicable, select a different insurance case from the Insurance case drop-down.
- SALT (Same As Last Time): To copy the Referring Provider, Diagnosis and Procedure codes from a previous charge, click SALT and select the previous charge date from the drop-down list. Then, complete the charge as necessary.
- Visit & Provider Information:
- Date of Service: The date of service from the note is selected.
- To use a date range, click to select "Use date range". Then, enter the End Date.
- Service Location and Place of Service: The service location from the associated appointment is selected. The place of service auto-populates based on the selected location.
- Rendering Provider: The assigned to provider from the note is selected.
- If applicable, select a different provider from the Rendering Provider drop-down.
Note: The Assigned To provider in the note does not update when a different rendering provider is selected in the charge.
- Optionally, select a Scheduling, Referring, and/or Supervising Provider.
- If a referring provider is populated in the selected insurance case, the associated Referring provider displays.
- If a referring provider is not populated in the insurance case, the referring provider from the patient chart displays.
- Visit mode: The appointment mode from the associated appointment is selected.
- If an appointment is not associated to the note, "In-Office" is selected by default. To indicate this charge is for a telehealth visit, select "Telehealth Visit".
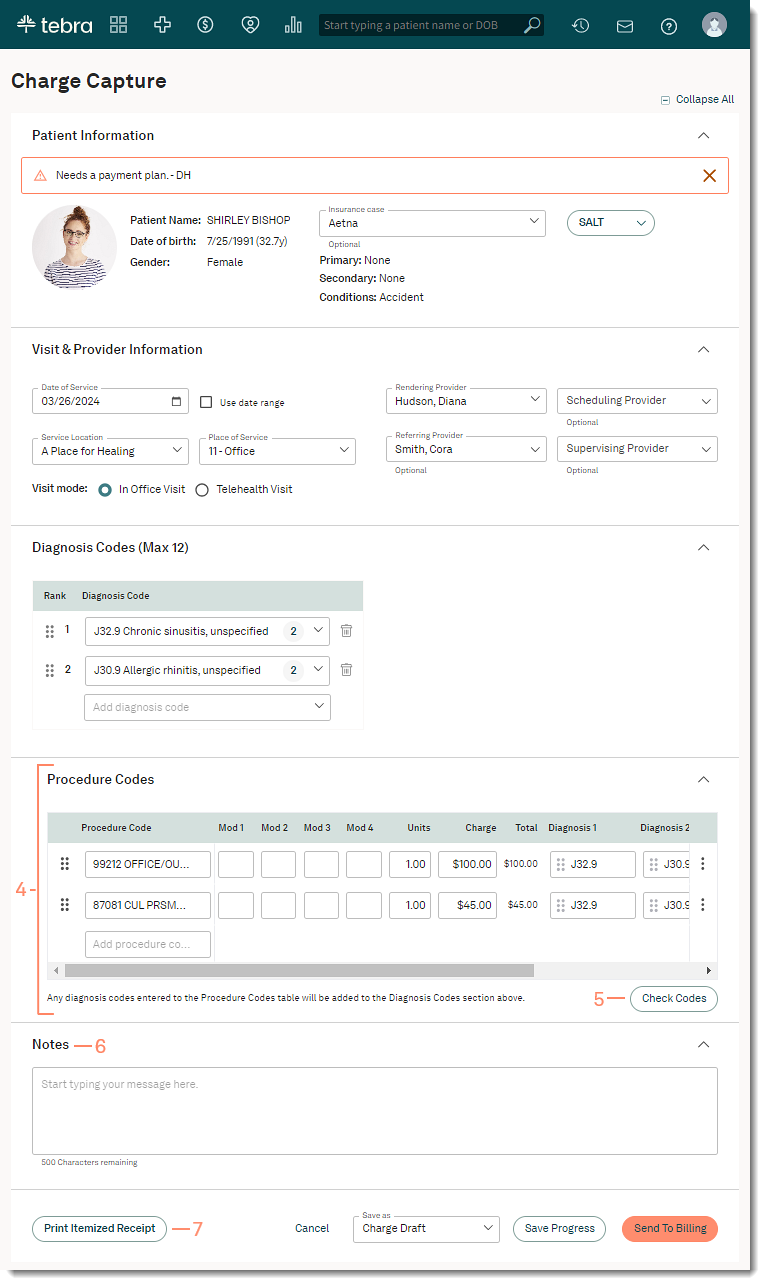
- Diagnosis Codes: ICD codes is pulled from the Assessment section of the note into the Diagnosis Code section of the charge.
Note: The badge number indicates the amount of procedure code(s) the diagnosis code is mapped to.
- If applicable, codes can be added, reordered, or removed.
Note: Codes added or deleted in the charge will need to be manually updated in the note.
- To add a diagnosis code, type at least three characters of the code or name. Then, select the code from the results drop-down list.
- To reorder the diagnosis codes in the list, click and drag the bar icon up or down under the Rank column.
- To remove a diagnosis code from the list, click the trash icon.
|
 |
- Procedure Codes: Procedure codes (E/M, CPT and HCPCS) capture the level and complexity of care provided to the patient during the visit.
- Procedure Code: Enter at least three characters of the code or name. Then, select the code from the results drop-down list.
Tip: Use code favorites or visit reasons to aid in efficiency when adding procedure codes.
- If the associated appointment's visit reason is configured with default procedure code(s), the charge capture auto-populates the procedure code(s).
- Modifiers: Enter or select up to four applicable modifier codes.
- Units: By default, 1 unit is populated. If necessary, update the amount of units.
- Charges: Enter the charge amount. For Billing subscribers, charge amounts may auto-populate based on the practice's Contract Rates or Standard Fees Schedule.
- Total: The calculated amount based on the Units multiplied by the Charge.
- Diagnosis Codes: If necessary, add, remove, or reorder diagnosis codes (1 - 4) of each procedure code.
- To add a diagnosis code, type at least three characters of the code or name. Then, select the code from the results drop-down list. Up to 12 diagnosis code can be added to the charge.
Note: The new diagnosis code is also added to the Diagnosis Code section.
- To reorder the diagnosis codes, click and drag the bar icon left or right to the appropriate position.
- To remove a diagnosis code from the procedure code, selete the diagnosis code and press Delete on the keyboard.
- Reorder: To reorder the procedure lines in the list, click and drag the bar icon up or down under the first column.
- More Options: Click the icon to display additional options.
- Duplicate Row: Click to create a new procedure line with the same details in the row.
- Refresh fee: Click to refresh the charge amount of the specific procedure line based on the practice's Contract Rates or Standard Fees Schedule.
- Refresh all fees: Click to refresh the charge amounts for all procedure lines based on the practice's Contract Rates or Standard Fees Schedule.
- Delete: Click to remove a procedure line from the list.
- Check Codes: To perform a code validation, click Check Codes. A green Codes successfully checked notification appears on the bottom right of the page when no errors are found.
- If a warning or error is found, an alert appears. Make the appropriate corrections then click Check Codes to confirm the error is fixed.
- Notes: If applicable, enter any notes related to the charge. Notes entered here also display in the Medical Office Notes section of the encounter in the Desktop Application (PM).
- Print Itemized Receipt: To print or download an itemized receipt for out-of-network (OON) billing, health savings account (HSA), or flexible spending account (FSA) purposes, click Print Itemized Receipt. The itemized receipt includes information such as provider name, practice tax ID, services provided, charge amounts, patient payments, diagnoses, and the option to include provider NPI and notes.
Note: The Print Itemized Receipt feature also saves the charge.
|
 |
Save Charge Capture
Save the charge with a status to indicate the progression of the charge capture and to continuing editing.
Send the charge to the biller to finalize the charge capture. The charge will be sent to the Desktop Application (PM) as a draft encounter for billing and users will no longer be to edit the charge. However, the biller can edit the encounter in the Desktop Application (PM) if revisions are required.
- To save the progress of the charge and allow additional revisions, select one of the following statuses from the Save As drop-down menu. Then, click Save Progress. The patient's clinical note reopens.
Note: Available options depend on the user's role(s).
- Charge Draft: The charge was just created or is currently being worked on.
- Pending Charge Approval: The charge is ready to be reviewed for approval (to be submitted to billing) and can be edited as necessary.
- Pending Charge Rework: The charge needs to be updated or requires corrective actions.
- To finalize the charge capture, click Send To Billing. The patient's clinical note reopens. The charge is sent to the Desktop Application (PM) and can no longer be edited.
|
 |