View and Edit Self-Pay Charge Capture
- Last updated
-
-
Save as PDF
Updated: 06/26/2023 | Views: 1247
Users with the appropriate permissions can access and edit a self-pay charge as often as needed until the charge is approved. Once approved, the charge is placed under the Approved by Biller status of the Charges page as read-only and cannot be modified.
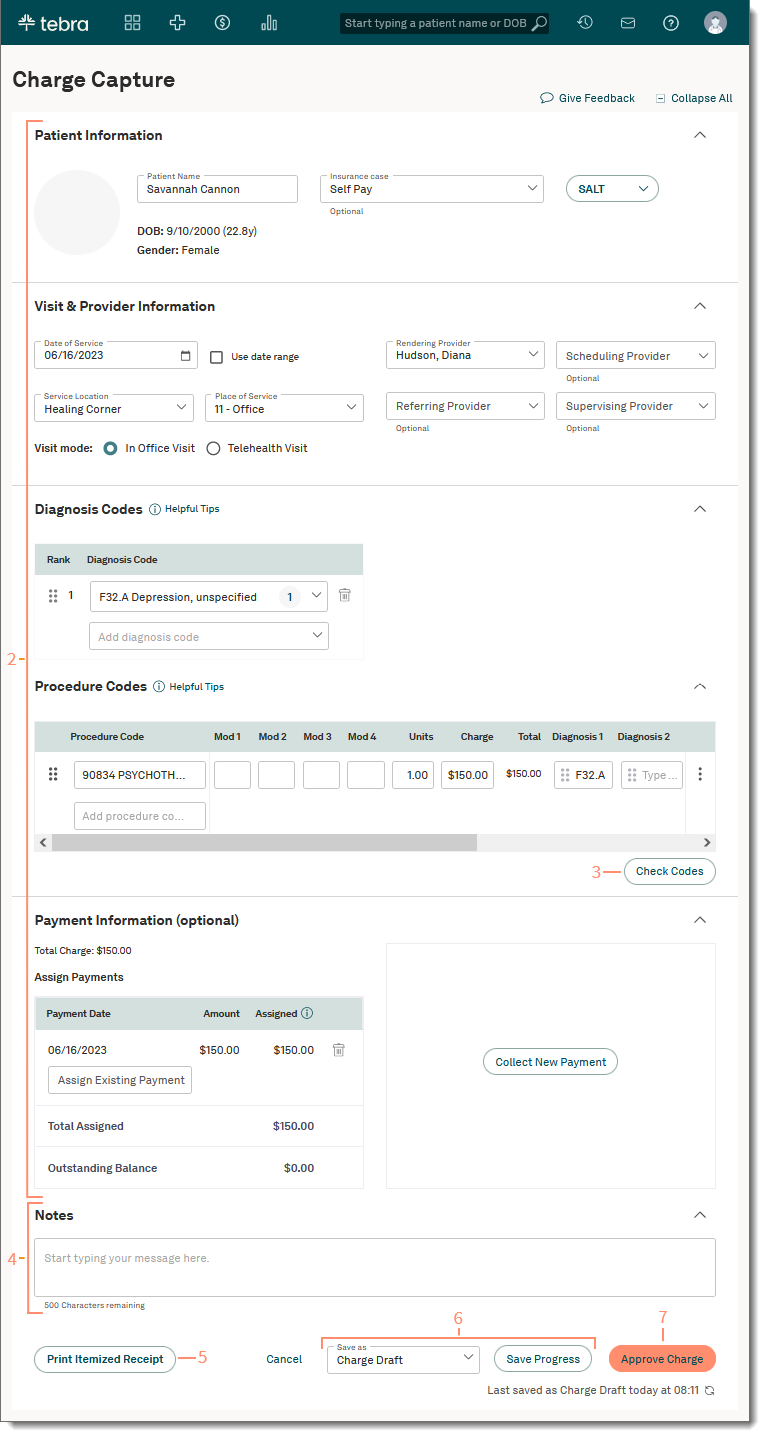
View/Edit Self-Pay Charge Capture
- Access Charges then find the self-pay charge and click to open it. The Charge Capture page opens.
- Review the Patient Information, Visit & Provider Information, Diagnosis Codes, Procedure Codes, and Payment Information sections and make any necessary edits.
Note: For more information about these sections, review New Self-Pay Charge Capture.
- Check Codes: To perform a code validation, click Check Codes. A green Codes successfully checked notification appears on the bottom right of the page when no errors are found.
- If an error is found, a red error alert appears. Make the appropriate corrections then click Check Codes to confirm the error is fixed.
- Notes: If applicable, enter any notes related to the charge. Notes entered here also display in the Medical Office Notes section of the encounter in the Desktop Application (PM).
- Print Itemized Receipt: To print or download an itemized receipt for health savings account (HSA) or flexible spending account (FSA) purposes, click Print Itemized Receipt. The itemized receipt includes information such as provider name, practice tax ID, services provided, charge amounts, patient payments, diagnoses, and the option to include provider NPI and notes.
Note: The Print Itemized Receipt feature also saves any changes made to the charge and will reflect information (e.g., NPI, Tax ID, State License Number) entered as overrides for the provider's general claim settings and advanced settings in the Desktop Application (PM).
- If necessary, select one of the following options from the drop-down menu. Then, click Save Progress.
Note: Available options depend on the user's role(s).
- Charge Draft: The charge was just created or is currently be worked on.
- Pending Charge Approval: The charge is ready to be reviewed for approval (to be sent to billing) and can be edited as necessary.
- Pending Charge Rework: The charge needs to be updated or requires corrective actions.
- Submit To Billing: The charge has been completed and confirmed for submission to the Desktop Application (PM) for billing. The charge is submitted to the biller and can no longer be edited.
- Approve Charge: Available based on the user's role(s) and permissions. If the charge is complete and does not need to be reviewed further for approval, click Approve Charge. The charge is moved to the Approved by Biller status of the Charges page as read-only and can no longer be edited. The charge is also submitted to the Desktop Application (PM), placed under the Approved encounters, and one or more claims associated with the encounter are created.
Note: For Self-Pay Only enabled practices, approved charges can be unapproved based on the user's permissions. Unapproving a charge moves the charge to the Pending Billing Approval status of the Charges page and retains payments assigned in the Payment Information section of the charge capture. However, the associated claim(s) and payment(s) in the Desktop Application (PM) will be deleted.
|
 |