Updated: 09/29/2023 | Views: 16088
The Action menu provides quick access to a variety of claim management options. An action can be applied to a single claim or in bulk when applicable. For added workflow efficiency, you can use keyboard shortcuts to initiate an action without accessing the menu.
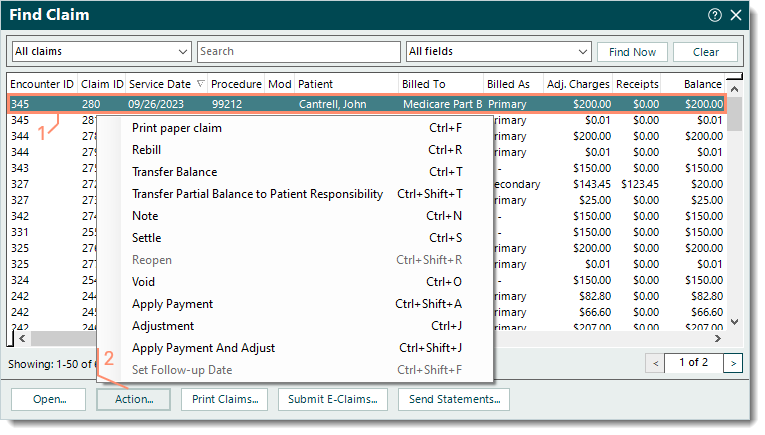
Single Claim Action
A claim action can be applied to an individual claim from the Find Claim or Edit Claim window. The available actions depend on the selected claim's current status.
- Find the claim and click once to select it.
- To review more claim details first (e.g., transaction history), double click to open the claim. The Edit Claim window opens. Then, click Action on the bottom menu bar and select the appropriate claim action when ready.
- Once the claim is selected, right click or click Action on the bottom menu bar and select the appropriate claim action.
|
 |
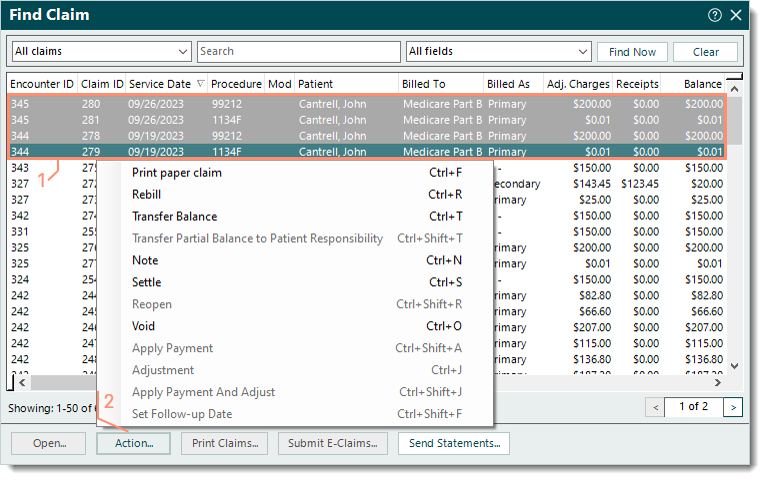
Bulk Claim Action
Claim actions can be applied in bulk when necessary from the Find Claim window. Only actions that can be applied to all selected claims are available for selection (e.g., Transfer Balance is available if all selected claims are associated with the same patient and payer).
Note: Other actions that can be applied to all claims with the appropriate status are available on the bottom menu bar: Print Claims for mailing, Submit E-Claims for electronic claims submission, and Send Statements for patient statement billing options.
- Find the claims then click and drag to select them.
- For a large range, click once to select the first claim in the range, hold down the Shift key on the keyboard and click once to select the last claim in the range. The first, last and all claims in between are selected.
- To select one claim at a time for claims that are not in a consecutive order, hold down the Ctrl key on the keyboard and click once to select each individual claim.
- Once the claims are selected, right click or click Action on the bottom menu bar and select the appropriate claim action.
|
 |
Claim Actions
The table below provides detailed information and keyboard shortcuts for each claim action. Using keyboard shortcuts can help save you time and improve your workflow efficiency by directly initiating a specific claim action without accessing the menu. To use a shortcut, simply select the claim(s) on the Find Claim window and enter the action's corresponding shortcut keys.
Note: Always verify the information entered is correct prior to applying a claim action where applicable. Once applied, the transaction line is posted and automatically saved.
| Action |
Shortcut Keys |
Description |
| Print Paper Claim |
Ctrl+F |
Opens the option to print the claim(s). For more information, review Print Paper Claims. |
| Rebill |
Crtl+R |
Opens the Transaction panel to rebill the claim(s). For more information, review Rebill Claims. |
| Transfer Balance |
Ctrl+T |
Opens the Transaction panel to transfer the entire claim balance(s). For more information, review Transfer Balance to Patient or Payer. |
| Transfer Partial Balance to Patient Responsibility |
Ctrl+Shift+T |
Opens the Transaction panel to transfer a specific amount of the claim balance to the patient's responsibility. For more information, review Transfer Balance to Patient or Payer. |
| Note |
Ctrl+N |
Opens the Transaction panel to add internal notes related to the claim(s). Enter the following information as necessary then click Apply.
- Type: Auto-populates with 7 - Note.
- Posting Date: Defaults to the current date. If necessary, enter a different date.
- Note: Internal notes related to the claim that will display when viewing transaction line details.
|
| Settle |
Ctrl+S |
Opens the Transaction panel to settle the claim(s). Enter the following information as necessary then click Apply.
- Type: Auto-populates with 8 - Settle.
- Posting Date: Defaults to the current date. If necessary, enter a different date.
- Adjustment Code: Click the drop-down arrow and select the appropriate code if applicable.
- Notes: Internal notes related to settling the claim(s) that will display when viewing transaction line details.
|
| Reopen |
Ctrl+Shift+R |
Opens the Transaction panel to reopen the Completed claim(s) and updates the status (depending on the status of the claim(s) when previously settled). Enter the following information as necessary then click Apply.
- Type: Auto-populates with 10 - Reopen.
- Posting Date: Defaults to the current date. If necessary, enter a different date.
- Notes: Internal notes related to reopening the claim(s) that will display when viewing transaction line details.
|
| Void |
Ctrl+O |
Opens the Transaction panel to void the claim(s). Enter the following information as necessary then click Apply.
- Type: Auto-populates with 9 - Void.
- Posting Date: Defaults to the current date. If necessary, enter a different date.
- Override: To override a pre-set closing date, click to select "Override".
- Notes: Internal notes related to voiding the claim(s) that will display when viewing transaction line details.
|
| Apply Payment |
Ctrl+Shift+A |
Opens the Transaction panel to apply a payment to the claim. Enter the following information as necessary then click Apply.
- Type: Auto-populates with 1 - Apply Payment.
- Posting Date: Defaults to the current date. If necessary, enter a different date.
- Payment: Click Payment to search and select the appropriate Payment record.
- Unapplied: Auto-populates with the unapplied balance amount of the associated Payment record.
- Paid: The amount of the payment to apply to the selected claim.
- Change Status: Click the drop-down arrow to select the appropriate status update.
- Note: Internal notes related to the payment that will display when viewing transaction line details.
|
| Adjustment |
Ctrl+J |
Opens the Transaction panel to post a claim adjustment. Enter the following information as necessary then click Apply.
Note: To post an adjustment on a specific Payment record or Claim record, review Post Adjustment.
- Type: Auto-populates with 2 - Adjustment.
- Posting Date: Defaults to the current date. If necessary, enter a different date.
- Adjustment: The amount that needs to be adjusted.
- Adjustment Code: Click the drop-down arrow and select the appropriate code.
- Reason Code: Click the drop-down arrow and select the appropriate code for the balance.
- Change Status: Click the drop-down arrow to select the appropriate status update.
- Related Payment: Click Payment to search and select the appropriate Payment record if applicable.
- Note: Internal notes related to the adjustment that will display when viewing transaction line details.
|
| Apply Payment And Adjust |
Ctrl+Shift+J |
Opens the Transaction panel to apply a payment and an adjustment to the claim. Enter the following information as necessary then click Apply.
- Type: Auto-populates with 0 - Apply Payment And Adjust.
- Posting Date: Defaults to the current date. If necessary, enter a different date.
- Payment: Click Payment to search and select the appropriate Payment record.
- Unapplied: Auto-populates with the unapplied balance amount of the associated Payment record.
- Paid: The amount of the payment to apply to the selected claim.
- Adjustment: The amount that needs to be adjusted.
- Adjustment Code: Click the drop-down arrow and select the appropriate code.
- Reason Code: Click the drop-down arrow and select the appropriate code for the balance.
- Change Status: Click the drop-down arrow to select the appropriate status update.
- Note: Internal notes related to the payment and adjustment that will display when viewing transaction line details.
|
| Set Follow-up Date |
Ctrl+Shift+F |
Opens the Transaction panel to set a follow-up date for the claim(s). Enter the following information as necessary then click Apply.
Note: A follow-up date cannot be set for claims under the Rejected status.
- Type: Auto-populates with 11 - Set Follow-up Date.
- Follow-up Date: Defaults to the current date. Enter the follow-up date for the claim(s).
- Note: Internal notes related to following up on the claim(s) that will display when viewing transaction line details.
When applied, the claim(s) with a set follow-up date are under the Pending Insurance status until the follow-up date is reached. Once the date is reached, previously denied claims revert back to the Denied status, and all other claims update to the No Response status. |