Updated: 09/19/2023 | Views: 1848
Some situations require an adjustment reversal (e.g., the insurance reprocessed a claim). Once the adjustment amount is reversed, you can either repost the correct adjustment amount or leave the balance if the claim needs to be rebilled.
There are two common workflows:
- Reverse an adjustment related to a specific Payment record and use that payment's posting date.
- Reverse the adjustment on the Claim record to use the current posting date, and if applicable, relate the adjustment to a specific Payment record.
Reverse Adjustment on Payment Record
Follow the steps below to locate and open the specific Payment record (related to the the adjustment that needs to be reversed) then post the reversal of the adjustment amount(s).
Note: This workflow is typically used for reversing adjustments related to insurance payment reversals.
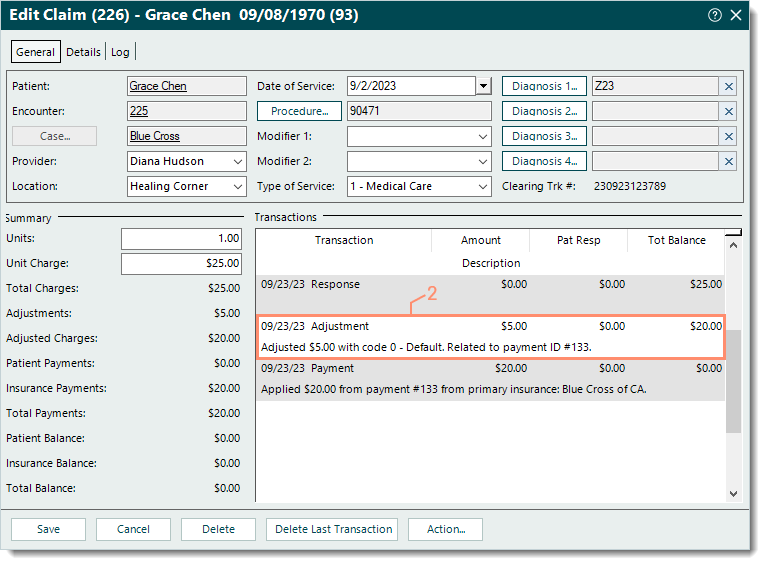
- Find the claim with the adjustment that requires the reversal then double click to open. The Edit Claim window opens.
- If the Payment record details (e.g., payment ID, check number, payer) are available, find the payment and double click to open it. The Edit Payment window opens then proceed to step 3.
 Tip: To return more accurate payment search results, select the All tab, use the Look For search bar to enter all or part of a keyword for the payment, and click to clear "Show unapplied only" as needed. Then, click Find Now. Tip: To return more accurate payment search results, select the All tab, use the Look For search bar to enter all or part of a keyword for the payment, and click to clear "Show unapplied only" as needed. Then, click Find Now.
- Under the Transactions section, double click the Adjustment transaction line to open the Payment record the adjustment is related to. The Edit Payment window opens.
Note: The Adjustment transaction line description includes the posted adjustment amount, adjustment code, and Payment ID number.
|
 |
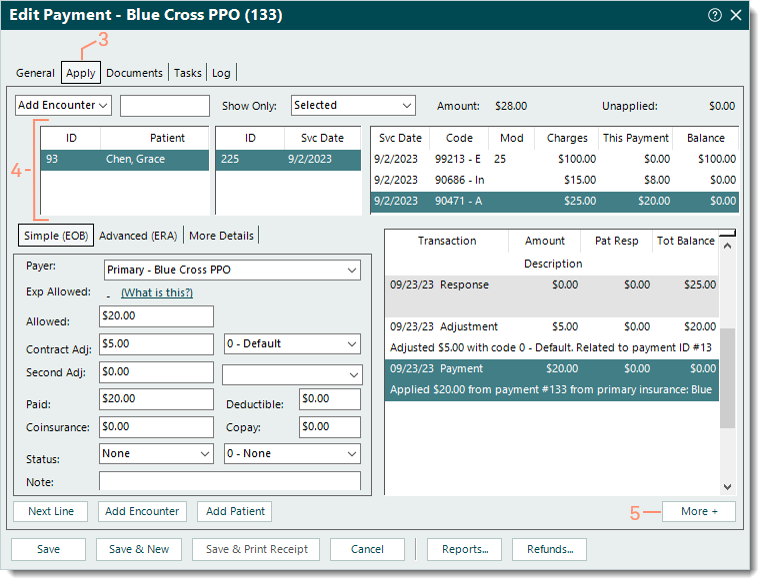
- Select the Apply tab. The additional payment details display.
- Click to select the appropriate patient, encounter, and/or service line with the posted adjustment amount that requires the reversal as necessary.
- Click More + in the lower right of the window. Additional options display.
- If the service line was settled, click the drop-down arrow and select Reopen. Then, click Post.
|
 |
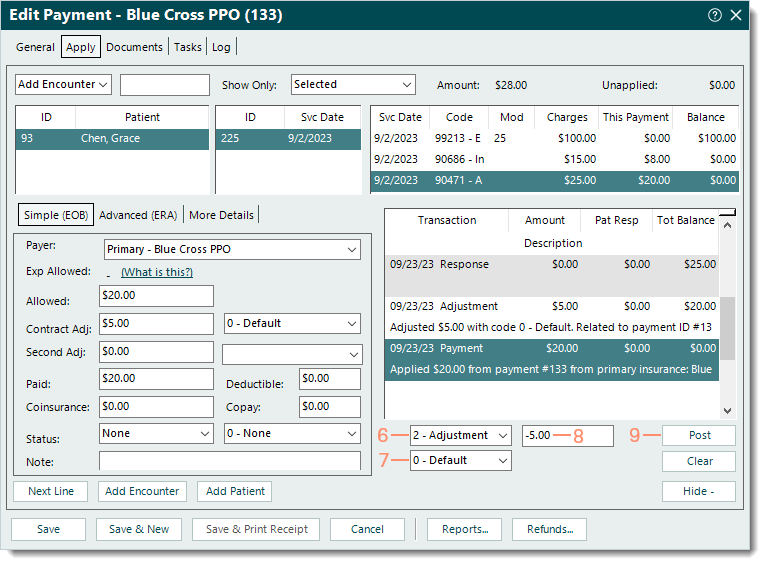
- Click the drop-down arrow and select 2 - Adjustment. Once selected, additional fields become available.
- Click the drop-down arrow and select the adjustment code previously used to post the adjustment amount.
- Enter the minus (-) sign and the adjustment amount that needs to be reversed (e.g., -12.34).
- Click Post. The Adjustment transaction line is posted.
|
 |
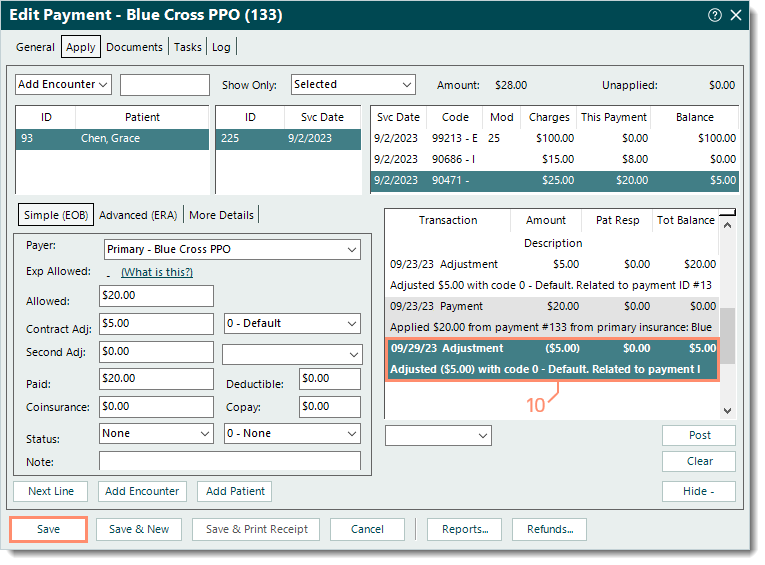
- Confirm the posted transaction line(s) are correct and reflects the adjustment amount(s) reversed.
- If the posted transaction line needs to be removed, right click on the transaction line then select Remove.
- For additional actions (e.g., add note, settle service line, transfer balance), click the drop-down arrow to select the appropriate option and enter information as necessary. Then, click Post.
Note: It is recommended to add a note indicating the reason for the reversal.
- When finished, click Save. The adjustment amount is now reversed and part of the total balance due.
|
 |
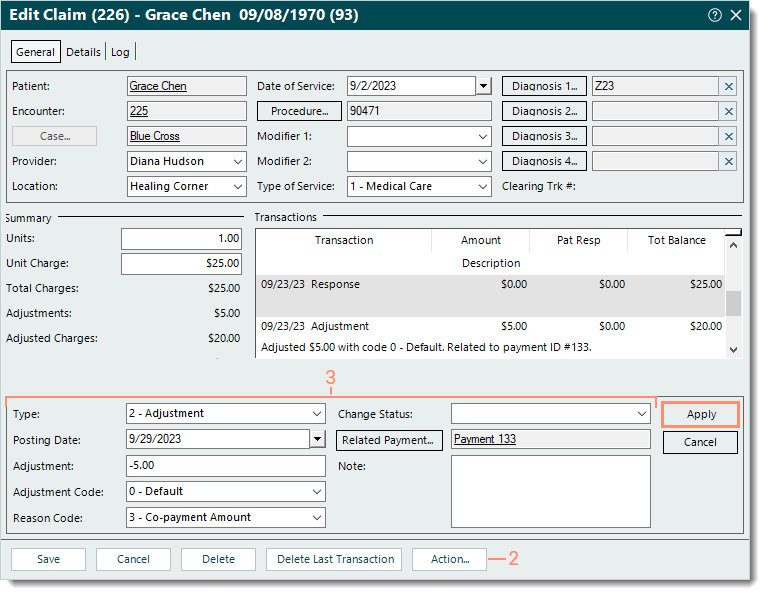
Reverse Adjustment on Claim Record
Follow the steps below to reverse an adjustment on the Claim record using the current posting date, and if applicable, relate the adjustment to a specific Payment record.
- Find the claim with the adjustment that needs to be reversed then double click to open. The Edit Claim window opens.
- Click Action and select Adjustment from the menu. The Transaction panel displays.
- Enter the information.
- Type: Defaults to 2 - Adjustment.
- Posting Date: Defaults to the current date. If necessary, enter a different posting date.
- Adjustment: Enter the minus (-) sign and the adjustment amount that needs to be reversed (e.g., -12.34).
- Adjustment Code: Click the drop-down arrow and select the adjustment code previously used to post the adjustment amount.
- Reason Code: Click the drop-down arrow and select the reason code previously used for the balance.
- Change Status: Click the drop-down arrow and select the appropriate status update.
- To bill the balance to the patient or payer, select to Rebill/Bill patient or Bill payer.
- To keep the current status after the adjustment, select None.
- Related Payment: If applicable, click Related Payment to search and select a Payment record the adjustment is related to.
- Note: Internal notes related to the adjustment that will display when viewing transaction line details.
- Verify the information is correct. Once applied, the transaction line is posted and automatically saved.
- Click Apply. The Adjustment transaction line is posted. If the option to change the status was selected, an additional transaction line is posted.
|
 |