Post Electronic Remittance Advice (ERA) Payments with ERA Errors
- Last updated
-
-
Save as PDF
Updated: 01/04/2024 | Views: 2903
Payments received electronically and reported in an Electronic Remittance Advice (ERA) can be automatically posted. The automatic posting supports denials, reversals, underpayments, overpayments, and other complex electronic remittance scenarios. However, there are times where automatically posting payments from an ERA results in ERA errors.
Note: For practices that receive large ERA reports containing a high count of Claim Reference IDs, the ERA Splitting Options feature is available to automatically split ERA reports into several, more manageable reports.
Post ERA Payments with ERA Errors
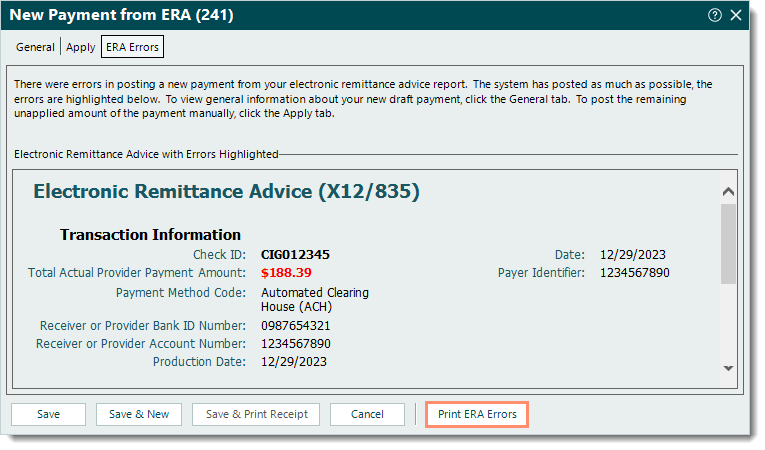
When the Tebra Desktop Application (PM) encounters errors in posting a new payment from an ERA, those error details are provided under the ERA Errors tab. The remaining payment amount that was not automatically posted by the system needs to be manually posted. Follow the steps below to first print and review the ERA errors to determine next steps.
Print and Review ERA Errors
- When the ERA Errors tab of the New Payment from ERA window opens while posting an ERA, click Print ERA Errors to generate a copy of the ERA errors. Then, use the computer's print function to print the document for easier reference.
- Review the error message(s) and follow the recommended steps below depending on the error.
|
 |
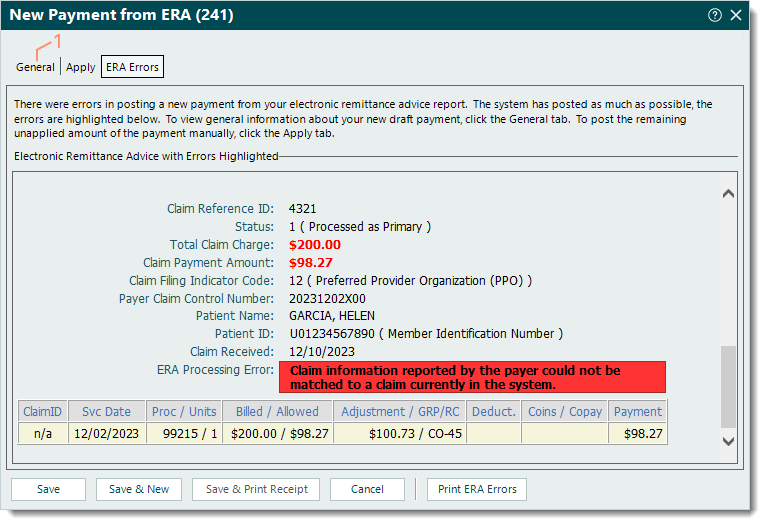
Claim Information Reported by the Payer Could Not be Matched
The ERA error, Claim information reported by the payer could not be matched to a claim currently in the system, indicates the claim was billed from another billing software or submitted through an online portal so the payment information reported could not be matched to an existing claim in Tebra.
Outlined below are two solutions depending on whether the payment(s) with this error should be posted in another billing software or should be posted in Tebra.
- If the payment(s) should be posted in another billing software, follow the steps below.
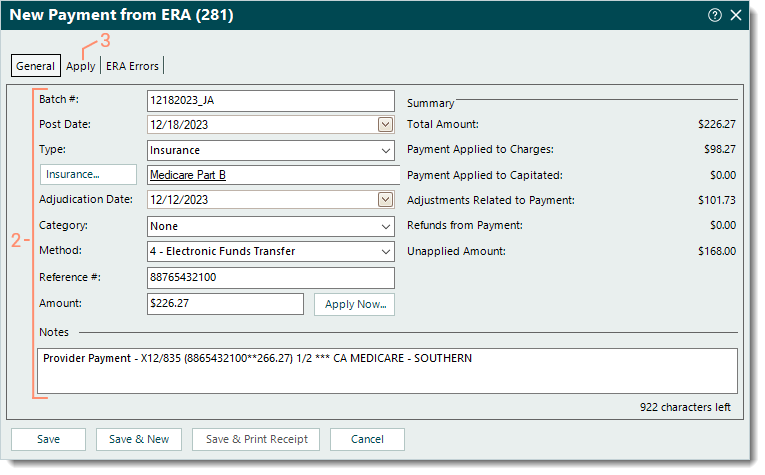
- Select the General tab. The general payment information displays.
|
 |
- Verify the auto-populated information is correct and make any changes as necessary. Then, enter the following information if applicable.
- Batch #: The batch number for the payment.
 Tip: Entering a batch number is helpful for running reports when there is a consistent naming convention such as the posting date with the user's initials (e.g., MMDDYYYYAB). Then, when running a report (e.g. Payments Detail), customize and filter by that specific batch number. Tip: Entering a batch number is helpful for running reports when there is a consistent naming convention such as the posting date with the user's initials (e.g., MMDDYYYYAB). Then, when running a report (e.g. Payments Detail), customize and filter by that specific batch number.
- Category: If the practice uses categories for certain payment reports, click the drop-down arrow and select the appropriate category.
- Amount: Enter the total payment amount reported on the ERA minus the total amount for payment(s) with this error (to be posted in the other billing software). e.g., If the total payment amount reported on the ERA is $100.00 and $30.00 is the total amount for payment(s) with this error, enter $70.00 as the amount.
- Notes: Add a note that the total payment amount was edited due to the payment(s) for the other billing software.
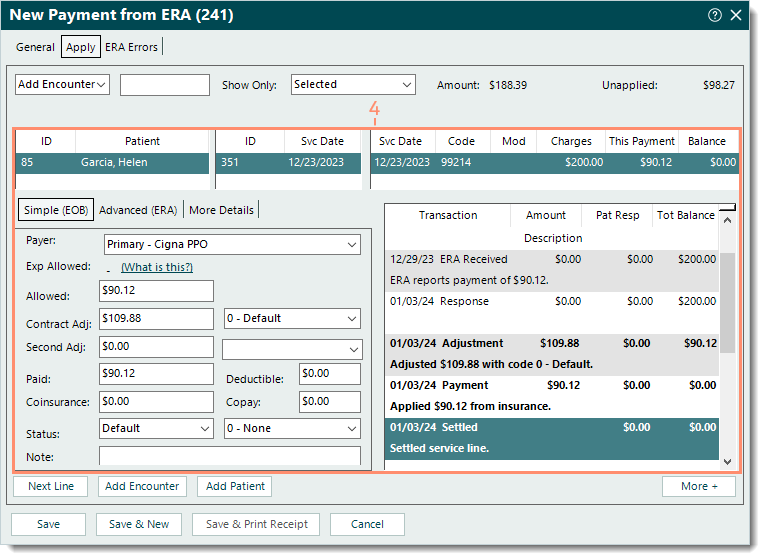
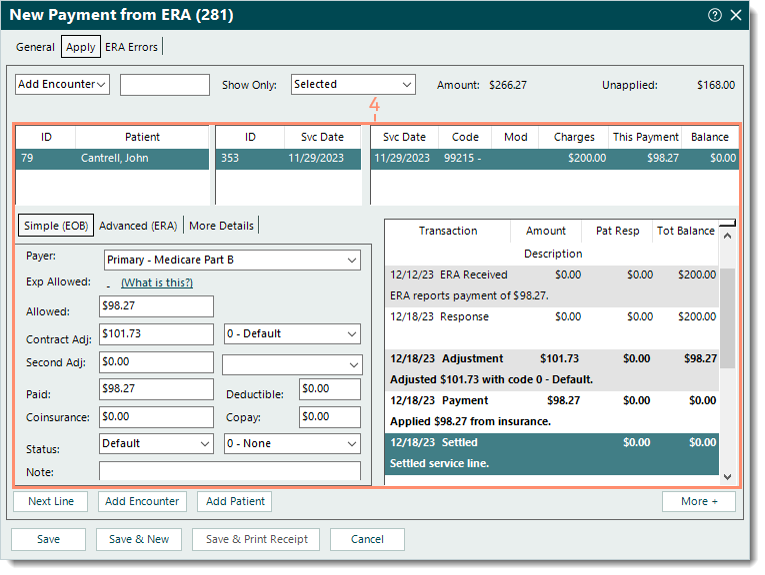
- Select the Apply tab. Additional payment details display.
|
_General.png?revision=4) |
- Click to select each service line and review the auto-populated Simple (EOB) and transaction information. Make any changes as necessary.
Tip: The Next Line button can also be used to navigate to the next service line.
Note: For balances transferred to secondary insurance policies, ensure the amounts are correct as this information is sent to payers that support secondary electronic claims submission.
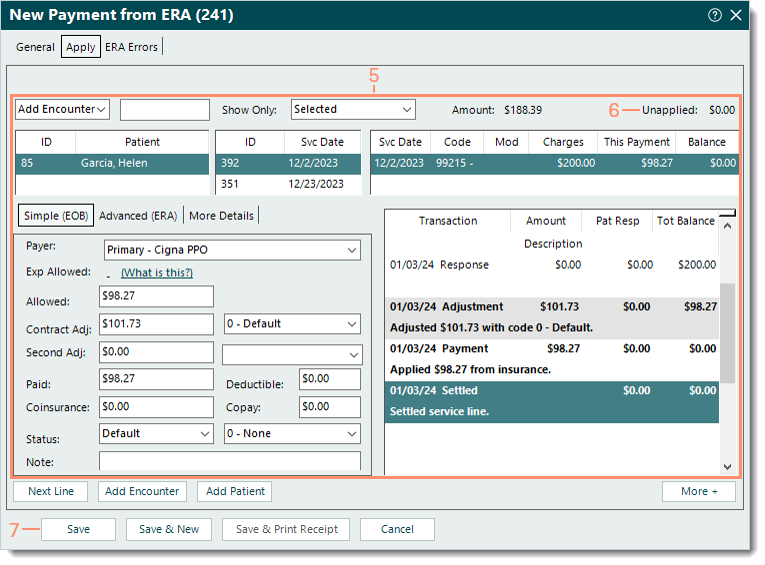
- Verify the Unapplied amount displays $0.00 to ensure all appropriate payments have been applied in Tebra.
- When finished, click Save. The payment is saved and the ERA report is marked as reviewed.
Note: Once saved, the ERA Errors tab is always available for reference in the Payment record.
Tip: To view a report of how the payment was allocated, open the Payment record, click Reports on the bottom of the Edit Payment window and select Payments Application.
Then, refer to the ERA errors and manually post the payment(s) in the other billing software.
|
_Apply.png?revision=4) |
- If the other billing system is no longer accessible and the data should be entered in the Tebra Desktop Application (PM), refer to the ERA errors and verify the encounter was recreated in Tebra then follow the steps below.
- If the encounter has not been created, cancel the ERA payment posting by clicking Cancel then Yes to confirm. The New Payment from ERA window closes. Create the encounter(s) as necessary for the payment(s) with this error. Then, post the ERA and follow the steps below.
- Select the General tab. The general payment information displays.
|
|
- Verify the auto-populated information is correct and make any changes as necessary. Then, enter the following information if applicable.
- Batch #: The batch number for the payment.
Tip: Entering a batch number is helpful for running reports when there is a consistent naming convention such as the posting date with the user's initials (e.g., MMDDYYYYAB). Then, when running a report (e.g. Payments Detail), customize and filter by that specific batch number.
- Category: If the practice uses categories for certain payment reports, click the drop-down arrow and select the appropriate category.
- Select the Apply tab. Additional payment details display.
|
 |
- Click to select each service line and review the auto-populated Simple (EOB) and transaction information. Make any changes as necessary.
Tip: The Next Line button can also be used to navigate to the next service line.
Note: For balances transferred to secondary insurance policies, ensure the amounts are correct as this information is sent to payers that support secondary electronic claims submission.
|
 |
- Refer to the ERA errors and manually apply the payment(s) to the encounter(s) that were recreated.
- Verify the Unapplied amount displays $0.00 to ensure all payments have been applied.
- When finished, click Save. The payment is saved and the ERA report is marked as reviewed.
Note: Once saved, the ERA Errors tab is always available for reference in the Payment record.
Tip: To view a report of how the payment was allocated, open the Payment record, click Reports on the bottom of the Edit Payment window and select Payments Application.
|
 |
Other ERA Errors
For all other ERA errors (e.g., The claim contained duplicate, unbundling, and or information which could not be processed), follow the steps below.
- Select the General tab. The general payment information displays.
|
 |
- Verify the auto-populated information is correct and make any changes as necessary. Then, enter the following information if applicable.
- Batch #: The batch number for the payment.
Tip: Entering a batch number is helpful for running reports when there is a consistent naming convention such as the posting date with the user's initials (e.g., MMDDYYYYAB). Then, when running a report (e.g. Payments Detail), customize and filter by that specific batch number.
- Category: If the practice uses categories for certain payment reports, click the drop-down arrow and select the appropriate category.
- Select the Apply tab. Additional payment details display.
|
 |
- Click to select each service line and review the auto-populated Simple (EOB) and transaction information. Make any changes as necessary.
Tip: The Next Line button can also be used to navigate to the next service line.
Note: For balances transferred to secondary insurance policies, ensure the amounts are correct as this information is sent to payers that support secondary electronic claims submission.
|
 |
- Refer to the ERA errors and manually apply the payment(s) that did not automatically post.
- Verify the Unapplied amount displays $0.00 to ensure all payments have been applied.
- When finished, click Save. The payment is saved and the ERA report is marked as reviewed.
Note: Once saved, the ERA Errors tab is always available for reference in the Payment record.
Tip: To view a report of how the payment was allocated, open the Payment record, click Reports on the bottom of the Edit Payment window and select Payments Application.
|
 |