Updated: 01/22/2020
Views: 15010
Patient cases are created to manage insurance policy selection as well as the order in which two or more insurance plans are billed. Separate cases (e.g., Commercial, Self Pay, Workers' Compensation, Auto) should be created for each policy type. For example, you may have a patient that is being treated for injuries sustained from an auto accident that is covered under one insurance policy; yet that patient may receive treatment during the same visit for a condition unrelated to the auto accident and for which a different policy is billed.
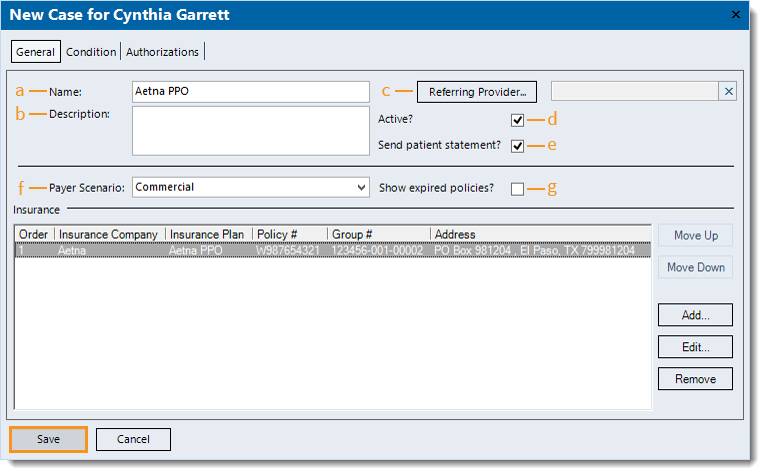
Information associated with a case is organized under three tabs: General, Condition and Authorizations. While the General tab of a new case includes basic information about the case, it's also where you would add one or more insurance policies that may provide reimbursement of medical services related to the case.
Note: There are some payer scenarios (e.g., Attorney Lien, Workers Comp) that will prompt the addition of the Attorneys and/or Workers' Compensation tabs.
Unless you are adding a case at the time of creating a new patient record, you will typically begin with navigating to Cases before adding, editing, or removing a case.
|
|
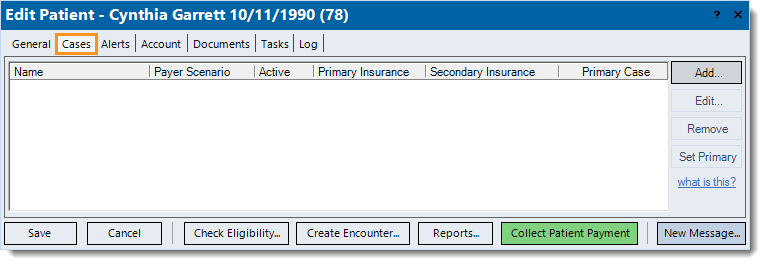 |
Add New Case
One or more cases can be added to the Patient record either at the time of creating a new patient record or at a later time to an existing patient record.
- To prevent duplication, navigate to Cases and verify the case is not in the system.
- Click Add on the right of the window. The General tab of the New Case window opens by default.
- Enter the General information:
- The Name for the case that will help distinguish it from other cases.
- Description (Optional): Information that best describes the purpose or use of the case (e.g., the condition for which the patient is being seen).
- Referring Provider (Optional): Automatically populates from the Patient record.
- If blank, click Referring Provider to search and select the provider.
- If the provider is not listed, click New at the bottom of the Select Referring Physician window.
- "Active?" is selected by default. To change the case to inactive at any time, click to clear the selection.
- "Send patient statement?" is selected by default and allows statements related to the case to be sent to the patient. To prevent patient statements from being sent, click to clear the selection.
- Click the drop-down arrow to select the Payer Scenario.
- Click to select "Show expired policies?" to see expired insurance policies for this case.
- If applicable, do the following to enter additional information for the case.
- Click Add under the Insurance section to add an insurance policy.
- Click the Condition tab to enter information about the cause that prompted treatment.
- Click the Authorizations tab to add authorization information from the insurance that documents approval for medical services.
- If the Payer Scenario is related to an attorney lien, click the Attorneys tab to add attorney information.
- If the Payer Scenario is related to workers' compensation, click the Attorneys tab and Workers' Compensation tab to add the information.
- Click Save at the bottom of each window until it is no longer available.
|
 |
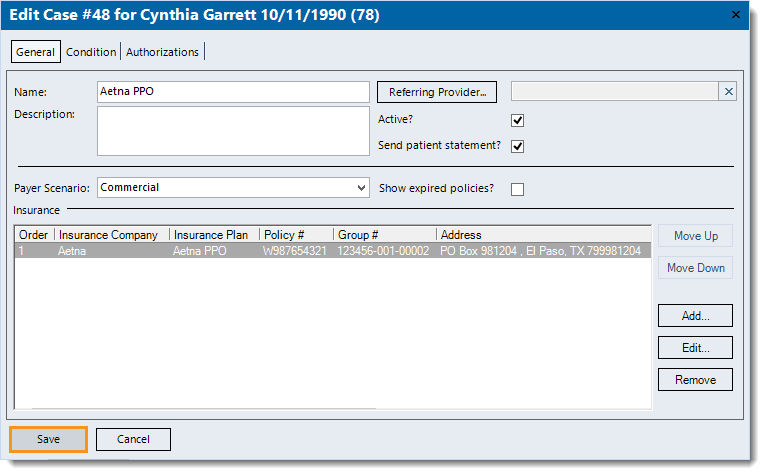
Edit Case
- Navigate to Cases then double click the case to open. The General tab of the Edit Case window opens by default.
- Make the desired changes to the General, Condition, or Authorizations information, or if applicable, the Attorneys or Workers' Compensation information.
- Click Save at the bottom of each window until it is no longer available.
|
 |
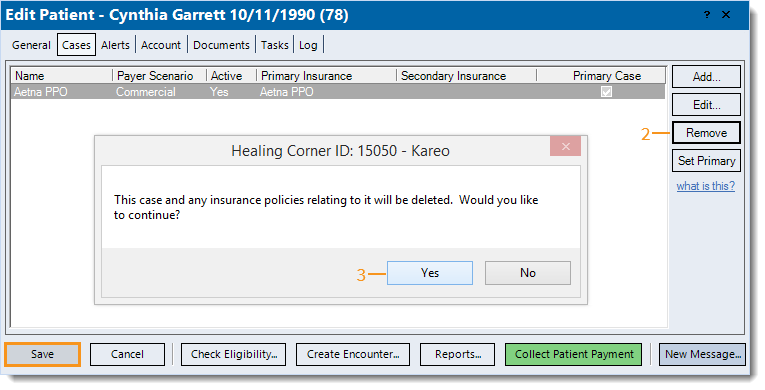
Remove Case
- Navigate to Cases then click once to select the case.
- Click Remove. A confirmation pop-up appears.
- Click Yes to continue with the removal. The case is removed from the list.
- Click Save.
- If the case removed was the only patient case, a Warning pop-up appears.
- To continue to save the removal of the only patient case, click No.
- Click Yes to add new case information.
Note: Only cases with no other records associated, such as an encounter or appointment, can be removed.
|
 |