Best Practice to Avoid Claim Rejection - Kareo Settings
- Last updated
-
-
Save as PDF
Updated: 07/15/2021
Views: 3388
Claim denials and rejections are two of the biggest obstacles in getting electronic claims (e-claims) accepted and processed by the payer. It is impossible to avoid, however, you can reduce the number of denials and rejections received by your practice and ensure your e-claims get paid by:
- Verifying practice, provider, and payer information and settings
- Creating provider claim settings override(s) when necessary
- Completing all required EDI enrollments and receiving payer approval before submitting e-claims
Your practice, provider, and payer information and settings in Kareo are essential for preventing claim denials and rejections. To verify you are setting up your account correctly, first gather all the necessary information to ensure you are billing appropriately for each insurance. If unsure of any credentialing or claims billing information, contact the payer directly to confirm.
Practice Information
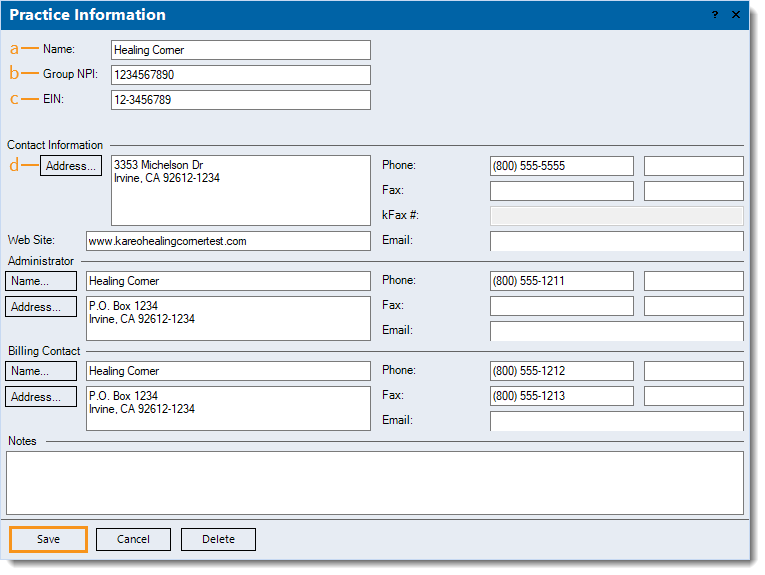
The practice information entered in Kareo should match the practice's credentials. Payers may reject any e-claims with submitted information that does not match what they have on file. Follow the instructions below to verify and edit the information as necessary.
- Click Settings > Practice Information. The Practice Information window opens.
- Verify the following information for accuracy.
- Name: Verify the practice name does not exceed 60 characters, including spaces.
- Group NPI: If credentialed to bill with a group NPI, verify the NPI entered is correct and not an individual NPI.
Note: The individual NPI is entered in the Provider record.
- EIN: If credentialed to bill with an EIN or Tax ID, verify the number is correct.
Note: For providers credentialed to bill using their SSN, the SSN is entered in the Provider record.
- Address: Under the Contact Information section, verify the practice address is correct. The address must be a physical address (cannot be a P.O. Box) with a valid 9-digit zip code.
 Tip: Click Address to enter the information in the Check Address pop-up window; this ensures the practice address is formatted correctly. Then, click USPS Website to access the USPS zip code lookup tool to verify the 9-digit zip code is valid. Tip: Click Address to enter the information in the Check Address pop-up window; this ensures the practice address is formatted correctly. Then, click USPS Website to access the USPS zip code lookup tool to verify the 9-digit zip code is valid.
- Click Save to record any changes made.
Note: Review Practice Information for more general details.
|
 |
Provider Information and Settings
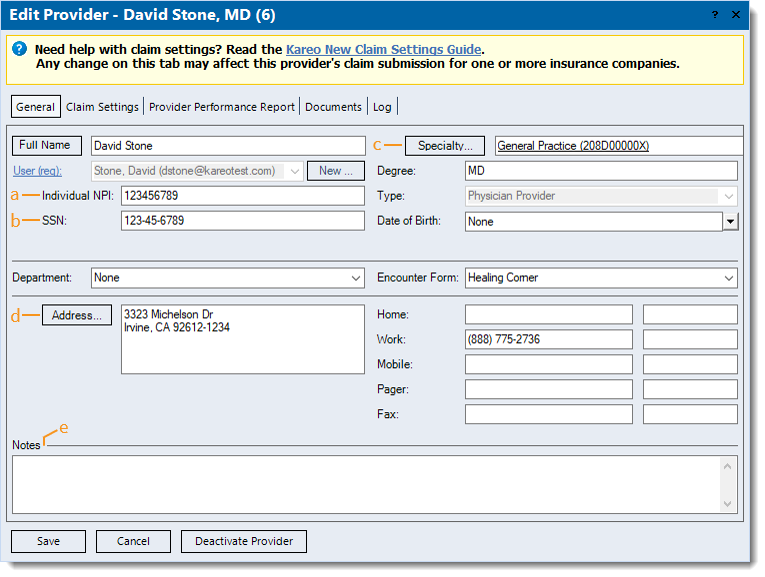
The provider information entered in Kareo should match the provider's credentials. Payers may reject any e-claims with submitted information that does not match what they have on file. Follow the instructions below to verify and edit the information and settings as necessary.
- Click Settings > Providers. The Find Provider window opens.
- Find the provider then double click to open. The General tab of the Edit Provider window opens by default.
- Under the General tab, verify the following information for accuracy.
- Individual NPI: Verify the NPI entered is correct. The individual NPI should match the NPPES NPI Registry.
- SSN: If applicable, verify the SSN entered is correct.
- Specialty: Verify the specialty is correct. If necessary, click Specialty to search and select the appropriate specialty from the list of taxonomy codes.
- Address: Verify the provider's office address is correct. The address must be a physical address (cannot be a P.O. Box) with a valid 9-digit zip code.
Tip: Click Address to enter the information in the Check Address pop-up window; this ensures the practice address is formatted correctly. Then, click USPS Website to access the USPS zip code lookup tool to verify the 9-digit zip code is valid.
- Notes: It is recommended to enter internal notes to track up-to-date provider credentialing information.
- Click the Claim Settings tab.
|
 |
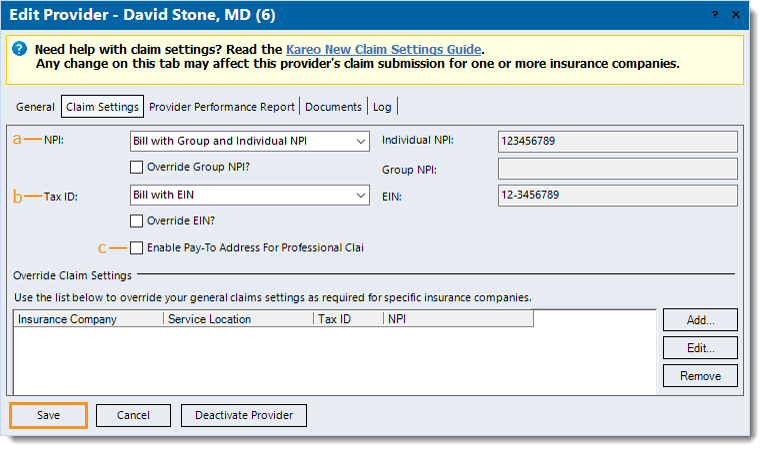
- Under the Claim Settings tab, verify the default claims billing information is based on how the provider is credentialed with most payers.
- NPI: Verify the default billing NPI is set correctly. If necessary, click the drop-down arrow to change the setting.
Note: The Individual NPI auto-populates from the General tab and the Group NPI auto-populates from the Practice Information.
- If Bill with Group and Individual NPI is selected, but this provider's claims need to be sent with a different Group NPI, click to select "Override Group NPI?" and enter the Override Group NPI.
- Tax ID: Verify the billing Tax ID is set correctly. If necessary, click the drop-down arrow to change the setting.
Note: The EIN auto-populates from the Practice Information and the SSN auto-populates from the General tab.
- If this provider's claims need to be sent with a different EIN, click to select "Override EIN?" and enter the EIN Override.
- If "Enable Pay-To Address for Professional Claim" is selected because the pay-to address (e.g., P.O. Box or Lockbox) differs from the practice's address, verify the name and address is correct.
- Click Save to record any changes made.
Note: If claims billing information varies for a specific payer and/or service location, override general claim settings and override advanced settings as necessary.
|
 |
Payer Information and Settings
The payer information entered in Kareo should match the information verified directly with the payer and its records. Payers may reject any e-claims with submitted information that does not match what they have on file.
Insurance Company
Follow the instructions below to verify and edit the insurance company information as necessary.
- Click Settings > Insurance > Insurance Companies. The Insurance Companies window opens.
Note: The Insurance Companies window is also known as the Enrollments Dashboard.
- Find the insurance company and click the name to open. The General tab of the Edit Insurance Company window opens by default.
- Under the General tab, verify the correct Insurance Program is selected (e.g., selecting BL - Blue Cross/Blue Shield for a Medicare payer may cause claim rejections). If necessary, click the drop-down arrow to make the appropriate selection.
- Click the Electronic Claims tab.
|
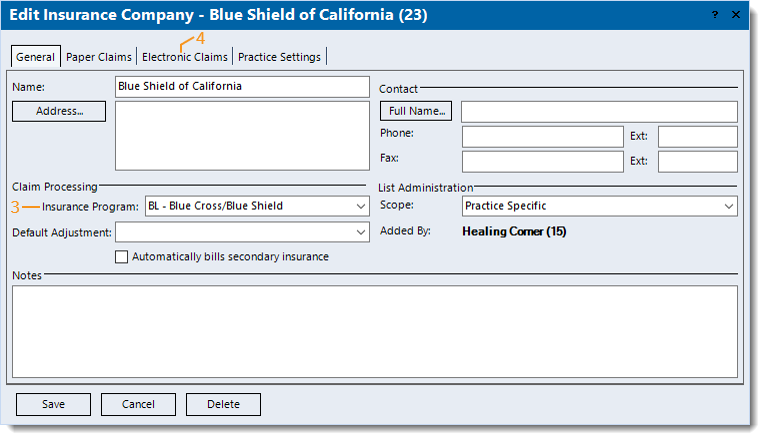 |
- Under the Electronic Claims tab, verify the electronic payer connection is set up correctly.
- Verify the selected Clearinghouse is the clearinghouse the practice/provider is enrolled with. If necessary, click the drop-down arrow to make the appropriate selection.
- Verify the correct Electronic Payer Connection is selected and Clearinghouse Payer ID displays. If necessary, click Electronic Payer Connection to search and select the payer connection.
Note: Only select a UB payer for Institutional (UB-04) claims submission.
- Click Save to record any changes made.
Note: Any changes made apply to all insurance policies/plans associated with the insurance company.
|
 |
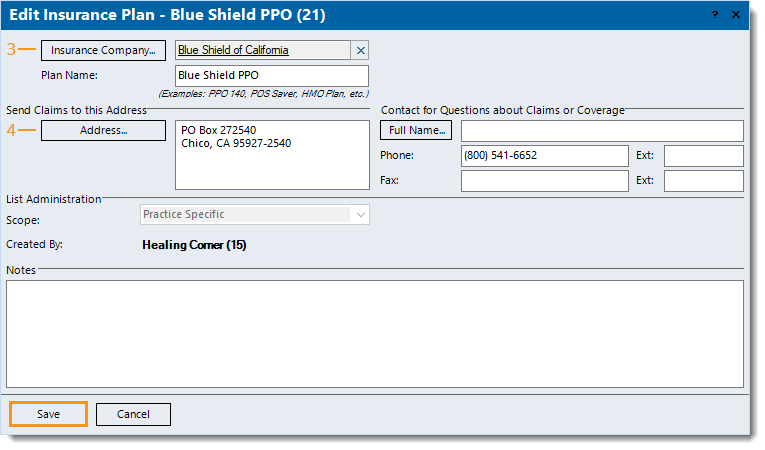
Insurance Plan
Next, follow the instructions below to verify and edit the insurance plan information as necessary.
- Click Settings > Insurance > Find Insurance Plan. The Find Insurance Plan window opens.
- Find the insurance plan then double click to open. The Edit Insurance Plan window opens.
- Insurance Company: Verify the correct insurance company is selected. If necessary, click Insurance Company to search and select the plan's carrier/network.
- Address: Verify the address entered is the correct address where claims should be sent.
- Click Save to record any changes made.
|
 |