Updated: 01/05/2024 | Views: 21838
Paper claims can be printed at any time. You can print a specific claim or a batch of claims as necessary.
Note: It is recommended to first print a single test claim to ensure claims will print correctly. If the printer alignment needs adjustment, review Change Printer Alignment.
Print Single Claim
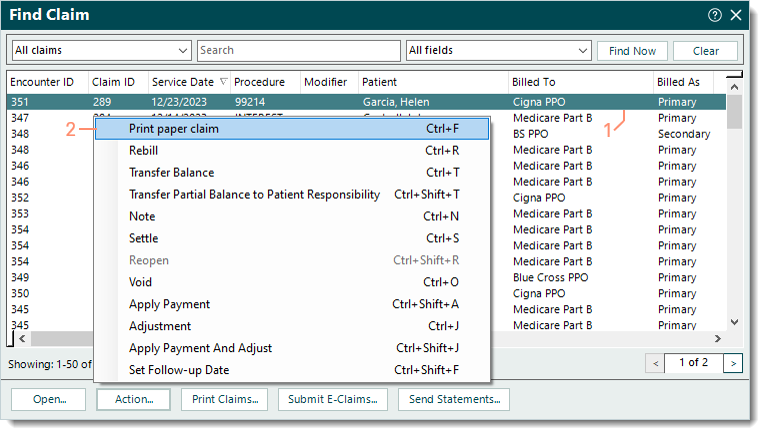
- Find the claim and click once to select it.
- To review more claim details first (e.g., transaction history), double click the claim to open. The Edit Claim window opens. When ready to print, click Action > Print paper claim. The Attention pop-up window opens. Proceed to step 3.
- Once the claim is highlighted, right click or click Action on the bottom menu bar and select Print paper claim. The Attention pop-up window opens.
|
 |
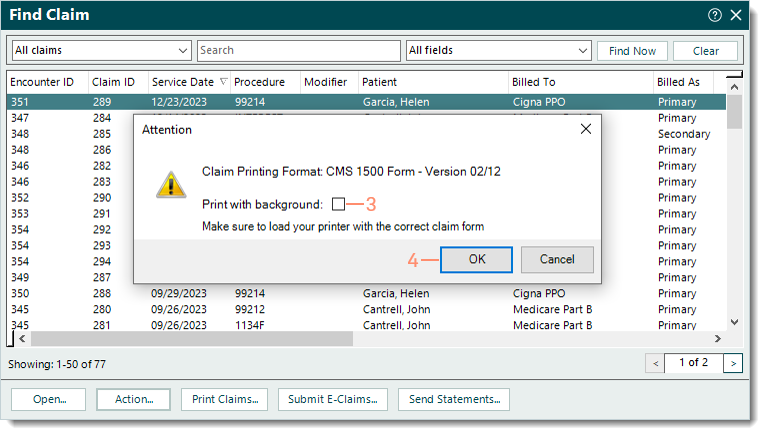
- Click to select or clear "Print with background". When selected, the claim will print as a black and white CMS-1500 claim form. If cleared, ensure the printer is loaded with the correct claim form prior to printing claims.
Note: Background printing is not available for UB-04 claim forms.
- Click OK. The Print dialog box opens. Print the claim using the computer's print function.
- When prompted "The printing is complete. Has the form printed correctly?":
- Click Yes to confirm the claim form printed correctly and to update the claim status to Pending insurance.
- Click No if printing a test claim or if the claim form did not print correctly and to leave the claim status as Ready to send claims.
|
 |
Batch Print Claims
- Click Encounters > Track Claim Status. The Find Claim window opens.
 Tip: For faster navigation, press Ctrl+Shift+C on the keyboard. Tip: For faster navigation, press Ctrl+Shift+C on the keyboard.
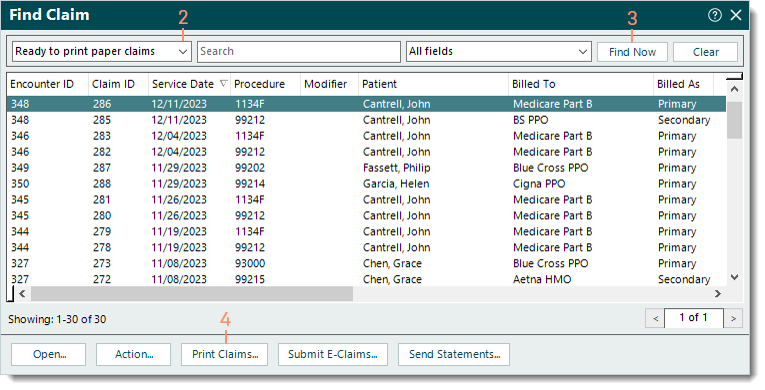
- Click the top left drop-down arrow and select Ready to print paper claims.
- Click Find Now. The list of claims ready to be printed display.
- Review the list of claims then click Print Claims. The Print Paper Claims - Step 1 window opens.
|
 |
- Enter the following information as necessary.
- Start and End Date: To print claims within a specific service date range, enter the dates.
- Insurance: To print claims for a specific payer, click Insurance to search and select the payer.
- Patient: To print claims for a specific patient, click Patient to search and select the patient.
- Payer Scenario: To print claims for a specific payer scenario, click the drop-down arrow and select the payer scenario (e.g., Commercial).
- Claim Type: Click the drop-down arrow to select the appropriate claim type that corresponds with the claim forms to print.
- "Include settled claims": Click to select to also print settled claims with the batch.
- "Print with background": Click to select or clear the selection. When selected, the claim will print as a black and white CMS-1500 claim form. If cleared, ensure the printer is loaded with the correct claim form prior to printing claims.
Note: Background printing is not available for UB-04 claim forms.
- When ready, click Print Claims. The Print Paper Claims - Step 2 window opens indicating the claims are being analyzed. Then, the Print dialog box opens. Print the claims using the computer's print function. The Print Paper Claims - Step 3 window opens.
|
 |
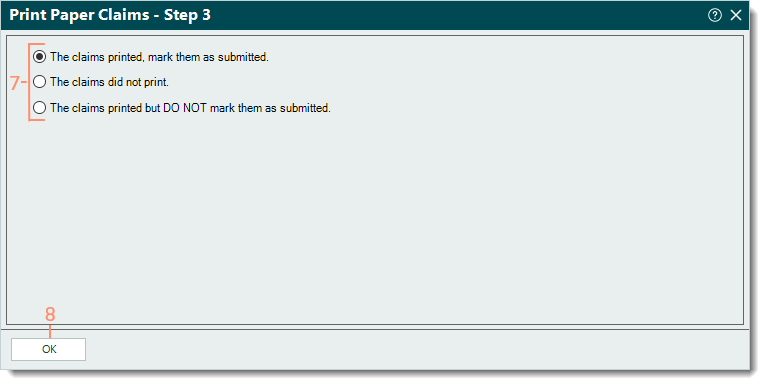
- Select the appropriate option.
- To confirm the claims printed correctly and to update the claim statuses to Pending insurance, select The claims printed, mark them as submitted.
- To leave the claim statuses as Ready to send claims, select The claims did not print or The claims printed but DO NOT mark them as submitted as necessary.
- Click OK.
|
 |