Updated: 08/30/2023 | Views: 28474
Encounters are used to capture information and charges for a patient visit with a provider. The Encounter record includes general information about the visit, the patient’s condition, the parties responsible for payment and the treatment rendered by the provider.
Tebra also offers a unique encounter workflow process to track encounters through each stage of the billing process. This enables the medical office staff to capture encounters at the point of service and route them to the business office or third-party medical billing staff for claims billing. Encounters can be tracked by the following statuses: Draft, Review, Approved, Rejected, and Unpayable.
Note:
- To aid in efficiency when users create new encounters, System Administrators can set default information under the Encounter Options.
- For billing anesthesia services, there are specific settings that must first be configured for Anesthesia Services so that the charges calculate correctly on the encounter.
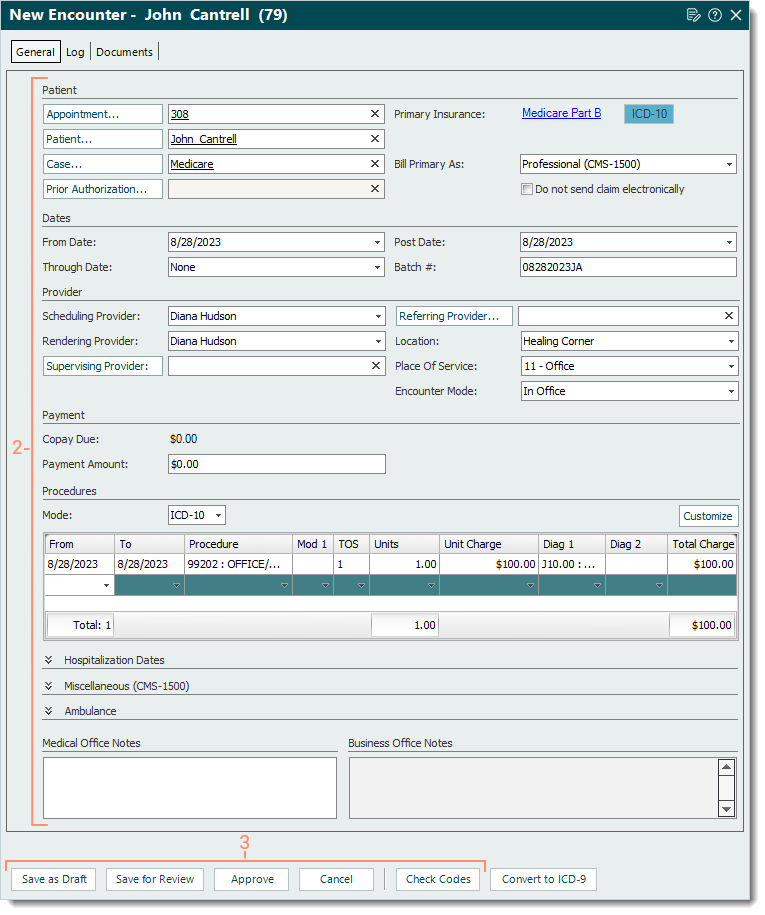
New Encounter
- Do one of the following depending on the window currently open:
- Practice Home window: Click Encounters > New Encounter. The New Encounter window opens then proceed to step 2.
 Tip: For faster navigation, click the New Encounter icon or press F4 on the keyboard. Tip: For faster navigation, click the New Encounter icon or press F4 on the keyboard.
- Edit Patient window: Click Create Encounter on the bottom of the window. The New Encounter window opens then proceed to step 2.
- Calendar window: Right click on the patient's name and select Create Encounter. The New Encounter window opens then proceed to step 2.
- Enter the necessary information using the Professional (CMS-1500) or Institutional (UB-04) claim format.
- When finished, do the following as necessary.
- To perform a code check to validate the claim data against such coding rules dictated by Medicare, Medicaid, National Correct Coding Initiative Edits and other standard coding rules, click Check Codes.
Note: This feature can also be enabled to automatically perform a code check upon encounter approval under the Encounter Options.
- To place the encounter under the Draft status (to be completed), click Save as Draft.
- To place the encounter under the Review status, click Save for Review.
- To place the encounter under the Approved status and create claims associated with the encounter, click Approve.
|
 |
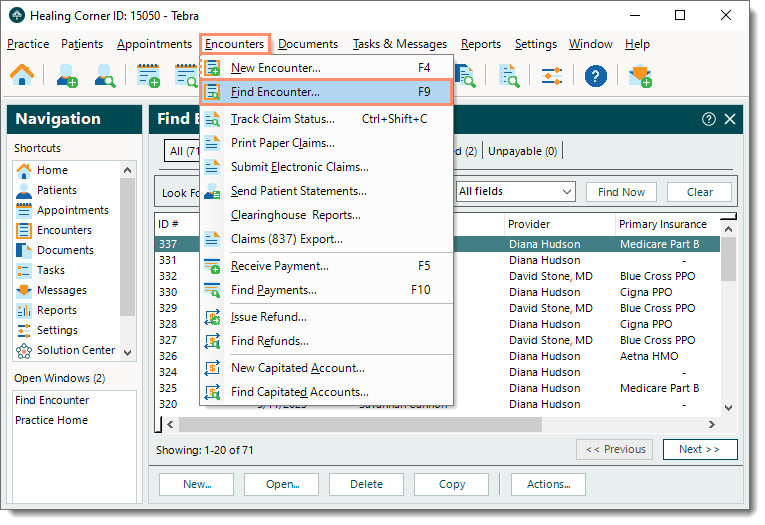
Find Encounter
- On the top menu bar, click Encounters > Find Encounter. The Find Encounter window opens at the Review tab by default.
Tip: For faster navigation, click the Find Encounter icon or press F9 on the keyboard.
|
 |
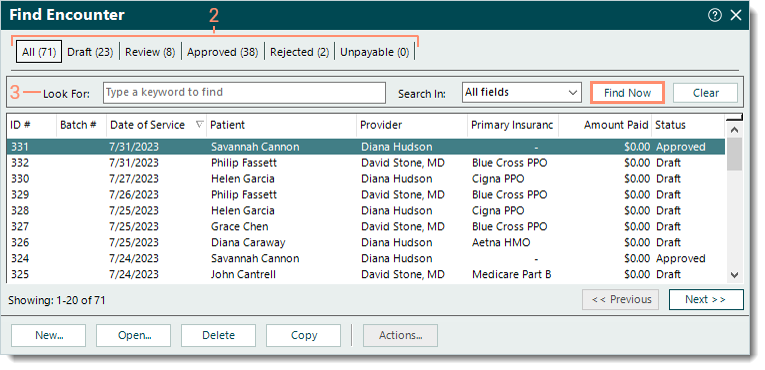
- Select a tab to search for an encounter under a specific status. If unsure of the status, select All.
Note: For more information on how to place encounters under a specific status, review Encounter Actions.
- All: Lists all encounters.
- Draft: Encounters not yet completed.
Note: For practices using the Charge Capture feature, practices using an integrated EHR, or Clinical subscribers, the encounters created and transferred from the web platform or EHR are also listed under the Draft tab.
- Review: Completed encounters, ready for review.
- Approved: Reviewed and approved encounters.
- Rejected: Reviewed encounters that need clarification or correction.
- Unpayable: Encounters that are not billed to payers or patients.
- Use the Look For search bar to enter all or part of a keyword for the encounter. Then, click Find Now.
|
 |
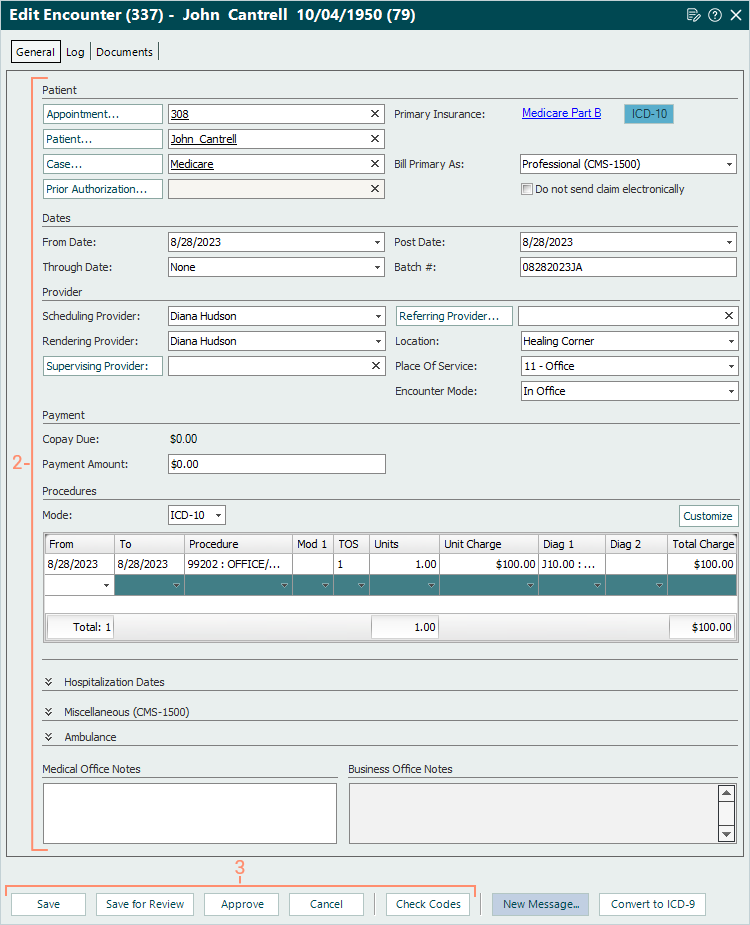
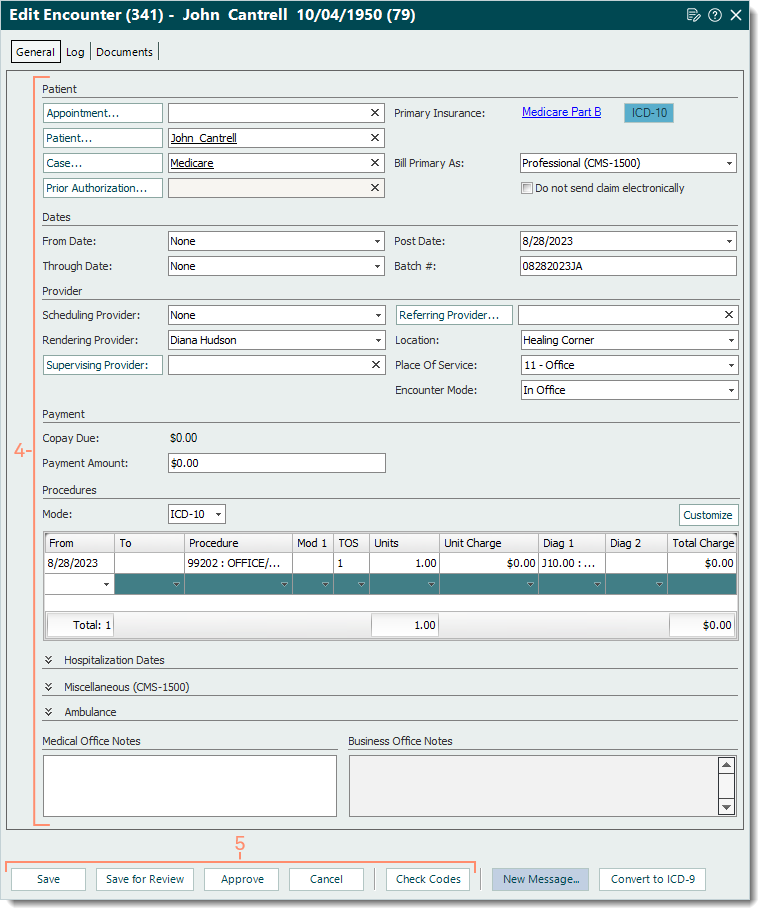
Edit Encounter
Encounters with a status of Draft, Review, or Rejected can be edited at anytime. An approved encounter should only be edited if:
- The associated claims have not yet been billed. A user with appropriate permissions can unapprove the encounter to delete all claims and payments created from the encounter and update the encounter's status to Review.
- The associated claims have already been billed but a validation error, clearinghouse or payer rejection, or payer denial was received. Certain encounter information can be edited to correct the claims for resubmission.
- Find the encounter then double click to open. The Edit Encounter window opens.
- Make the necessary changes.
- When finished, click the appropriate option on the bottom menu bar.
Note: Available options depend on the status of the encounter.
|
 |
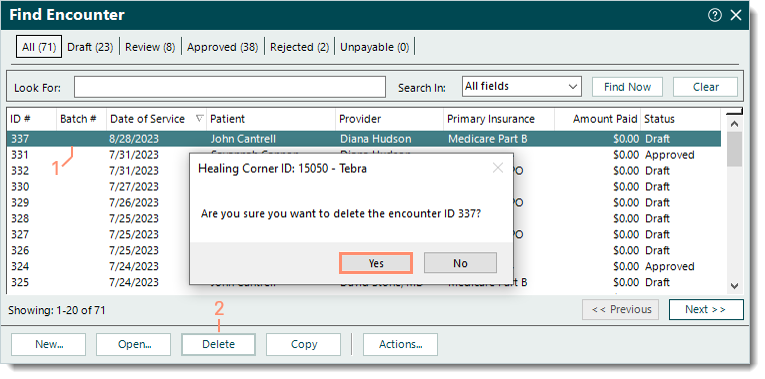
Delete Encounter
Only encounters with a status of Draft, Review, or Rejected can be deleted.
- Find the encounter then click to select it or drag to select multiple encounters.
- Click Delete. A confirmation pop-up appears.
- Click Yes to confirm the deletion. The encounter is deleted.
|
 |
Copy Encounter
The copy feature, also known as same as last time (SALT), creates a new draft encounter from an existing one. When an encounter is copied, the system copies all data in the encounter except the appointment and dates of service.
Important Note: By using this optional copy feature, your practice acknowledges that the responsibility for auditing a newly created encounter falls solely with you as an end user. Federal and State False Claims Acts do place the obligation on the person that processes the claim to ensure the accuracy and completeness of the data prior to submission for reimbursement.
- Find the encounter then click to select it.
- Click Copy. A confirmation pop-up appears.
- Click Yes to confirm. The encounter is copied and the Edit Encounter window opens.
Note: It may take a few seconds for the copy of the encounter to open.
|
 |
- Review all copied data, make updates, and enter any additional information as necessary. This includes but is not limited to:
- The patient's appointment and service dates.
- The patient's coverage information (e.g., case, policy, authorization).
- The providers (e.g., rendering, referring, supervising).
- The service line information (e.g., procedures, diagnosis codes, modifiers).
- When finished, click the appropriate option on the bottom menu bar.
|
 |