New Encounter: Institutional (UB-04)
- Last updated
-
-
Save as PDF
Updated: 09/22/2022
Views: 4924
Encounters are used to capture information and charges for a patient visit with a provider. The Encounter record includes general information about the visit, the patient’s condition, the parties responsible for payment and the treatment rendered by the provider.
Note:
- To aid in efficiency when users create new encounters, System Administrators can set default information under the Encounter Options.
- If you are billing for anesthesia services, there are specific settings that must first be configured for Anesthesia Services within Kareo so that the charges calculate correctly on the encounter.
New Encounter
Follow the steps below to create a new encounter using the Institutional (UB-04) claim format.
- Do one of the following depending on the window currently open:
- Practice Home window: Click Encounters > New Encounter. The New Encounter window opens then proceed to step 2.
 Tip: For faster navigation, click the New Encounter icon or press F4 on your keyboard. Tip: For faster navigation, click the New Encounter icon or press F4 on your keyboard.
- Edit Patient window: Click Create Encounter on the bottom of the window. The New Encounter window opens then proceed to step 2.
- Calendar window: Right click on the patient's name and select Create Encounter. The New Encounter window opens then proceed to step 2.
- Enter the necessary information.
Note: Certain information auto-populates depending on the window the New Encounter was initiated from, default information set (e.g., in the Patient record or Encounter Options), and the records (e.g., Appointment, Patient, Case) selected in the encounter.
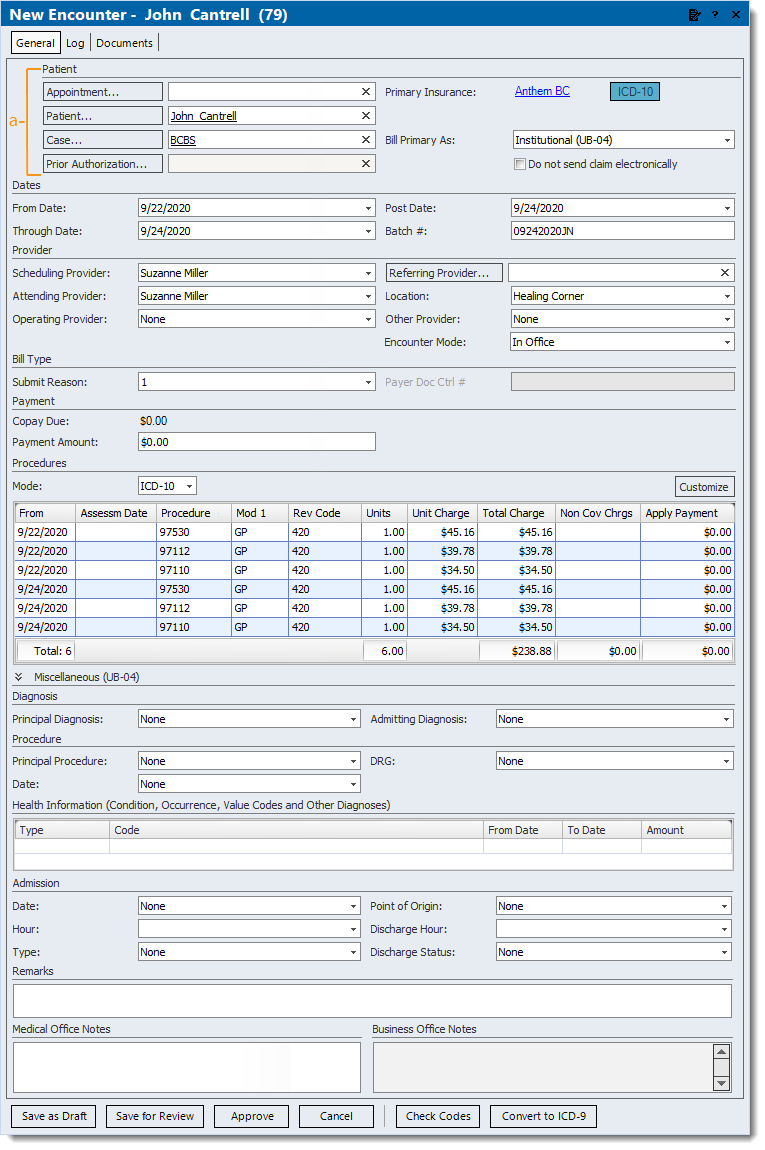
- Patient section:
- Click Appointment to search and select the appropriate patient appointment if applicable.
- Click Patient to search and select the appropriate patient.
- The case auto-populates when there is only one case under the patient's record. Click Case to select a case when there are multiple or to create a new case under the patient's record.
- Click Prior Authorization to select or enter authorization information if required.
- The Primary Insurance displays the primary payer within the associated case. Click the insurance name to edit the insurance if needed.
Note: The Secondary Insurance displays when there is a secondary payer in the associated case.
- If not already selected, click to select Institutional (UB-04) in the Bill Primary drop-down menu.
Note: The available formats are set under the Claim Formats section of the Encounter Options.
- If needed, click to select "Do not send claim electronically" to prevent the claim(s) associated with the encounter from submitting electronically to the payer.
Note: UB-04 claims cannot be submitted electronically to a Secondary Insurance, therefore this option is automatically selected and shaded.
|
 |
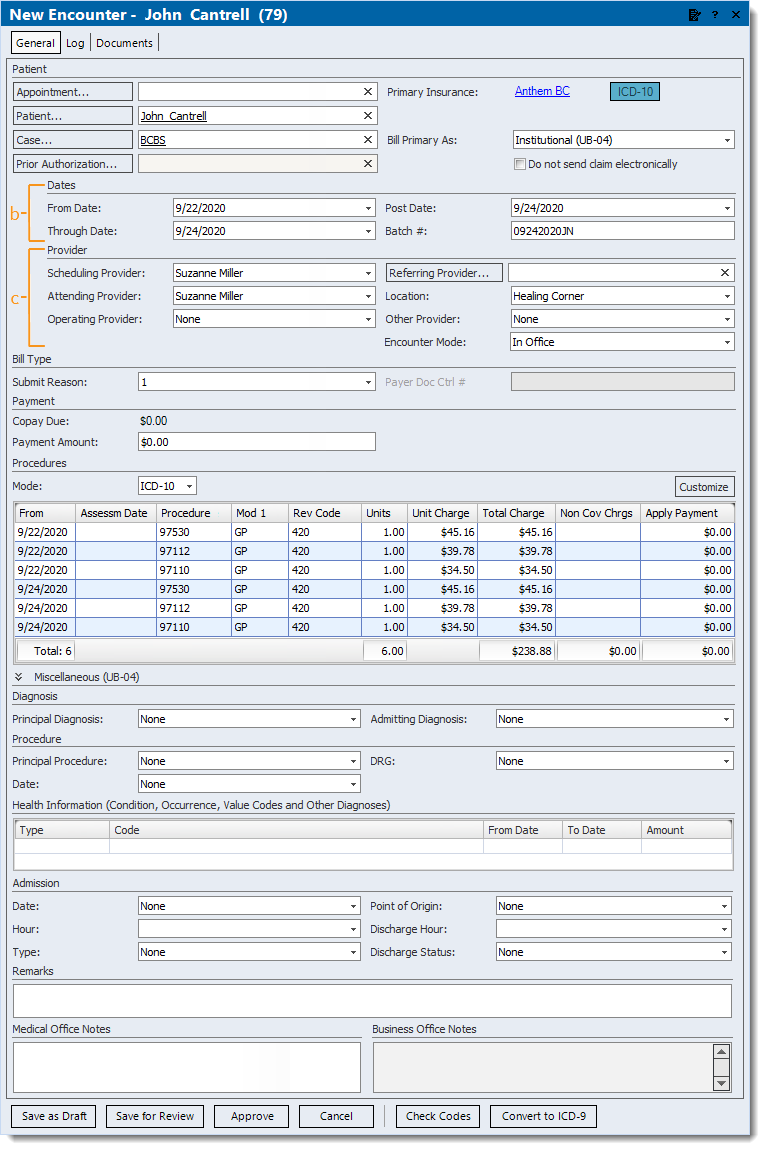
- Dates section: Enter service dates, posting date and optional batch number.
Tip: Entering a Batch # is helpful for running reports when there is a consistent naming convention such as the posting date with the user's initials (e.g., MMDDYYYYAB). Then, when running a report (e.g. Encounters Summary), customize and filter by that specific Batch #.
- Provider section:
- Click to select the provider who provided services to the patient from the Scheduling Provider drop-down menu.
Note: Auto-populates based on this order; the provider on the associated Appointment record, the Default Rendering Provider on the Patient record, the Scheduling Provider from the patient's previous encounter, or the default Scheduling Provider set in the Encounter Options.
- Click to select the provider used for paper and electronic claims billing from the Attending Provider drop-down menu.
Note: Auto-populates based on this order; the provider on the associated Appointment record, the Default Rendering Provider on the Patient record, the Rendering Provider from the patient's previous encounter, or the default Rendering Provider set in the Encounter Options.
- Click to select the provider who performed the surgical procedure(s) from the Operating Provider drop-down menu when applicable.
- Click Referring Provider to search and select a provider if applicable.
Note: Auto-populates with the default Referring Physician on the Patient record.
- Click to select the Location where services were rendered.
Note: Auto-populates based on this order; the Location on the associated Appointment record, the Default Service Location on the Patient record, or the default Service Location set in the Encounter Options.
- Click to select any other provider who was involved in the patient's care from the Other Provider drop-down menu when applicable.
- Encounter Mode: Defaults to In Office.
Note: The Encounter Mode feature is available for Kareo Telehealth subscribers but coming soon for all customers.
- To indicate a telehealth visit, click to select Telehealth from the drop-down menu.
|
 |
- Bill Type section:
- Submit Reason: Defaults to 1. Click to select another code from the drop-down menu only when it is specifically required by the payer.
- If submit reason code 6, 7, or 8 is selected, enter the associated Payer Doc Ctrl # (Payer Document/Claim Control Number) as required by the payer for claim processing.
- Payment section: If applicable, enter a patient payment associated with the encounter. Once the encounter is approved, a Payment record for the patient payment is created.
- Copay Due: Displays the Copay amount from the primary insurance policy within the associated case.
- Payment Amount: The patient payment amount. Once entered, additional fields become available.
- Method: Click to select how the payment is being made from the drop-down menu.
- Category: Click to select the appropriate category from the drop-down menu if the practice uses categories for certain payment reports.
- Reference #: The reference number for the payment if applicable (e.g., check number).
- Memo: Internal notes related to the payment if applicable. When left blank, a note is automatically added to the Payment record that indicates the patient payment date and encounter ID.
- Procedures section: Enter dates, procedures and charges.
Note: Customize the Procedures section as needed.
- Mode: Defaults to the ICD codes the Primary/Secondary Insurance accepts. Click to select ICD-9 or ICD-10 as necessary from the drop-down menu.
- Click the field under a column to enter data.
Tip: Enter a question mark (press Shift+? on your keyboard) in the Procedure field to search and select from the codes list.
Note: Enter the procedure macro name in the procedure field if the practice uses Procedure Macros.
- To see the procedure code description, hover over the procedure code.
Note: Descriptions display if they have been enabled under the Procedure Lists section of the Encounter Options.
- To reorder a service line, right click on the service line and select Move Up or Move Down.
- To remove a service line, right click on the service line and select Remove Procedure.
|
 |
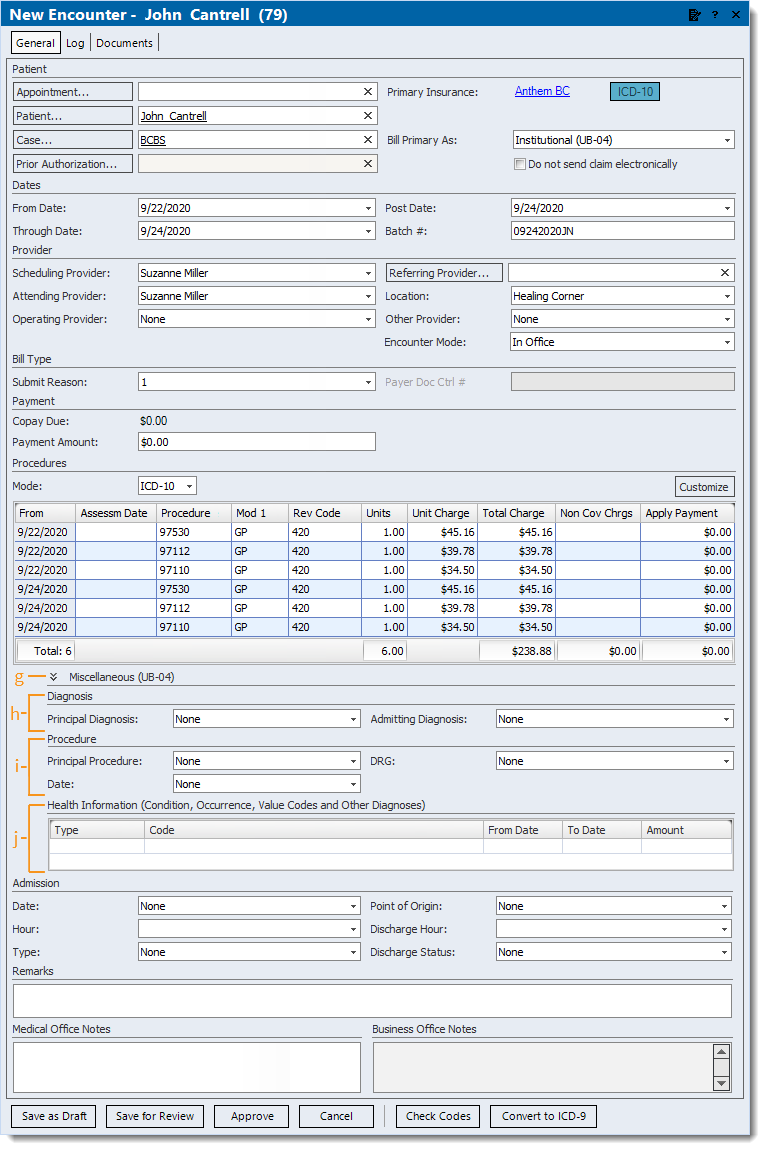
- Miscellaneous (UB-04) section: Click the double arrow to expand or collapse this section.
- When applicable, click to select the E-Claim Note Type in the drop-down menu. Then, enter the E-Claim Note to be submitted to the payer as part of the ANSI 837 electronic claim format.
Note: Contact the payer to verify requirements for submitting notes as part of the claim.
- Diagnosis section:
- Principal Diagnosis: Click to select the diagnosis code in the drop-down menu that describes the condition, after study, to be chiefly responsible for the patient's admission for care.
- Admitting Diagnosis: Click to select the diagnosis code in the drop-down menu that describes the patient's condition at the time of admission for inpatient care.
- Procedure section:
- Principal Procedure: Click to select the procedure code from the drop-down menu that identifies the procedure performed for definitive treatment for inpatient care.
- Date: Enter the corresponding date to the Principal Procedure performed.
- DRG: Click to select the code from the drop-down menu to identify the Diagnosis Related Group (DRG).
- Health Information section:
- Click in the Type and Code fields to select the type of code and the corresponding code from the drop-down menus.
- Condition codes: Report conditions or events relating to the encounter that may affect processing.
- If selected, codes should be entered in alphanumeric sequence.
- Occurrence codes: Report a significant event and the duration of the event relating to the encounter that may affect processing.
- If selected, enter the associated From Date and To Date.
- Other Diagnosis codes: Report diagnosis codes corresponding to all conditions that coexist at the time of admission, that develop subsequently or that affect the treatment received and/or length of stay.
- Value codes: Report value codes and amounts as qualified by the payer.
Note: Contact the payer to verify requirements for submitting value codes as part of the claim.
- If selected, enter the associated Amount.
|
 |
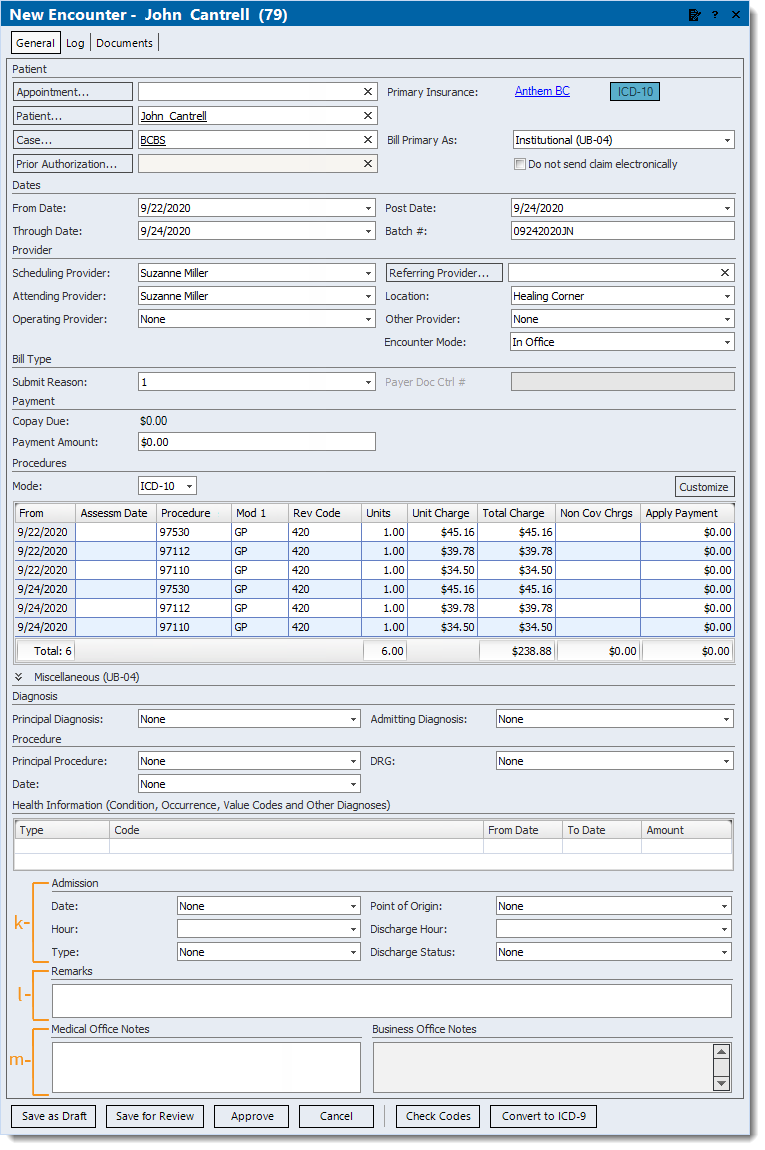
- Admission section:
- Date: Enter the date of admission for inpatient care or the start date for this episode of care for other services (e.g., home health).
- Hour: Click to select the code from the drop-down menu that refers to the hour during which the patient was admitted for inpatient care.
- Type: Click to select the code from the drop-down menu that indicates the priority of this admission/visit.
- Point of Origin: Click to select the code from the drop-down menu that indicates the location from where the patient came before this admission/visit.
- Discharge Hour: Click to select the code from the drop-down menu that indicates the hour the patient was discharged from inpatient care.
- Discharge Status: Click to select the code from the drop-down menu that indicates the disposition of the patient at the end (as of the Through Date) of the billing period on the claim.
- Remarks section: Enter additional information necessary to adjudicate the claim.
Note: Contact the payer to confirm if Remarks are required for adjudication of the claim.
- Office Notes section: Enter any Medical or Business Office Notes (determined by the type of user currently logged in) related to the encounter.
- When finished, do the following as necessary.
- To perform a code check to validate the claim data against such coding rules dictated by Medicare, Medicaid, National Correct Coding Initiative Edits and other standard coding rules, click Check Codes.
Note: This feature can also be enabled to automatically perform a code check upon encounter approval under the Encounter Options.
- To place the encounter under the Draft status (to be completed), click Save as Draft.
- To place the encounter under the Review status, click Save for Review.
- To place the encounter under the Approved status and create claims associated with the encounter, click Approve.
|
 |