Updated: 01/08/2021
Views: 14474
Encounter forms are similar to the pre-printed superbills or fee tickets used by providers; they are templates for the diagnoses and procedure codes typically used during encounters with patients. You can create multiple custom encounter forms for use within the practice. This is helpful when you have multiple providers in a practice who use different forms, and it can significantly cut down on the data entry time for staff members who enter encounters into the system.
Once set up, the encounter forms can be printed directly from the Daily Calendar or Encounter Form window. The forms print with the practice name, provider's name, patient's demographic information, and date of the encounter.
You always begin with finding the encounter form before creating, editing, or deleting an encounter form.
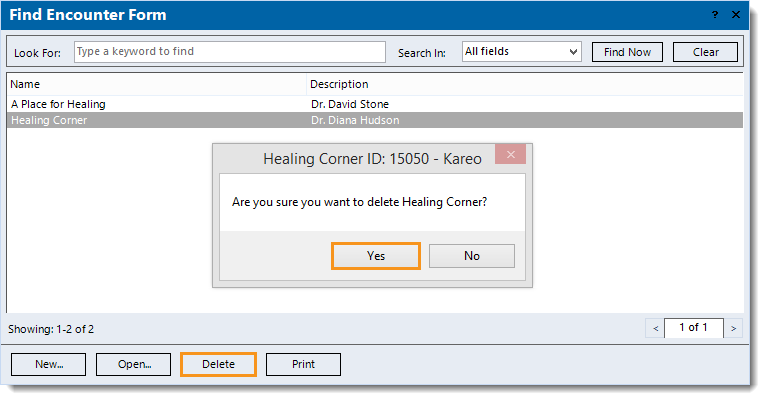
Find Encounter Form
- On the top menu bar, click Settings > Encounter Forms. The Find Encounter Form window opens.
 Tip: When there are numerous encounter forms listed, use the Look For search bar to enter all or part of a keyword for the encounter form. Then, click Find Now. Tip: When there are numerous encounter forms listed, use the Look For search bar to enter all or part of a keyword for the encounter form. Then, click Find Now.
|
 |
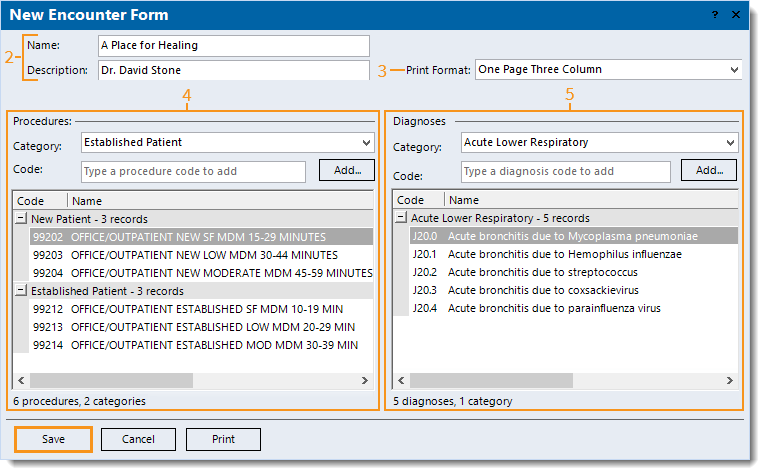
New Encounter Form
It is recommended to use the provider's paper encounter form or superbill as a guide when creating a new encounter form.
- To prevent duplication, verify the encounter form is not in the system then click New at the bottom. The New Encounter Form window opens.
- Enter the Name and short Description that best describes the encounter form.
- Click the drop-down arrow to select the Print Format.
Note: These formats are built into Kareo. View the Encounter Form Samples to determine which format to use.
- Enter the information in the Procedures section.
- Category: Enter the name for the first procedure code category.
- Code: Enter the code then click Add. The procedure category and code displays in the list.
- To find and select a code, leave Code blank and click Add. The Select Procedure window opens. Locate the procedure code then double click to add.
- To remove a code from the list, right click on the code then select Delete.
- To remove a category and all its associated codes from the list, right click on the category then select Delete Category.
- Repeat steps 4a and 4b as necessary to add additional procedure categories and codes.
- Enter the information in the Diagnoses section.
- Category: Enter the name for the first diagnosis code category.
- Code: Enter the code then click Add. The diagnosis category and code displays in the list.
- To find and select a code, leave Code blank and click Add. The Select Diagnosis window opens. Locate the diagnosis code then double click to add.
- To remove a code from the list, right click on the code then select Delete.
- To remove a category and all associated codes from the list, right click on the category then select Delete Category.
- Repeat steps 5a and 5b as necessary to add additional diagnosis categories and codes.
- Click Save.
Note: Once one or more encounter forms have been created, return to each of the Provider records and select the default Encounter Form to be used by the provider.
|
 |
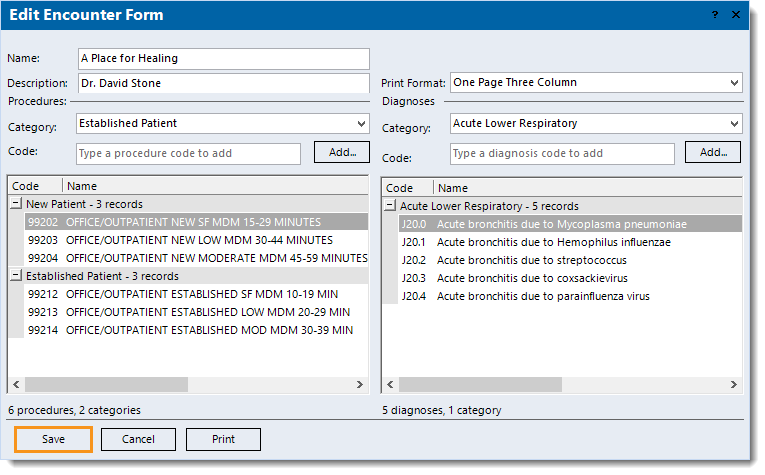
Edit Encounter Form
- Find the encounter form then double click to open. The Edit Encounter Form window opens.
- Make the desired changes.
- Click Save.
|
 |
Delete Encounter Form
- Find the encounter form then click to select it > Delete. A confirmation pop-up appears.
- Click Yes to confirm the deletion. The encounter form is deleted.
Note: Once the encounter form is deleted, all Provider records associated with that form no longer have a default set. Edit the Provider records to select the default Encounter Form as necessary.
|
 |