Timeblock Calendar
The Timeblock Calendar is used to set up and organize provider schedules. The blocks of time you set up here will show up color-coded on the Appointment Scheduler. You can give each timeblock a name (e.g., New Patient Visits, Do Not Schedule) and color. You can also configure recurring timeblocks, establish scheduling rules and define permissible scheduling reasons and service locations. There are three Timeblock Calendar views: Daily, Workweek and Weekly.
Note: Kareo PM is a permission-driven application. Your permission level is determined by your Kareo PM application administrator. If you don't have access to a specific task or function described within these help topics, please contact the person in your office who is the Kareo PM application administrator.
 To configure a timeblock
- Click Appointments on the top menu. Select one of the timeblock calendar views.
- In the Resource section, check the box next to the resource(s) for which you want to set a timeblock.
- Select a date on the calendar in the top right of the window.
- Double-click on a time slot on the calendar. A new timeblock opens.
- Complete the timeblock details. See below.
- Optional: Add the Recurrence, Permitted Locations and Permitted Reasons. See below.
- When finished selecting the timeblock details, click Save.
General Tab
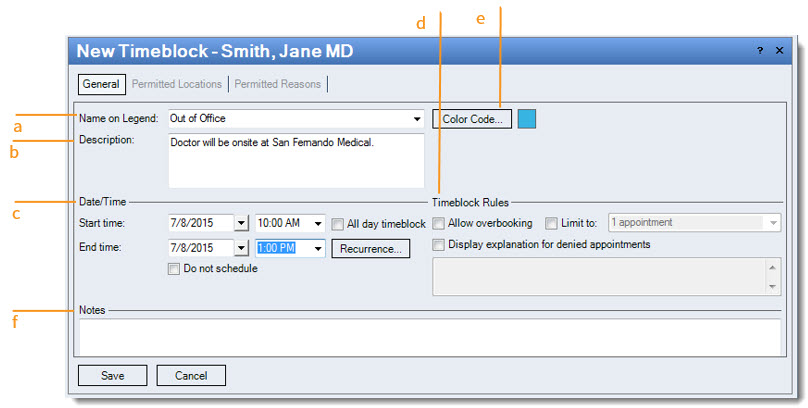
- Name on Legend: Enter the name as you would like it to appear on the legend of the scheduler; or select a name from the drop-down list of previously entered timeblocks.
- Description: Optional. A description entered here will appear as a tool tip when a person hovers his or her mouse over the timeblock reason in the calendar legend.
- Date/Time: For a single occurrence, enter a start/end date and time or check the "All day timeblock" box. For multiple occurrences, click Recurrence to set the pattern. Check "Do not schedule" if no appointments are to be scheduled during this timeblock. Checking this box disables the Permitted Locations, Permitted Reasons tabs, and the Timeblock Rules options.
- Timeblock Rules: Optional. Set rules for the following by checking the appropriate box.
Note: In order for timeblock rules to be enforced, enforcement must be set under Appointment Options.
- Allow overbooking - Multiple appointments are allowed during the timeblock.
- Limit to - Limit the amount of appointments allowed during the timeblock. Select the number from the drop-down menu.
- Display explanation for denied appointments - Enter the explanation for the denied appointment; this message will be displayed to the person who attempts to schedule an appointment that breaks the timeblock rules.
- Color Code: Optional. Click to open the color pallet and select the color for the timeblock.
- Notes: Optional. Enter any notes about the timeblock.
Permitted Locations Tab
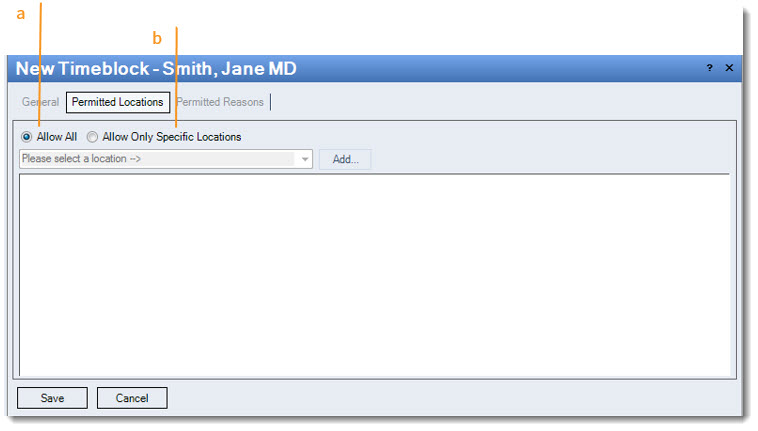
- Allow All: Default setting. Select to apply timeblock to all service locations.
- Allow Only Specific Locations: Select to apply timeblock to one or more specific service locations. In the drop-down menu, select a service location and click Add. To remove it from the list, right-click on the service location in the box and click Delete.
Note: Service Locations must be set up in order to appear in the drop-down menu. See New Service Location.
Permitted Reasons Tab
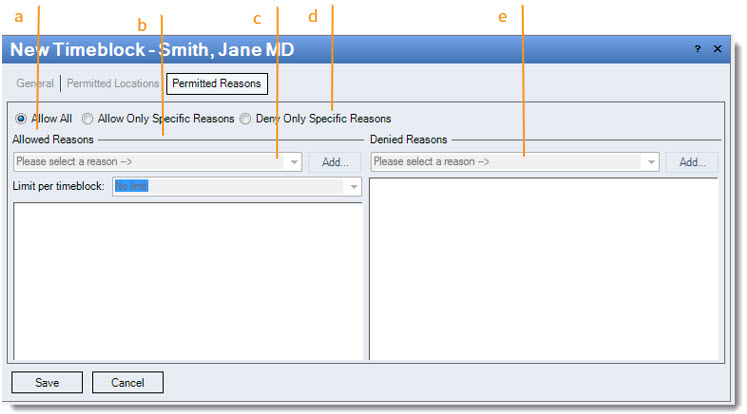
- Allow All: Default setting. Select to scheduling during a timeblock for any reason.
- Allow Only Specific Reasons: Select to allow scheduling during a timeblock only for specific reasons.
- Allowed Reasons: When "Allow Only Specific Reasons" is checked, select reasons in the drop-down menu and click Add. To remove it from the list, right-click on the reason in the box and click Delete.
Note: Reasons must be set up in order to appear in the drop-down menu. See Add Appointment Reason. - Deny Only Specific Reasons: Select to deny scheduling during a timeblock for specific reasons.
- Denied Reasons: When "Deny Only Specific Reasons" is checked, select reasons in the drop-down menu and click Add. To remove it from the list, right-click on the reason in the box and click Delete.
Note: Reasons must be set up in order to appear in the drop-down menu. See Add Appointment Reason.