Schedule Patient Appointment
![]() To schedule an appointment
To schedule an appointment
- Click Appointments on the top menu. Select one of the calendar views or; click the Daily
 or Workweek
  icon in the top menu.
 - In the Service Location drop-down menu, select a location.
- In the Resource section, check the box next to the resource(s) you want to schedule.
- Select a date on the calendar in the top right of the window.
- Double-click on a time slot on the calendar. A new appointment opens.
- Complete the appointment details. See below.
- Click the Documents tab to attach documents, if necessary.
- When finished entering the appointment details, click Save.
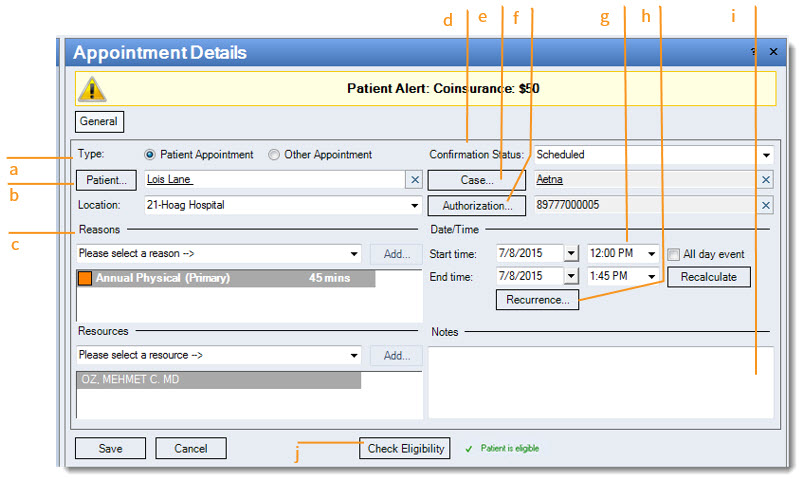
- Type: Select the type of appointment.
- Patient: Click Patient to search for an existing patient. If the patient does not exist in the database, click New at the bottom of the Find Patient window to create a new patient record.
- Reasons: Optional. Select the reason from the drop-down list, then click Add. To remove a reason, right-click on the reason and click Delete.
Note: A list of appointment reasons is only available if one has been set up. See Add Appointment Reasons. - Confirmation Status: "Scheduled" is selected by default. If you choose, select another option from the drop-down menu; these statuses can be used to track appointment work flow.
- Case: Click to add one or more cases if not yet recorded on the record.
- Authorization: If an authorization number assigned by the patient’s insurance company has already been entered, that number will appear here. If required for the visit, click the Authorization button to select it (double-click to select).
- Date/Time: Auto-populated; confirm and adjust the end time if necessary.
- Recurrence: Click to set the appointment to recurring.
- Notes: Optional. When notes are entered, a symbol will appear on the calendar to alert staff to check the appointment notes.
- Check Eligibility: Click to check patient eligibility. After checking eligibility, one of three statuses is displayed: Patient is eligible, Patient is ineligible, Eligibility is unknown.