Updated: 11/29/2023
Views: 7214
System Administrators of accounts created after May 9, 2016 have the User Accounts settings option to assign Web User Roles. System Administrators of billing company accounts and accounts created prior to May 9, 2016 have both settings options: User Accounts and Web User Roles. Web User Roles allow you to assign roles to users in the practice so they can access the web platform.
You always begin with navigating to Web User Roles before creating, editing, unassigning, or locking a web user.
Navigate to Web User Roles
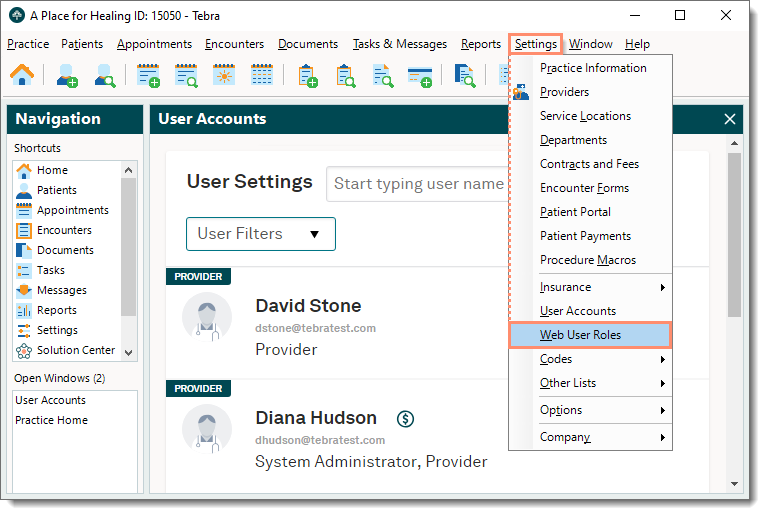
- Click Settings > Web User Roles. The User Settings display.
Note: For accounts created after May 9, 2016, click Settings > User Accounts.
- To find a specific user, use the search box to enter their first name, last name, or email address.
- To view a specific type of user, click the User Filters drop-down and select "Provider", "Non-Provider", "Locked", and/or "Unlocked" users.
|
 |
New Non-Provider User
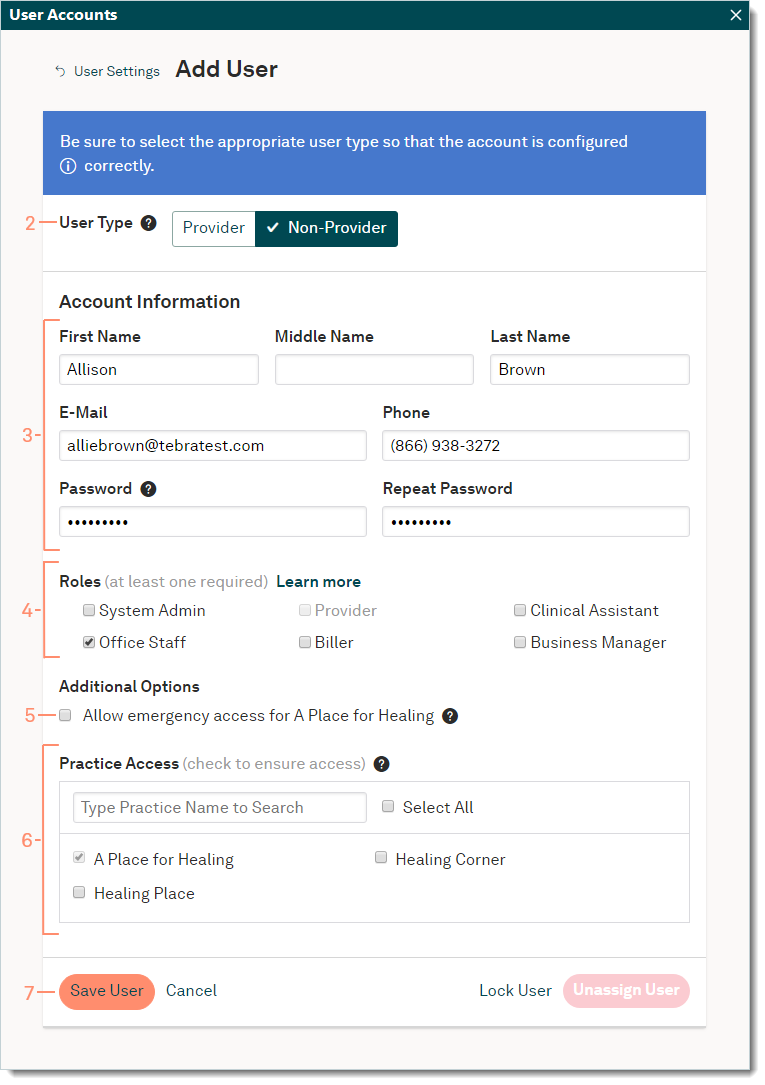
- To prevent duplication, navigate to Web User Roles and verify the user is not in the system then click + New User. The Add User window opens.
 Tip: When there are numerous users listed, use the search box to enter the first three letters of the user's name or email. Tip: When there are numerous users listed, use the search box to enter the first three letters of the user's name or email.
- User Type: Non-Provider is selected by default.
- Account Information: Enter the user's account information.
- First, Middle, and Last Name: The user's name.
- E-Mail: The user's valid email address to which they can only access their emails for security purposes.
Note: This is the email address used to log into Tebra.
- Phone: The user's contact phone number.
- Password and Repeat Password: Create a temporary password and verify it by entering it again.
Note: Once the user logs into Tebra with the temporary password, they are prompted their password has expired and to create a new password.
- Roles: Click to select one or more roles for the user.
Tip: Click Learn more to view a comparison of each role's permissions.
Note: For billing company accounts, the "System Admin" role automatically assigns the user the "Practice Administrator" role under Preset User Account Permission Settings.
- Additional Options: To allow the user to grant themselves or other staff members the "System Admin" role in the event of an emergency, click to select "Allow emergency access for (Practice)".
- Practice Access: Only applicable for accounts with multiple practices and defaults to include access to the current practice.
Note: System Administrators can only grant users Practice Access to practices they themselves can access.
- To filter the practices, use the search box by entering all or part of the practice name.
- To grant the user access to all available practices, click to select the master checkbox "Select All".
- To grant the user access to specific practices, click to select the practice(s).
- Click Save User. The new user displays under User Settings.
|
 |
New Provider User
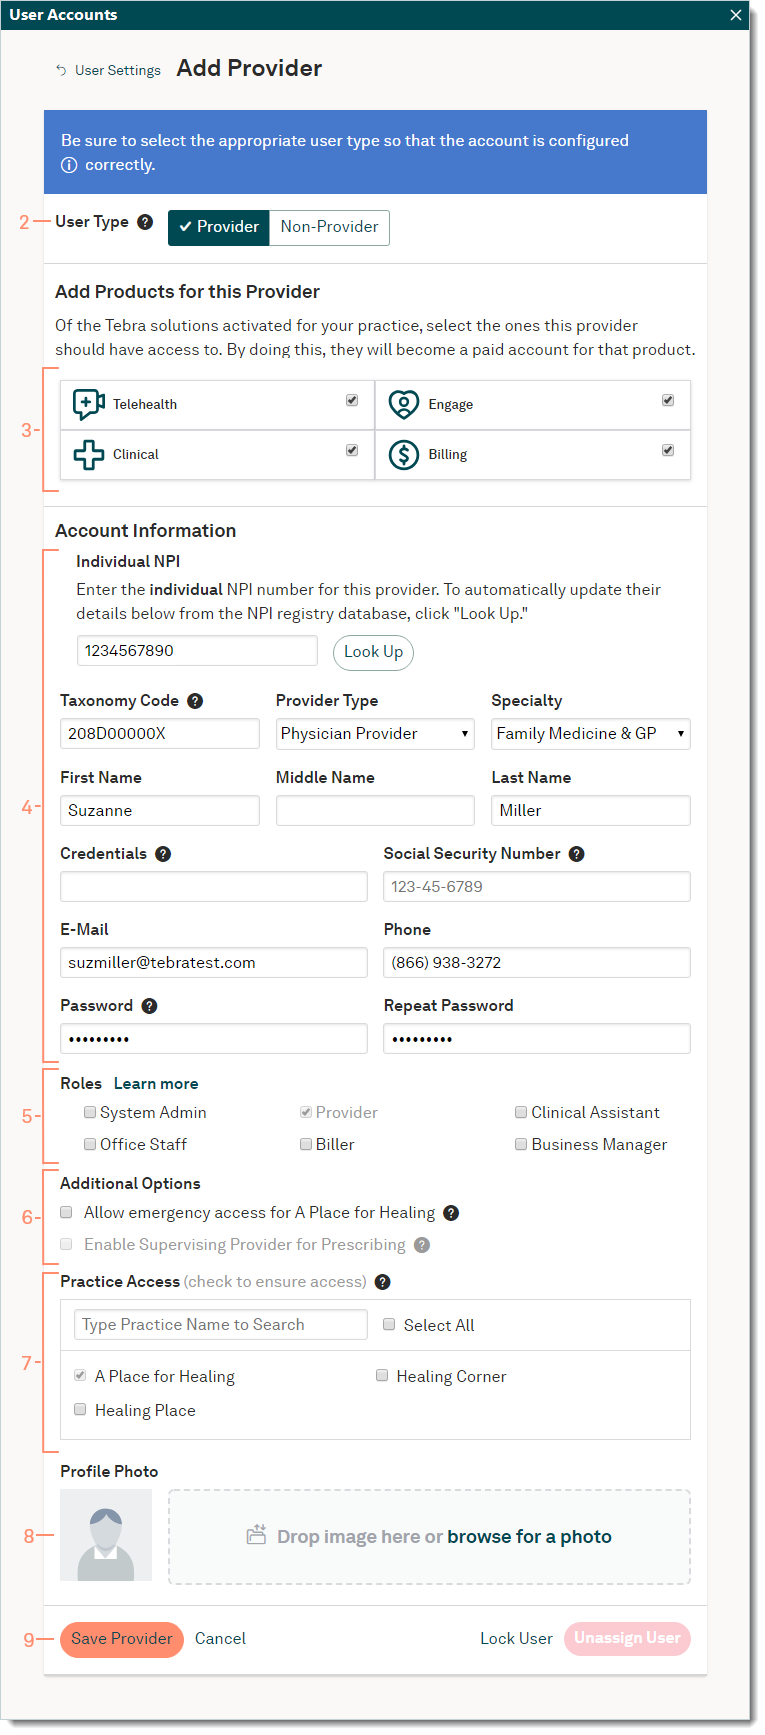
- To prevent duplication, navigate to Web User Roles and verify the provider is not in the system then click + New User. The Add User window opens.
Tip: When there are numerous users listed, use the search box to enter the first three letters of the user's name or email.
- User Type: Click Provider. The Add Provider window displays with a list of available product modules activated for the practice.
- Add Products for this Provider: Click to select the product(s) to activate for the provider.
- Enter the Account Information:
- Individual NPI: The provider's 10-digit National Provider Identifier (NPI) number.
- To auto-populate additional details from the NPI registry database, enter the NPI then click Look Up.
- Taxonomy Code: The provider's taxonomy code number.
- Provider Type and Specialty: Click to select from the menu options.
- First, Middle, and Last Name: The provider's name.
- Credentials: The provider's credentials.
- Social Security Number (only applicable for the Billing subscribers): The provider's SSN if used for claims billing purposes.
- E-Mail: The provider's email address to which they can only access their emails for security purposes.
Note: This is the email address used to log into Tebra. Do not use a staff member's email address for a provider.
- Phone: The provider's contact phone number.
- Password and Repeat Password: Create a temporary password and verify it by entering it again.
Note: Once the provider logs into Tebra with the temporary password, they are prompted their password has expired and to create a new password.
- Roles: If applicable, click to select additional roles for the provider.
Tip: Click Learn more to view a comparison of each role's permissions.
Note: For billing company accounts, the "System Admin" role automatically assigns the user the "Practice Administrator" role under Preset User Account Permission Settings.
- Additional Options:
- To allow the provider to grant themselves or other staff members the "System Admin" role in the event of an emergency, click to select "Allow emergency access for (Practice)".
- To allow prescribers to select this provider as a supervising provider on ePrescriptions, click to select "Enable Supervising Provider for Prescribing". This option is only available for eRx enrolled providers.
- Practice Access: Only applicable for accounts with multiple practices and defaults to include access to the current practice.
Note: System Administrators can only grant providers Practice Access to practices they themselves can access.
- To filter the practices, use the search box by entering all or part of the practice name.
- To grant the provider access to all available practices, click to select the master checkbox "Select All".
- To grant the provider access to specific practices, click to select the practice(s).
- Upload an optional photo of the provider. Drag and drop an image or click browse for a photo to search and select a file from the computer.
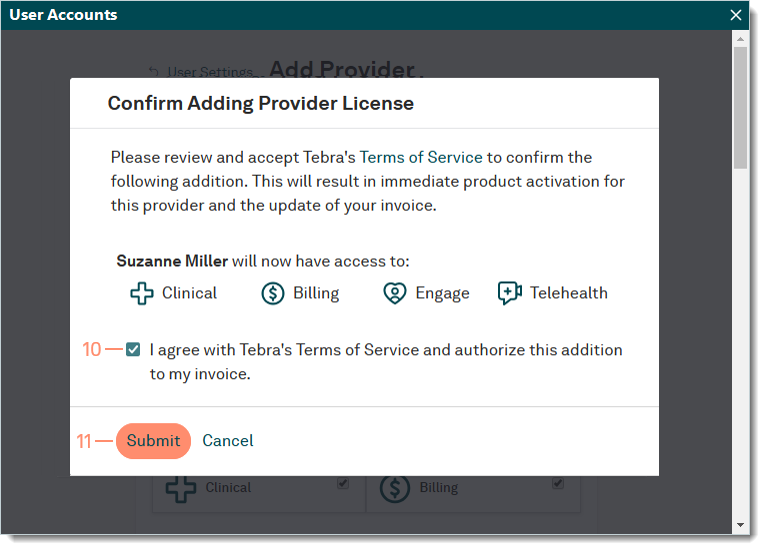
- Click Save Provider. The Confirm Adding Provider License window opens.
|
 |
- Review the Terms of Service. To accept the terms, click to select "I agree with Tebra's Terms of Service and authorize this addition to my invoice.".
- Click Submit. The provider user displays under User Settings.
|
 |
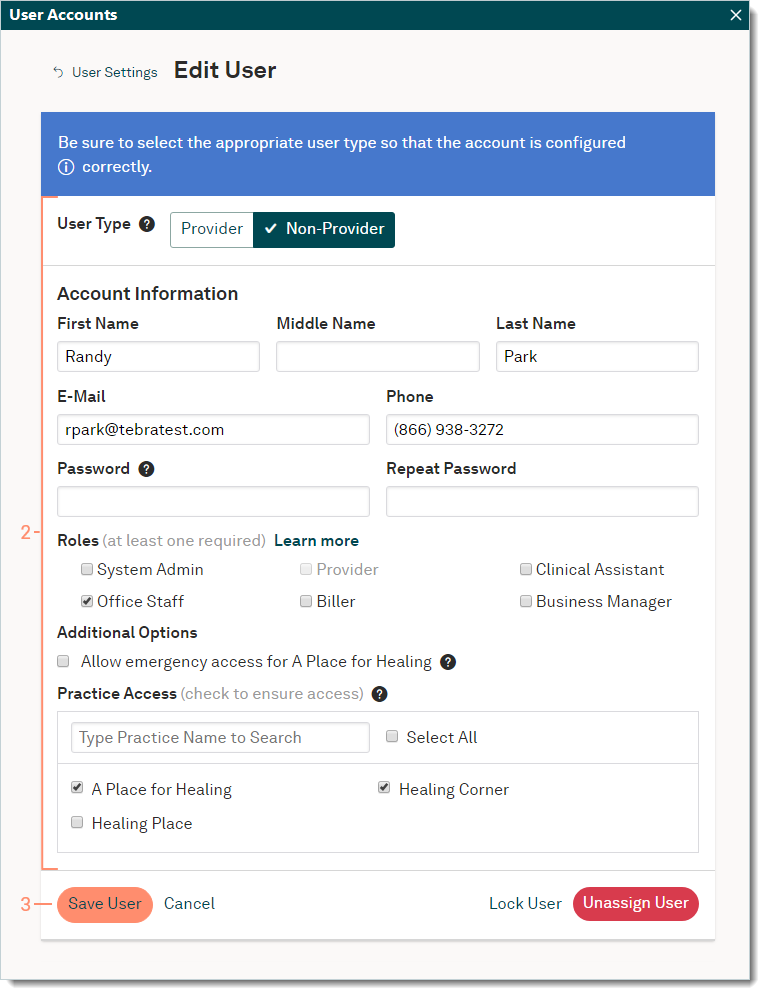
Edit Web User
- Navigate to Web User Roles then click Edit on the right of the user's name. The Edit User/Provider window opens.
- Make the necessary changes.
- Click Save User/Provider.
- If editing a provider and an additional product was added, the Confirm Adding Provider License window opens. Review the Terms of Service. To accept the terms, click to select "I agree with Tebra's Terms of Service and authorize this addition to my invoice.". Then, click Submit.
|
 |
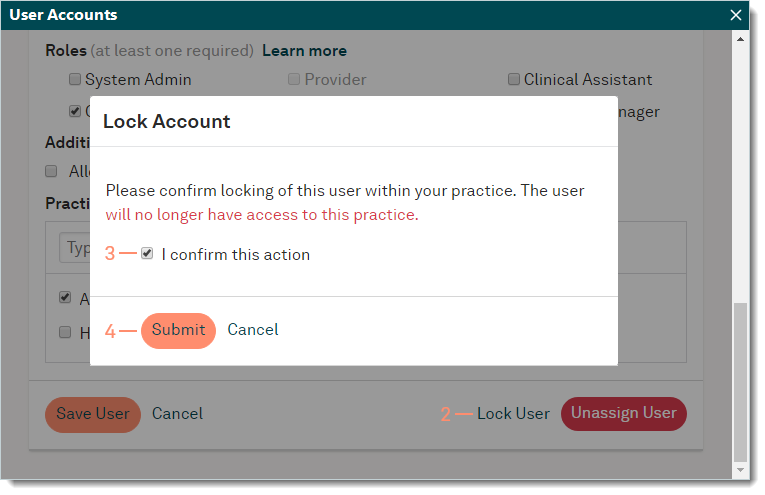
Lock Web User
Non-Provider users can be locked, making the practice(s) inaccessible to them, and can be unlocked at a later time if necessary. Provider users can only be locked when there are no active product modules (e.g., Clinical, Billing) associated with the provider.
Note: Locking a user associated to multiple Tebra accounts locks the user from all of the accounts.
- Navigate to Web User Roles then click Edit on the right of the user's name. The Edit User window opens.
- Click Lock User on the bottom right of the window. The Lock Account pop-up opens.
- To confirm, click to select "I confirm this action".
- If the user is associated to multiple Tebra accounts, click to select " I acknowledge that by locking this user, I am disabling the user from accessing any Tebra accounts."
- Click Submit. The user is locked.
|
 |
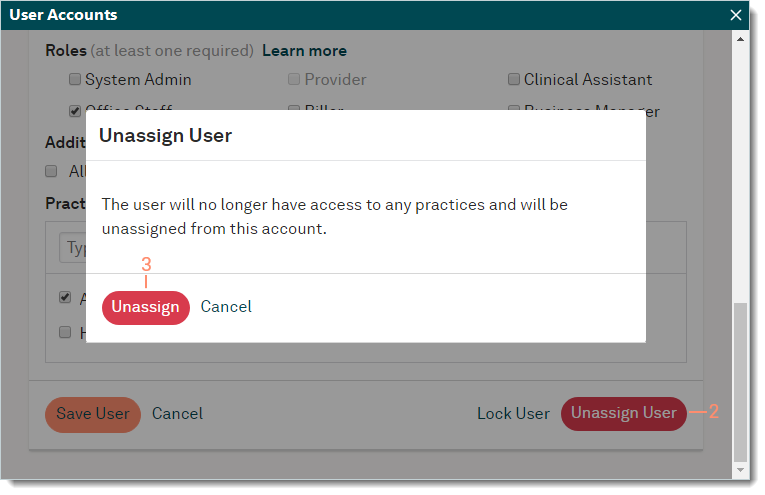
Unassign Web User
Non-Provider users can be unassigned, permanently removing them from the Tebra account as well as their access to the practice(s). To maintain the transaction history for providers, provider users can be locked but not unassigned.
Note: Unassigning a user associated to multiple Tebra accounts only removes them from the current Tebra account without impacting their access to the other accounts.
- Navigate to Web User Roles then click Edit on the right of the user's name. The Edit User window opens.
- Click Unassign User on the bottom right of the window. The Unassign User pop-up opens.
- Click Unassign to confirm. The user is unassigned from the Tebra account.
After the user is unassigned, their email address is updated with a preceding "archived_" (e.g., archived_jadams@ tebratest.com) and displays in reports and audit logs when applicable to indicate the user was unassigned.
|
 |