Updated: 04/05/2024 | Views: 1733
The Collect Patient Payment feature offers a simplified patient payment process that allows practices to record, post, and provide a patient payment receipt for copays and outstanding account balances. Activate Tebra Payments to process credit/debit card payments.
Note: For Patient Collect (Stripe) activated customers, review Patient Collect (Stripe): Collect Patient Payment.
Collect Patient Payment: Cash or Check
- Navigate to the patient's record or existing appointment.
- Click Collect Patient Payment to initiate the transaction. The Collect Patient Payment window opens.
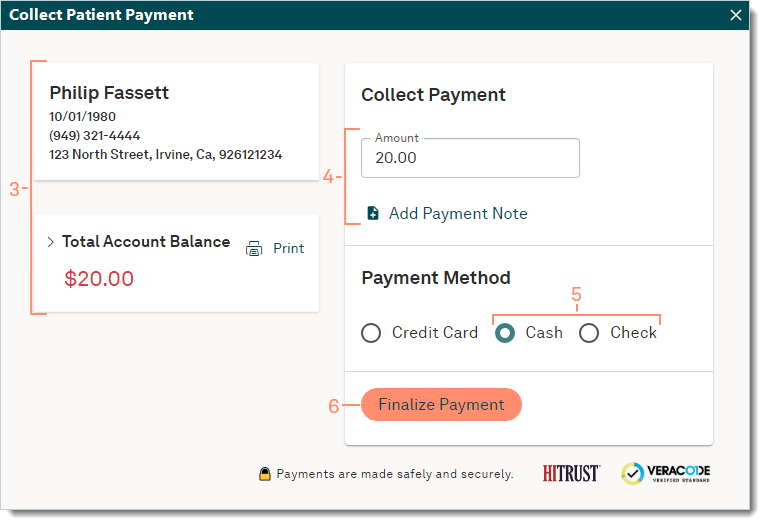
- Verify patient information, review outstanding charges and unapplied payments.
- Patient name, DOB, phone and address.
- To review an overview of charges and unapplied payments, click the arrow to expand the Total Account Balance section.
- To view a printable version of the Balance Details, click Print.
- Collect Payment:
- Amount: By default, the Total Account Balance populates. If necessary, enter a different payment amount.
- Add Payment Note: To enter details about the payment (e.g., reference number, check number, date of service), click Add Payment Note.
Note: Payment Notes are only visible to the practice and do not print on the patient receipt.
- Payment Method: Click to select Cash or Check. For card payments, review Collect Patient Payment: Credit Card.
- Click Finalize Payment. The confirmation window opens.
|
|
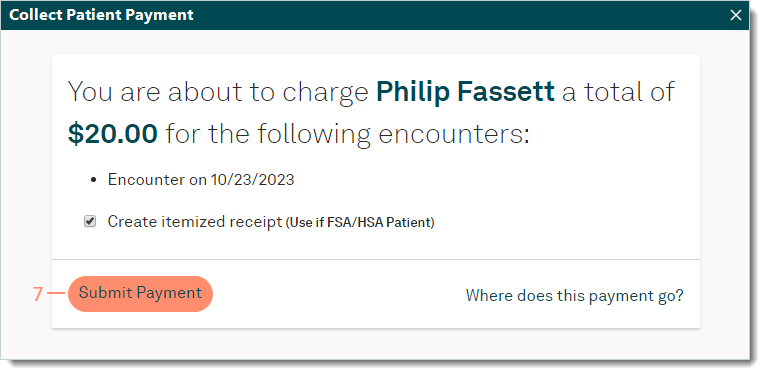
- Review and confirm the payment information is correct. Once submitted, the Method and Amount of the Payment record created can not be edited. When finished reviewing, click Submit Payment. The Receipt window opens.
Note: The Payment record created is an Unapplied Payment until it is applied to the appropriate service(s) associated with the patient.
- To generate a detailed receipt (e.g., for FSA/HSA patients), click to select "Create itemized receipt". Otherwise, a non-itemized receipt displays once the payment is submitted.
|
|
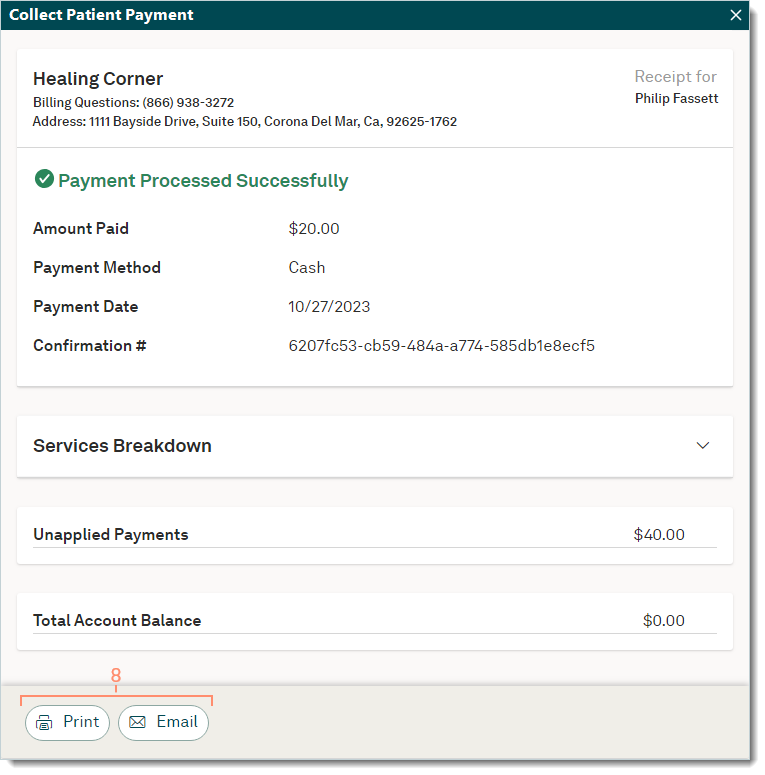
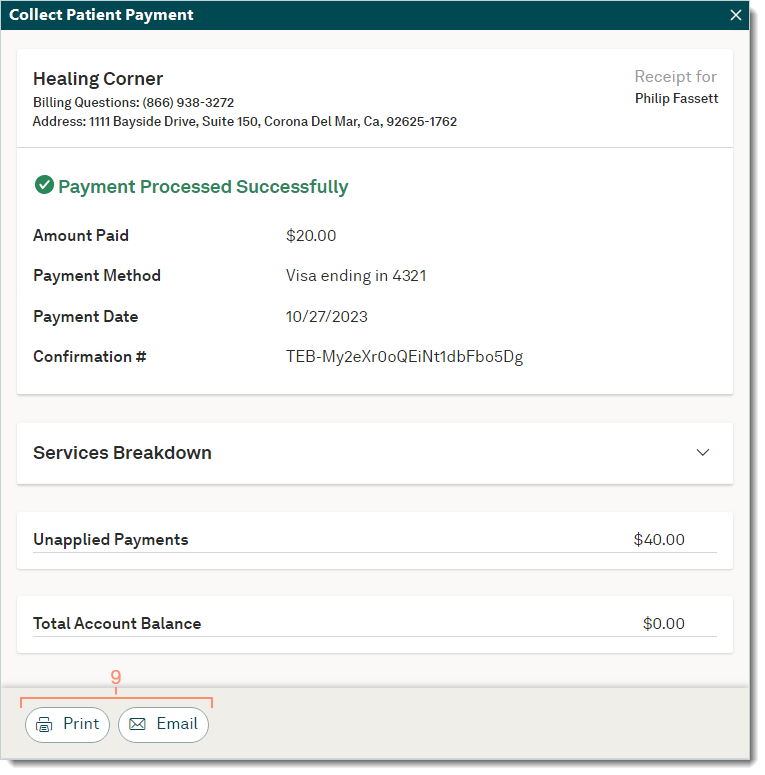
- A non-itemized payment receipt displays. If "Create an itemized receipt" was selected when the payment was submitted, a Services Breakdown section is included on the receipt if applicable (as shown in the image).
- To print the receipt using the computer's print function, click Print at the bottom of the window.
- If "Create an itemized receipt" was selected when the payment was submitted, and if applicable, click to expand the Services Breakdown section to print the receipt with service line information.
- To enter an email address to receive a modified email receipt that only contains general information (e.g., payment confirmation number, date payment was processed, amount paid), click Email at the bottom of the window. Then, enter the email address and click Email Receipt.
Note: The full details of itemized and non-itemized receipts can only be printed and is not sent via email.
|
|
Collect Patient Payment: Credit Card
Credit/debit card payments can only process for Tebra Payments activated practices.
Note: Credit card payments can be entered for recording purposes when Tebra Payments has not been activated.
- Navigate to the patient's record or existing appointment.
- Click Collect Patient Payment to initiate the transaction. The Collect Patient Payment window opens.
- Verify patient information, review outstanding charges and unapplied payments.
- Patient name, DOB, phone and address.
- To review an overview of charges and unapplied payments, click the arrow to expand the Total Account Balance section.
- To view a printable version of the Balance Details, click Print.
- Collect Payment:
- Amount: By default, the Total Account Balance populates. If necessary, enter a different payment amount.
- Add Payment Note: To enter details about the payment (e.g., reference number, check number, date of service), click Add Payment Note.
Note: Payment Notes are only visible to the practice and do not print on the patient receipt.
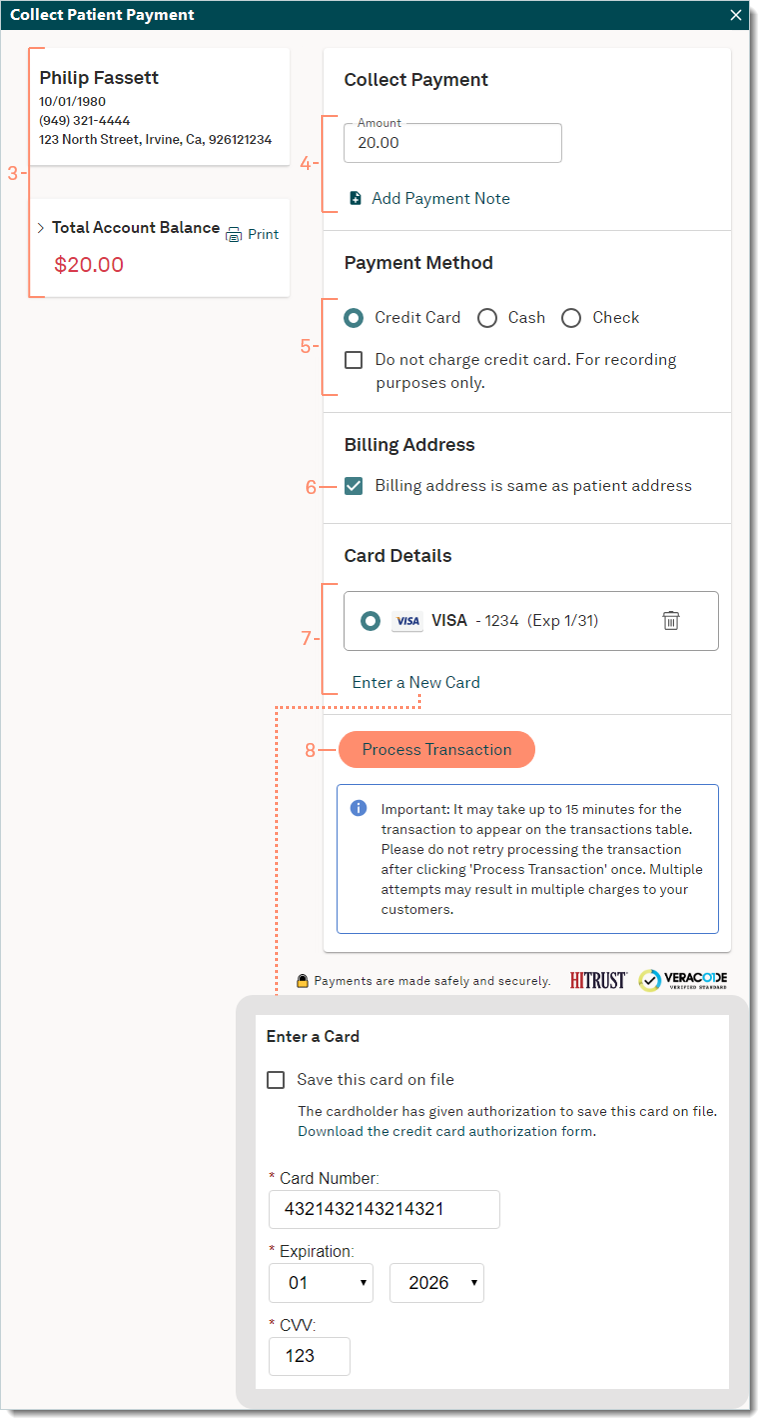
- Payment Method: Keep Credit Card selected by default.
- To record a credit card payment that was processed outside of Tebra, click to select "Do not charge credit card. For recording purposes only.". When selected, the card payment will not be processed through Tebra. Proceed to step 6 of Collect Patient Payment: Cash or Credit Card to confirm the payment information and for receipt options.
- Billing Address: By default, "Billing address is same as patient address" is selected. If necessary, click to clear the selection. Then, enter the appropriate billing Address and Zip for the card.
- Card Details:
- To use a saved card on file, click to select the card.
- If the card's expiration date is within 30 days from the current date, an Expiring Soon message displays next to the card.
- If the card's expiration date has passed, an Expired message displays next to the card.
- To delete a saved card, click the trash icon. Then, click Delete in the confirmation pop-window to permanently remove the card on file.
- To manually enter a card, click Enter a New Card.
- If applicable, click to select "Save this card on file" to save the new card on file. For convenience, Tebra has provided a credit card authorization form that can be used to obtain authorization from the cardholder to save their card on file. To download the form, click Download the credit card authorization form for a template. Engage subscribers also have the option to send the Credit Card Authorization form to the patient.
Important Note: Saved cards cannot be removed at this time. Should the saved card need to be removed, contact Customer Care.
- Enter the Card Number, Expiration Date, and three-digit CVC code.
Note: If any information (e.g., Amount, Billing Address, "Save this card on file" option) needs to be corrected after it the card information was entered, all card information fields will automatically clear for security purposes.
- Click Process Transaction. Once the payment has successfully processed, the Receipt window opens.
|
 |
- An itemized receipt displays by default. If a card was entered with the "Save this card on file" option selected, the receipt will also indicate the "Card saved to file".
Note: The processed payment creates a Payment record as an Unapplied Payment until it is applied to the appropriate service(s) associated with the patient.
- To print the receipt using the computer's print function, click Print at the bottom of the window.
- If applicable, click to expand the Services Breakdown section to print the receipt with service line information.
- To enter the patient's email address to receive a modified email receipt that only contains general information (e.g., payment confirmation number, date payment was processed, amount paid), click Email at the bottom of the window. Then, enter the email address and click Email Receipt.
Note: The full details of itemized receipts can only be printed and is not sent via email.
|
 |